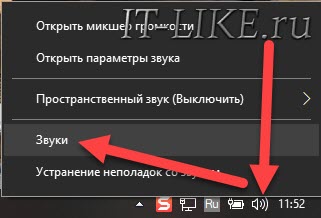
Monday, August 19, 2013
Guide: Creating Texmod Package Files (TPF) for ME Series Games
What is Texmod?
Texmod is a utility to browse, extract, save and modify textures in Direct3D 9 applications.
In order to share and distribute texture modifications, packages can be created which are compressed to prevent further modification.
This modding method allows you to temporarily replace any texture in your application without the need to use an application specific modding tool or replacing any files in your application’s installation. Download Texmod here. For Mass Effect it is the natural counterpart to ME3Explorer, which allows for permanent texture replacement.
The application interface offers three modes:
- Package mode: If you’re looking to run Texmods created by others, this is the correct mode. Add package files to a list and load them into the selected application. Packages on top of the list are loaded first.
- Logging mode: If you are looking to extract textures, this is the correct mode. Choose between several options and start in logging mode. You can browse through all loaded textures of the application and save the selected one in the output folder.
You can also use this mode to test textures as you are creating them, without having to build a .tpf to test between edits or restarting your application. - Package Build mode: If you are looking to create a Texmod package file, this is the correct mode. Create a package by selecting a definition file (.log) and entering your name and a comment.
Supported Formats
While Texmod supports most all file formats used in the ME Series, it can’t extract nor load the ATI2N / 3DC / BC5 format that is used for normal maps in both ME1 and ME2.
Loading in or creating a tpf that contains them will not return an error, it will simply not display these textures when loaded in-game.
How to launch Mass Effect (1/2/3) with Texmod
Before you can use Texmod, you’ll have to load the target application .exe properly («Target Application» box in the top left corner). Depending on which game you want to launch and which Client you own them on, the technique for loading an exe correctly and launching with Texmod differs.
For the Origin / boxed copy of ME1 and ME2 you can launch «texmod.exe» and manually browse to the target application exe file ( «..Mass EffectBinariesMassEffect.exe» and «..Mass Effect 2BinariesME2Game.exe«) and select them. Simple.
Alternately, you can use a batch-file to automate the renaming process when launching through Origin.
1. Download this .rar containing both «texmod.bat» and «Texmod.exe» for ME2.
2. Place «Texmod.exe» and «texmod.bat» in the «..\Origin GamesMass Effect 2Binaries» folder.
3. Launch «texmod.bat» and follow the instructions in the prompt in the correct order to go through the entire renaming process. Be sure to select «ME2Game.exe», NOT «MassEffect2.exe» in Texmod.
Unlike the renaming process for the Steam version of ME1/ME2, you will need to do this every time you launch.
For the Steam version of ME1 (and ME2) it’s a little more complex the first time around:
1. Place «Texmod.exe» in the Binaries folder.
2. Rename «MassEffect.exe» (or «MassEffect2.exe») to anything you want (example: «MassEffectOriginal.exe»).
3. Rename «Texmod.exe» to «MassEffect.exe».
4. Launch «Masseffect.exe» (=renamed Texmod) through Steam.
5. Point Texmod to your original «Masseffect.exe» (now renamed)
This renaming process is only necessary the first time you set up, you can leave it like this and every time you launch ME1 or 2 through Steam (whichever you set up) it will launch Texmod instead and you can start the ‘real’ .exe through Texmod (example: «MassEffectOriginal.exe»).
For ME3 you’ll need to use a batch-file to automate the renaming process required when launching through Origin.
1. Download this .rar containing both texmod.bat and «Texmod.exe» for ME3.
2. Place «Texmod.exe» and «texmod.bat» in the «..Origin GamesMass Effect 3BinariesWin32» folder.
3. Launch «texmod.bat» and follow the instructions in the prompt in the correct order to go through the entire renaming process. Unlike the renaming process for the Steam version of ME1/ME2, you will need to do this every time you launch.
Tip : It is advised you manually browse to and select your .exe under «Target Application». Not doing this can cause Texmod to stop functioning on occasion.
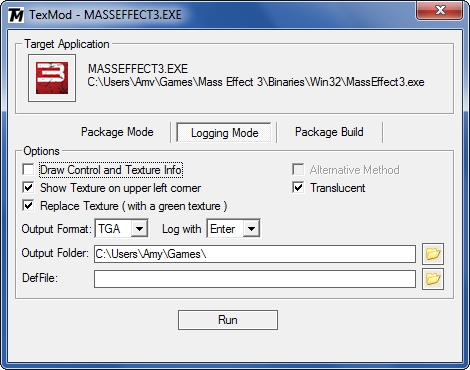
Logging mode explained
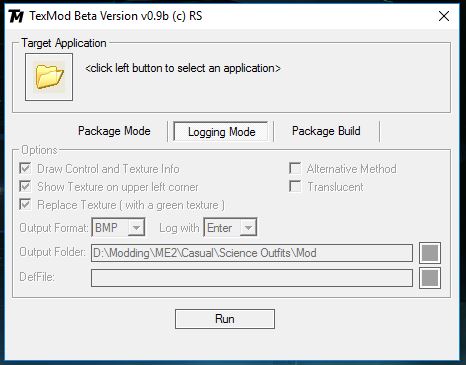
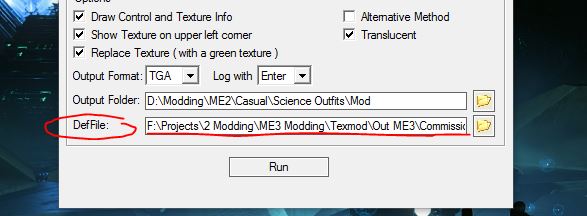
Draw control and Texture info: This shows text information and controls in red in the top left corner of your screen.
Show texture in upper left corner: Speaks for itself, texture cycle overlay position is the top left corner expanding to the bottom-right.
Replace Texture: This applies a green overlay to objects a diffuse applies to when cycling over them using + and -. The overlay colour will be different for spec-maps (with and without alpha) and normal maps.
Alternative Method: Unknown.
Translucent: Lowers the opacity of the texture overlay.
Output format: Variety of formats available, I strongly advise using «DDS» to preserve alphas.
Log with: Key used to extract textures. Defaults to «Enter«.
Output folder: Every successfully extracted texture will be saved to this folder.
DefFile: Location for the definition file you want to use. If you leave this open, Texmod will create a new definition file in the Output folder you selected whenever you extract a texture.
Basic controls for Logging mode in-game:
Numpad + Select next texture
Numpad — Select previous texture
Enter Default logging key
* Turns filter mode on. With filter mode on, only textures current visible on screen will
be cycled through.
/ Turns filter mode off. With filter mode off, all loaded textures can be cycled through.
Extracting textures
When extracting a texture the naming will always be similar to this:
MASSEFFECT3.EXE_0x487289A3.dds
The first part will reflect the application the texture was extracted from, the second part is the hash that is used to identify that particular texture with (0x487289A3). Texmod will also generate a file called «Texmod.def» in the same folder, but you don’t really need it. I’ll explain how to create these from scratch later in this guide.
While it’s tempting to change the name of textures completely, I’d advise keeping the hash in there so you have an easy time creating manual definition files for Texmod Packaging and the textures can also be picked up in ME3Explorer TPFTools for matching.
Testing new textures in-game
You don’t actually have to build a new .tpf every time you’re looking to test a texture. You can also use Texmod logging mode to do this without having to restart your application.
When you launch in logging mode and have Draw control and Texture info turned on, you will see the following message at the top of your screen:

As you can see, it tells you the key to reload replacement textures is the comma ( , ), but this has never worked for me. Instead I need to use the period ( . ) key on my NumPad.
When you select a definition file under Logging Mode that includes textures you want to test, Texmod will automatically load these in whenever you launch with Texmod in logging mode.
Creating a Definition File (.log)
To build a Texmod TPF using Package Build Mode or to test textures in Logging Mode, you’ll need to create a definition file. Definition files list the hash for the texture you are going to replace and point to the location of the texture that is supposed to replace it. An example:
Hash — Separator — Texture location
0x487289A3 | D:ProjectsTexmodOut ME3skin MASSEFFECT3.EXE_0x487289A3.dds
Now the texture location can be inserted relative to the location of the definition file as well, but I prefer using absolute paths to avoid any issues while building. To create one from scratch you can simply create a new text document (.txt) using notepad or wordpad.
Every texture should be defined on a new line in this file, so counting the number of lines counts the number of added Texures Texmod should return when you build your TPF with this definition file selected.
When you save the file, change the extension from .txt to .log. Feel free to give it whatever name is convenient for you.
Package build mode explained
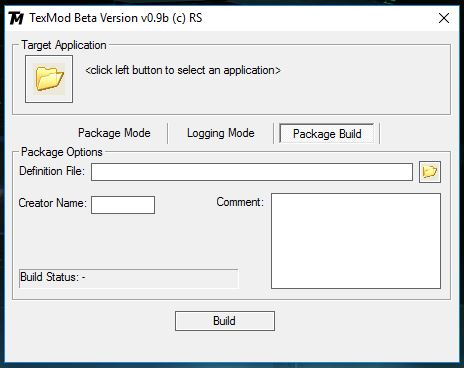
Definition File: Definition file location for the mod you are planning to build.
Creator Name: Your name goes here, it will be visible when loading the tpf under Package Mode.
Comment: Specify what your Texmod does, also visible when loading the tpf under Package Mode.
When you have selected your definition file, filled in your name and added your comments, hit ‘Build’. While processing, Texmod will display ‘Started. ‘ under Build Status and when completed it will pop up a save dialogue box for the TPF and it will show you under Build Status how many textures it packed into this newly created TPF.
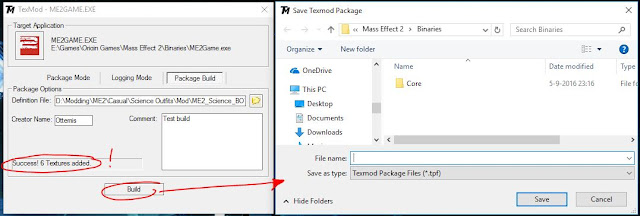
This is a good way to double-check if Texmod packaged all your textures. If it hasn’t, be sure to recheck the paths in the definition file.
Tip : If you are unable to view file extensions in Windows, this can be changed in your folder options. While you have your folder selected, press «Alt+T» followed by «o» (aka in the menu go through Tools, Folder Options). Open the «View» tab and under «Files and Folders» un-check the box next to «Hide extensions for known file types«.
Tip : If you have trouble opening DDS files, make sure that you have installed the appropriate plugin. While it might seem more convenient to work with other file-types, I personally advise against it as Mass Effect uses DXT1 and DXT5 compression for all textures apart from normal maps. To save as DXT you will need the DDS plugin. For Photoshop, it is located here.
Troubleshooting
- Q: I get an error message with the text «D’OH». What should I do?
This is a general error message used for nearly all exceptions. You can check several things here:
— Make sure you manually browse to the .exe for the game you are looking to launch.
— A TPF you are trying to load is corrupt
— A TPF you are trying to load is no longer in the location where Texmod expects it to be. Reload it.
— Your virus scanner has blocked TexMod’s access to the target application executable file. Turn your virus scanner off, then launch TexMod. Once you are ingame you can turn your Virusscanner back on. You can also add texmod to your exception list. Some Virus scanners allow you to temporarily turn them off, after which time they turn back on automatically.
— Try running TexMod as an administrator, especially for Windows Vista or Windows 7.
- Q: My anti-virus/anti-malware software claims that Texmod has a trojan in it. Is it safe to use it?
If your anti-virus/anti-malware program uses heuristic detection, a program’s ability to modify the way another program works, it might detect TexMod as a trojan. This is a false positive. You are safe to use Texmod as long as you make sure to download it from trusted sources only.
Please log in or register
To enjoy the benefits of Nexus Mods, please log in or register a new account
- All games
- Mass Effect 3
- Mods
- Textures
- Covered Clothing (ME3)
Covered Clothing (ME3)

File information
Last updated
Original upload
Created by
Uploaded by
Virus scan
Tags for this mod
- Compilation
- Replacer
- Textures
- Tutorials for Players
- Description
- Files 1
- Images 14
- Videos 0
- Posts 29
- Forum 0
- Logs
- Viewing:
About this mod
Covered clothing TexMod override for default resolution textures.
Credits and distribution permission
- Other user’s assets All the assets in this file belong to the author, or are from free-to-use modder’s resources
- Upload permission You are not allowed to upload this file to other sites under any circumstances
- Modification permission You must get permission from me before you are allowed to modify my files to improve it
- Conversion permission You are not allowed to convert this file to work on other games under any circumstances
- Asset use permission You must get permission from me before you are allowed to use any of the assets in this file
- Asset use permission in mods/files that are being sold You are not allowed to use assets from this file in any mods/files that are being sold, for money, on Steam Workshop or other platforms
- Asset use permission in mods/files that earn donation points You must get permission to earn Donation Points for your mods if they use my assets
Author notes
This author has not provided any additional notes regarding file permissions
File credits
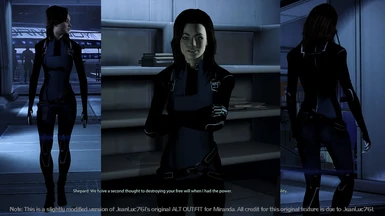
Thanks are due to JeanLuc761 on the BioWare forums, for creating and freely sharing the original ALT OUTFIT for Miranda, back in 2012. All credit for Miranda’s original ALT OUTFIT is due to JeanLuc761.
Donation Points system
This mod is not opted-in to receive Donation Points
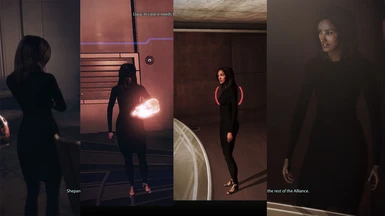
Texture replacements are offered for:
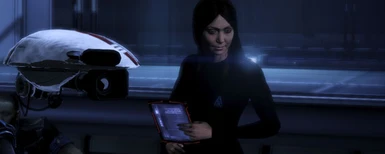
1) The civilians and dancers on the Citadel
2) Diana Allers
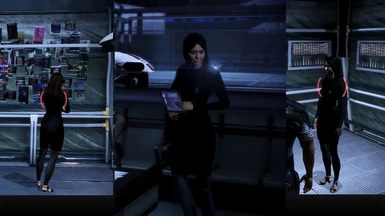
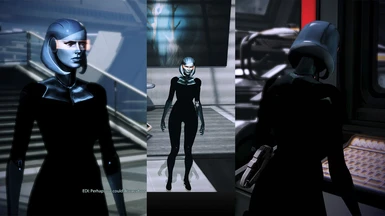
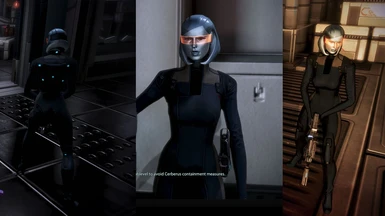
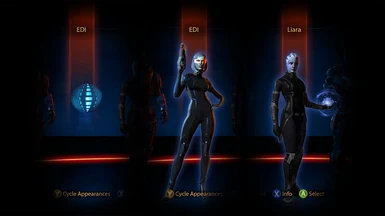
3) EDI
a) Default robot body textures changed
b) Default squad selection menu image replaced by EDI’s hologram from ME2
c) Minor modifications (closed, less shine) made to the default alternate outfit
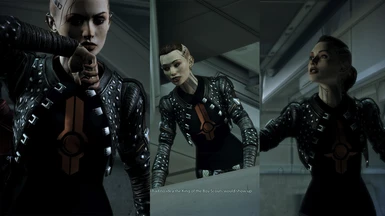
4) Jack
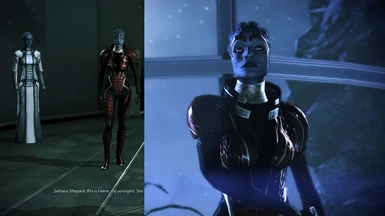
5) Liara
Default LotSB white armor/outfit replaced with a dark version.
6) Miranda
a) Default white suit replaced with a (game default resolution) closed — and further slightly modified — version of JeanLuc761’s ALT OUTFIT for Miranda from 2012. DISCLAIMER: Miranda’s original ALT textures here are entirely credited to JeanLuc761, not to me at all.
b) DLC Casino outfit modded in line with that of the standard civilian version.
[c) I further recommend AVPen‘s excellent: Miranda Horizon and Arena armors ]
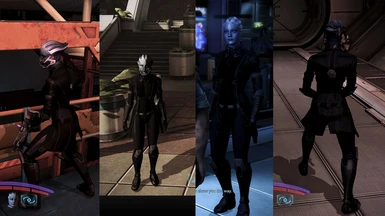
7) Samara
8) Maya Brooks
.. and relevant codex / GUI images .
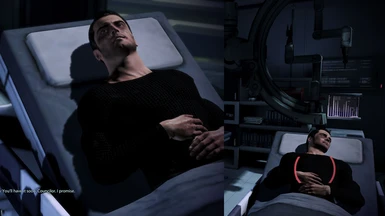
9) Kaidan
If selected, Kaidan’s upper torso will be clothed on the hospital bed (and consequently, I would assume, on any other bed as well).
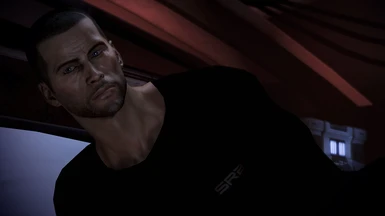
10) Male Shepard
Clothes the Male Shepard body.
Please refer to the provided screenshots to preview the changes (screenshots for the civilians and dancers may be obtained from the pages of the ME1 and ME2 versions of TRAM — they will look the same in ME3 as well).
This mod uses TPF files — if you’re familiar with these, you’re good to go (but I recommend using them with TexMod, not permanently replacing textures with ME3 Explorer).
If you’re not familiar with TPFs, then you may refer to the detailed instructions for new users provided below.
ME3’s relatively robust modding scene has already produced some very high quality solutions, but as these generally involve model replacement (which, admittedly is the only comprehensive fix), a common concern arises around maintaining consistency with all DLCs and with other mods that may not be compatible with the replacement(s) — (I have had issues where multiple meshes appear simultaneously, or an original mesh can continue to pop up once in a while, among others).
A consistency issue can also arise when permanently replacing textures in Mass Effect 3, as I have discovered, for example, when using moonshine’s ME3 Controller mod (as of version 1.0b), which overrides some replaced textures and continues to display their default versions. Additionally, as mods such as that one aren’t compatible with Texplorer, I’d prefer avoiding the scanning and permanent replacement route altogether for Mass Effect 3.
With the default meshes (and my basic abilities) being what they are, it leaves little room to actually ‘fix’ anything, so I have generally just gone the *make stuff darker* route and called it a day.
Using TexMod will add a few steps to launching the game every time, and it can be buggy (see ‘Known issues’ below), but overall it’s still the best solution here, in my opinion.
1) Download and extract TRAM_ME3_v1.0
2) You should now have two folders: one called ‘ texmod ‘, and the other called ‘ TPF ‘.
3) I suggest moving the ‘ TPF ‘ folder to a convenient location, such as your Documents -> BioWare folder.
4) From the ‘ texmod ‘ folder, move the two files (called ‘ Texmod.exe ‘ and ‘ TEXMOD.bat ‘) into your Origin Games -> Mass Effect 3 -> Binaries -> Win32 folder
[Note: Make sure to move the two individual files, not the folder.]
5) [Cont’d from 4)] — Once the two files are in your ‘ Win32 ‘ folder, double click on ‘ TEXMOD.bat ‘ (that’s the file name in capitals).
6) This should launch a command prompt window, as in the screenshot. For now, leave the prompt alone (do not press any key while the prompt window is active).

7) Next, run Mass Effect 3 from Origin. This should being up the TexMod window, as in the screenshot:

8) Now, switch back to the command prompt window, and press the Enter/Return button. It should change, as in the screenshot.

9) Return to the TexMod window and click on the yellow folder icon under ‘Target Application‘, then click on ‘Browse. ‘

10) In the subsequent ‘Select Executable‘ window, navigate to and select ‘MassEffect3.exe‘ in your Origin Games -> Mass Effect 3 -> Binaries -> Win32 folder, then click on ‘Open‘.
MASSEFFECT3.EXE should now display as your Target Application.

11) Switch back to the command prompt window and press the Enter/Return button. The command prompt window should now disappear.
12) Back in the TexMod window, under ‘Package Mode‘, click on the yellow folder icon, then click on ‘Browse. ‘.

13) In the subsequent ‘Select Texmod Packages to add‘ window, navigate to the ‘ TPF ‘ folder [ from step 3) ] and select the ‘01_NPC‘ file, then click on ‘Open‘.
[If you wish to add the Kaidan and Male Shepard options as well, then just browse for, and add them in the same manner.]
Your TexMod window should display your added packages as in the screenshot:

14) Finally, click the ‘Run‘ button to launch Mass Effect 3.
Bear in mind that it will take longer than normal to launch ME3 with the mod. As a guide, on my PC, it takes about 17 seconds to launch ME3 with all three packages. By itself (without this mod), ME3 normally takes 6 seconds to launch.
IMPORTANT: You will need to follow steps 5)-14) every time you wish to launch Mass Effect 3 with this mod. Make sure to always manually browse for the ‘MassEffect3.exe’ file, when you get to step 9 (do not select it from a dropdown shortcut menu, where it should appear in subsequent launches).
If you run into any issues, I refer you to the additional links provided on Ottemis’ tutorial page (which all of these instructions have been based upon).
1) Occasionally, one of the texture files can ‘leak’ out and fill up the game’s entire screen area.
This is a TexMod issue and there isn’t apparently a solution other than quicksaving if possible, and restarting the game (if the menu screens get affected as well, you will have to use «ALT+F4» to force quit the game).
I’ve also encountered a more rare ‘leak’ situation when customising weapons at a mission’s launch point, where one of the textures occupied the area where a weapon mod’s description is meant to be displayed. Again, there is no apparent solution to this other than exiting and resuming the session.
2) Minor stutter when entering new areas
Depending on your system specs, and on the number of other TPFs you may be running as well, this could either be almost unnoticeable, or slightly noticeable. We are replacing textures here in memory on the fly, so a small performance hit is to be expected, but I would be surprised if this could be a serious issue for anyone.
TRAM (ME3) is fully compatible with all single-player replacements effected by moonshine’s ME3 controller mod (as of v1.0b).
1. Can I apply only the textures I want to rather than the whole pack?
Yes, but you’ll have to create the necessary TPF files for yourself. Sorry, but I won’t be able to provide any tutorials or support for custom packages (there should be plenty of information available online, though).
2. Nothing for Ashley?
Basically, no. As far as I’m concerned, Ashley RIP Virmire 2183.
3. Will there be a Female Shepard version of the Male Shepard replacement in this mod?
Currently there are no plans to include that. I wonder whether there is any interest at all in the Shepard replacement in general. If there is, and someone would like to volunteer to do a Female version, I’d be happy to include it in this mod (with credit), or to link to an independent upload.
4. Why not permanently replace textures like in TRAM for ME1 and ME2?
For compatability reasons outlined in the ‘Foreword’ earlier on this page, the permanent replacement option has been avoided for TRAM (ME3). It can still be done using ME3Explorer, and advantages would be elimination of the delay when launching ME3 and the texture ‘leak’ problem and minor stutter outlined in the ‘Known issues’. On the other hand, the TexMod route is certain not to break anything and will ensure that your default files remain unaffected.
Ottemis , for the TexMod tutorials. These were a one-stop source for the entirety of my knowledge and workflow around the ME3 TexMod process, and the basis for this mod’s instructions.
JeanLuc761 on the BioWare forums, for creating and freely sharing the original ALT OUTFIT for Miranda, back in 2012.
Melllin on deviantart, for providing a render of the EDI hologram.
NimbleJack3 on deviantart, for providing convenient access to the Grissom Academy Insignia.
Mass Effect Modding Tutorial: Extracting Textures
Required Programs:
ME3 Explorer
Texmod
Photoshop or another editing software
The Basics:
There are actually two different ways to go about modding textures in Mass Effect (and any other video game, really). You can use Texmod to create a temporary texture replacer (.tpf) or you can go into the program files and mess around with the base files (using ME3 Explorer, in this case). There are pros and cons to each
Texmod
Pros – it’s temporary so you can’t mess up your game
Cons – it makes your game take longer to load (just at startup, not throughout the whole game)
Manual Replacement Using ME3 Explorer
Pros – you don’t need to use Texmod to run your game
Cons – if you mess up, it’s harder to fix (but just be careful, you should be fine)
In general, here are the steps you take to edit textures – I will go over each one in detail:
1. Extract the desired texture
2. Edit the texture using Photoshop
3. Replace the old texture with the new one
Simple, right? Ok, keep going:
STEP 1. Extract the Desired Texture
Extracting is the easiest step! There are 3 different files you’ll want to extract for each texture – the “diff”, “spec”, and “norm” files.
Diff – The actual texture that shows up in the game
Spec – Controls how much light reflects off the texture
Norm – Controls bumpiness of the texture … a lot of times, you won’t need to edit this file.
Extracting can be done with Texmod or manually. There are already detailed instructions out there that deal with Texmod, so consider my Texmod information a supplement to this tutorial.
Tips for Extracting Textures with Texmod:
Run logging mode with Texmod – your setup should look like this:
In logging mode, use + or – to select the desired texture. I set it to log the texture when I hit “enter” but you can set it up to use whatever key you want.
- Your keyboard needs a numpad! Maybe I’m an idiot, but I kept wondering why it wasn’t working with the + or – keys on my numpad-less keyboard.
- Most people save the textures as DDS or TGA – I personally prefer TGA because you don’t need an extra plugin for it to work in Photoshop, and you don’t need to worry about what format of DDS to save it in.
- You’ll want to extract the diff and the spec files for sure. Usually, you won’t have to mess with the norm file.
- As you scroll through logging mode, you’ll see that the target texture will change colors as you select them. Diff will be bright green, spec will be shiny white, and norm will be black-ish.
- If you want to capture the norm file, you’ll notice that Texmod doesn’t capture it in the same way as it does diff and spec files. The texture will still be logged in the TexMod.log file, but it will NOT save a copy of the file to your computer.
How to Extract Textures Manually Using ME3 Explorer
This is a little harder if you don’t know what you’re doing. It will probably take some trial and error.
- Open up ME3 Explorer and go to Texplorer (Developer Tools > Texplorer).
- If it’s the first time you’ve used Texplorer, it will take a while to load all the textures. When it’s done, you’ll have a list like this:
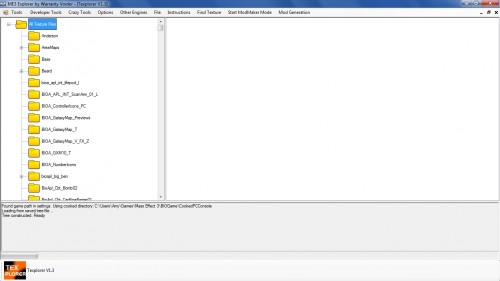
- Find the texture you want to extract … this can be hard to find the right folders if you’re not sure what you’re looking for. You’ll want to extract the textures that end in “diff”, “spec”, and “norm”. To make it easier, here is my master list of textures so you don’t mess up.
- You can double-click your desired file to preview it, then click it again for the image to go away. Do this to double check that it’s the right file.
- Right-click and select Extract to extract the file. You’ll get a pop-up – check the top box (the largest image size) and hit Extract:
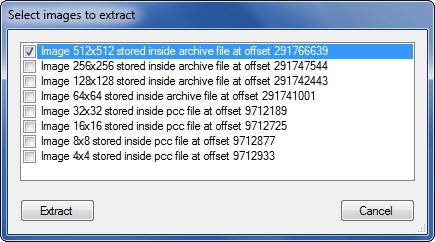
- Do this for all the files you want to extract (diff, norm, and spec).
Well, that’s it for extracting textures … not too bad, right? Now for the next part, editing the texture! Read on …
Лучшие моды для Mass Effect 3
В обсуждении Mass Effect 3 от Bioware, невозможно не затронуть тему спорной концовки или жадного издателя, Electronic Arts. Хочется верить, что с годами мнение об игре изменится и она войдет в фонд лучших ролевых игр в истории. Казалось бы, игра вышла недавно, а ей уже семь лет и возраст начинает сказываться.
Благодаря ПК игрокам, самым преданным фанатам серии Mass Effect, игра может ощущасться и играться как проект 2019 года. Прежде чем вы погрузитесь в ностальгию, взгляните на эти моды, которые заметно улучшат Mass Effect 3.
Пакет текстур для всего и вся
Сравнение мода ALOT Textures с оригиналом.
Если вам разрешат установить только один мод и у вас будет стоять выбор, то вы выберите именно этот. Пакет заменяет практически все текстуры, от капитана Шепарда до окружения и даже больше. Мод был выпущен в 2015 году, но до сих пор дорабатывается. Его создатели бережно заменяют текстуру за текстурой и стараются сохранить оригинальный визуальный стиль. Ни одна текстура не вредит игре и ее миру.
Набор расширений EGM – Expanded Galaxy Mod
Трейлер Expanded Galaxy Mod.
Это амбициозный мод. Он добавляет несколько миссий, восстанавливает вырезанный контент, добавляет огромное количество настроек кастомизации. Наиболее впечатляющими настройками являются кастомизация корабля «Нормандия» и его команды. Также он включает новые виды оружия и брони, которые могут сильно изменить геймплей. Если вы хотите получить свежие ощущения от игры, то это ваш выбор.
Набор брони для команды

Примеры великолепной брони, доступной в этом моде.
Если вы решили использовать предыдущий мод, то и этот вам понравится (к тому же без EGM этот мод не запустить). В него включено 8 наборов брони для Эшли, Кайдена, Джеймса и СУЗИ. Дизайн выполнен в стиле Mass Effect и это не может не радовать. Броня выглядит надежно и в то же время элегантно, не часто встретишь такое сочетание.
Дополнительные наборы навыков
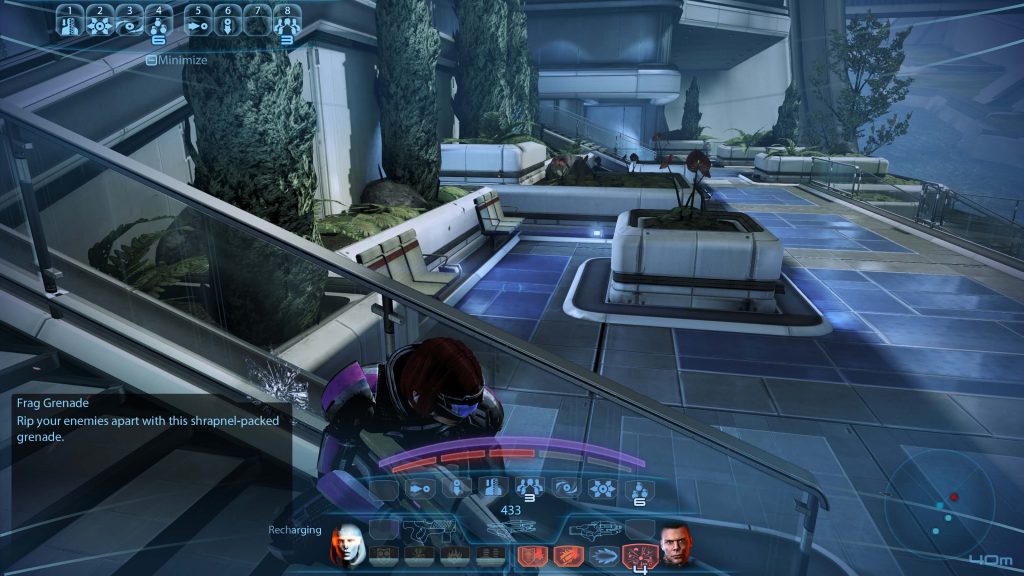
Атакуйте врагов с использованием Биоразреза даже одиночной кампании.
Этот мод переносит десять наборов навыков из мультиплеерной части игры, что значительно расширяет и без того внушительный арсенал Шепарда. К тому же вы вряд ли сможете протестировать навыки без мода, мультиплеер игры практически заброшен.
Поддержка геймпадов
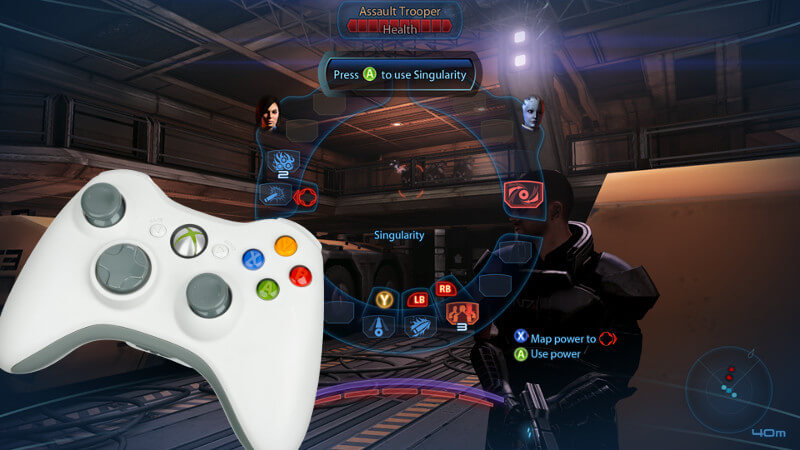
В наши дни поддержка геймпадов встречается повсеместно, а во время Mass Effect 3 были исключения, вроде нее самой.
Если вы до этого играли в Mass Effect 3 на консоли или просто предпочитаете использовать геймпад, то данный мод значительно облегчит вам жизнь. Он не только добавляет поддержку геймпадов, но еще и перестраивает интерфейс, подобно тому, что был на консолях.
Набор фиксов ME3Recalibrated
Исправьте многочисленные мелкие ошибки с ME3Recalibrated.
Моддеры потратили тысячи часов на исправление недочетов в играх, которые пропустили разработчики. Эту игру они не обошли стороной. Данный мод устраняет множественные опечатки и недочеты, а также восстанавливает некоторые вырезанные из игры диалоги. Скорее всего, вы даже не заметите того, что мод установлен, но поверьте, вы не раз столкнетесь с результатом его работы, он делает игровой процесс более ровным.
Лицо Тали под шлемом

Мод добавит экспрессии персонажу.
Тали это один из лучших напарников, стоит наряду с Гаррусом и Рексом. Это поразительно как разработчики смогли так передать состояние персонажа, его эмоции и переживания, ведь игрок совсем не видит ее лица, которое спрятано под шлемом. Благодаря моду шлем становится частично прозрачным и можно разглядеть полностью анимированное лицо. Он не вредит миру игры, лишь делает всеми любимую кварианку чуточку лучше.
Костюм для Джек

Новый прикид для Джек.
Удивительно как изменился персонаж за время между второй и третьей частями, она превратилась из оторвы в преподавателя в школе для особенных детей. Вместо странного наряда Джек получит более классическую кожаную куртку, что больше подходит ее внутреннему состоянию. Костюм отлично дополняет образ одного из сильнейших биотиков.
Костюм Арии Т’Лоак для Лиары Т’Сони
Лиара в костюме Арии.
Можете не согласиться, но среди всех азари в игре, лучший наряд у Арии Т’Лоак. Вместо скучного халата ученого у Лиары появится действительно подходящий костюм для спасения мира. Может быть это не совсем согласуется с лором игры, но в этом наряде она выглядит гораздо лучше.
Короткие сновидения
Геймплей со сновидениями.
Мало кому понравилась затянутость сновидений, особенно ели проходить игру во второй раз. Благодаря этому моду у вас будет возможность пропустить финальную часть сновидений. Многое вы не потеряете, вы и без этого набегаетесь по лесу рядом с мальчиком.
Улучшенные сновидения
Геймплей с улучшенными сновидениями.
Этот мод заменяет воспоминания на эпизоды из прошлых частей игры, это не только сделает сновидения более осмысленными, но еще и напомнит вам сюжет. Не волнуйтесь, мальчика никуда не дели, просто его экранное время сильно урезали. Этот мод отлично вписывается в повествование игры. Вам стоит его поставить даже в том случае, если вам понравились оригинальные сны.
Замена женнской версии Шепарда
Результат мода ELE Femshep Replacer.
Заменять модели в играх это вполне стандартно, но модель какого персонажа вы чаще всего хотите заменить? Правильно, главного. Результат данного мода сложно не заметить. Надо отдать должное мододелам, персонаж стал выглядеть приятнее, но при этом не сильно отошел от канона.
Прически для главного героя в качестве DLC
Создание персонажа с использованием мода.
Если вы ищете способ изменить внешность Шепарда, то набор причесок придется как нельзя кстати. Мод содержит десятки причесок как для Шепарда-мужчины, так и для Шепарада-женщины. Некоторые из них выглядят очень стильно, вы наверняка сможете найти такую прическу, которая вам придется по душе.
Набор маек и кожаная куртка
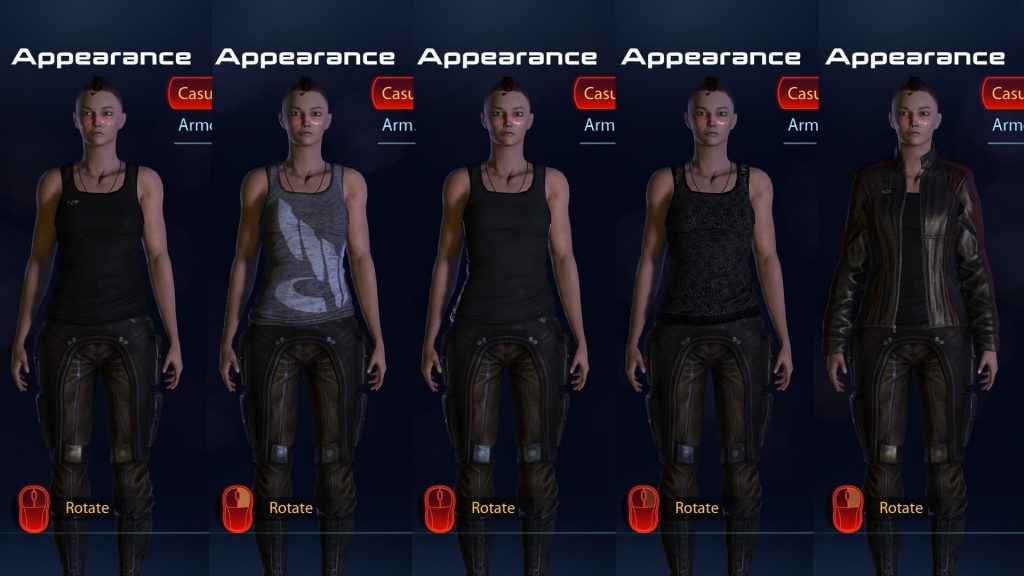
Шепард никогда не нравилось следовать правилам.
Большая часть верхней одежды для женской версии Шепарда довольно скучна. Это именно то, что оживит образ и отлично впишется в игру. Майки отлично детализированы и раскрывают характер Шепард. Установите мод и щеголяйте в стильном наряде мимо членов экипажа Нормандии.
Текстуры для лиц инопланетных рас
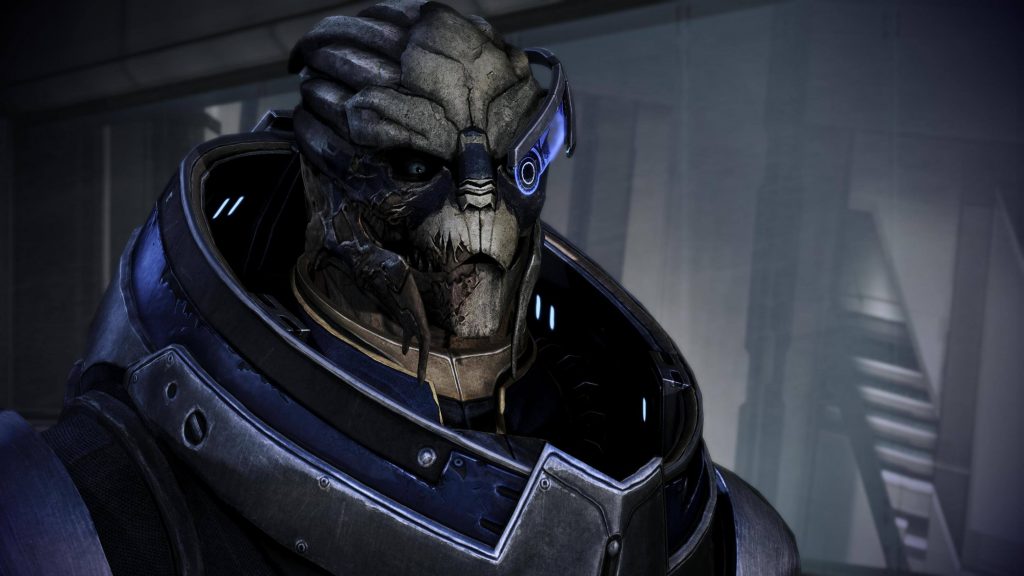
Новое лицо Гарруса.
Данный мод заменяет все текстуры лиц инопланетных рас в игре. Создатель мода утверждает, что он делает лица менее инопланетными. Мод не меняет лица полностью, лишь подчеркивает мелкие детали и делает их более живыми. Это не меняет геймплей, но значительно улучшает ваше впечатление об игре.
Правильный масштаб интерфейса при высоком разрешении
Данный мод масштабирует элементы интерфейса, такие как основной интерфейс, интерфейс мультиплеера, меню выбора команд, субтитры и многое другое. С его помощью играть на высоких разрешениях (4k) станет гораздо проще, он так же применим для игры на расстоянии (например, на ТВ). Мод масштабирует интерфейс до размеров такового для консолей, стандартным разрешением которых было 720p. С ним Mass Effect 3 станет более дружелюбным к ПК игрокам.
Если этих модов вам показалось недостаточно, то вы всегда можете посетить сайт Nexus Mods. Для Mass Effect выпустили не так много модов, как для того же Skyrim, но даже среди представленных образцов есть действительно стоящие, которые могут приукрасить мир игры.
A Lot Of Textures (ALOT) for ME3 / Большинство переработанных текстур для МЕ3 2020.10.2
Для обновления мода, скачайте отдельно с нексуса файл — ALOT for ME3 10.2 — Update
CREDIT: ALOT — этот проект, был разработан CreeperLava, который не смог бы так далеко продвинутся без участия многих художников, разработчиков и бесчисленного количества пользователей. Полный список текстур в ALOT и их авторов можно найти здесь.
Многие художники внесли свой вклад в ALOT, а именно: AlvaroMe, commositore, CDAMJC, ClearanceClarence, CreeperLava, cristi1990an, DeadMeat, ELE08, Ellise, heleuss, JeanLuc761, JimbobJeffers, MaryseDynasty, Mellin, Mgamerz, mylastsong18, Ottemis, smarteck, sulezraz, Tarshana, TheDarkFalkon, ThinkBlueN7. Особая благодарность CDAMJC за то, что он поделился своим проектом ME2 MEUITM для проекта ALOT.
В настоящее время команда ALOT состоит из трех человек: CreeperLava, aquadran и Mgamerz. AlvaroMe является четвертым почетным участником, но он покинул сцену моддинга. Mgamerz и aquadran разработали и оказали жизненно важную поддержку двум основным инструментам, используемым ALOT, а именно MassEffectModder и ALOT Installer. Спасибо также KFreon за ImageEngine.
ЧТО ЭТО ЗА МОД?
TL;DR A Lot Of Textures (ALOT) — визуальное обновление трилогии Mass Effect (ME1, ME2, ME3)
ALOT для ME3, содержит более 3000 текстур и является отдельным текстурным паком дополняющий MEUITM, но также может использоваться как самостоятельный мод. В результате получилась игра, на которую гораздо приятнее смотреть, сохраняя при этом ванильное ощущение без особой просадки FPS.
Для получения лучшего результата и текстур 4К, рекомендуется установить MEUITM, лишь после ALOT.
Подробней:
Установка:
Принцип установки:
Дополнительная настройка:
Обновления:
Удаление:
0. Cистемные требования:
- Минимум оперативной памяти: 4 ГБ. Приготовьтесь к очень медленной установке и возможные сбои при нехватке памяти. Рекомендуется устанавливать от 8 Гб и выше.
- Минимум видео памяти: 2 ГБ. Рекомендуется от 4 ГБ и выше.
- Процессор: от 2х ядер и выше.
- Монитор: Любое разрешение. Для 4K (3840×2160) вам не нужно разрешение монитора, чтобы работала поддержка текстур 4K (4096×4096).
1. Общие советы:
- Пиратские копии игры и ее DLC могут работать или не работать, тут зависит от репака. В любом случае, никакие вопросы по решению проблем на пиратских копиях решаться не будут и нет гарантий, что всё будет нормально работать.
- Если ME2 покупали в Origin, то обязательно выключите функцию автоматического обновления. В противном случае Origin может перезаписывать модифицированные игровые файлы оригиналом без уведомления. Если это произойдет, переустановите по новой.
- Выключите уведомления Origin в игре. Уведомления могут в разы уменьшить FPS от 60 до 30 кадров.
2. Совместимость ALOT с другими популярными модами:
Важно! Пользователи, прошедшие повторную калибровку через ME3Recalibrated, не запускать AutoTOC из ME3Explorer! Программа установки ALOT уже поддерживает AutoTOC, и запускать ME3Explorer до установки ALOT не рекомендуется, иначе сломаете свою игру. Однако, обратите внимание, что если вы не запустите AutoTOC, ваша игра не будет работать должным образом, пока вы не установите ALOT. Сам AutoTOC вы можете запустить через Settings в установщике ALOT.
- В настоящее время существует проблема с модами, которые заменяют файл «BioD_End002_500Choice.pcc» (MEHEM, ThaneMod, Extended Anderson Conversation). Игра вылетает при попытке загрузить этот файл с ошибкой, которая выглядит ТАК.
- Тем не менее, для MEHEM можно устранить проблему с MEHEM Patch, который вы можете скачать через кнопку «Скачать«, где и сам торрент на мод.
- Для других модов перейдите в папку BIOGame/DLC/DLC/DLC_CON_END, что в папке установки ME3 и скопируйте файл «BioD_End002_500Choice.pcc» в основную папку CookPCConsole и в папку CookPCConsole DLC mod, которая была упомянута в списке ошибок.
- Любая из этих операций потребует запуска AutoTOC из меню ALOT Installer > Settings > Game Utilities > AutoTOC.
Убедитесь, что другие моды установлены в правильном порядке:
- Перед ALOT установите все контент-моды (любые моды, содержащие PCC-файлы, включая моды для DLC).
- После ALOT установите все текстурные и модельные моды (моды, содержащие только файлы TPF, DDS или MOD), чтобы они перезаписывали ALOT.
- Чтобы установить моды в формате TPF, DDS, MOD или MEM, просто запустите программу установки ALOT и перетащите их на нее, выбаем нужный МЕ и жмём Install.
Для получения более подробной информации о форматах модов, прочитайте эту статью.
3. Как сделать резервную копию?
- Вы можете создавать резервную копию и восстанавливать игру из установщика ALOT. Зайдите в программу ALOT «Settings». Там нажимаем на выбор BACKUP ME 1, 2, 3 и указываем путь для резервной копии.
4. ALOT не работает?
- Для запуска требуется Microsoft Framework .NET 4.7.2. Если у вас его нет, вы можете скачать его здесь.
- Известно, что Avira, Bitdefender, RivaTuner и MSI Afterburner вызывают проблемы с MEM и ALOT. Деактивируйте их при использовании ALOT.
5. Игра вылетает:
ALOT не должен вызывать вылеты. Однако, есть несколько обходных путей на подобный случай, с которыми сталкиваются пользователи:
- Взломанный ехе. игры может приводить к сбоям с модами.
- Сообщалось, что при запуске игры в оконном режиме добавление аргумента командной строки «-nomoviestartup» в .exe игры, исправляет некоторые CTD.
- Отключение Motion Blur (в GamerSettings.ini) исправляет вылеты в некоторых DLC.
- Отключение ReShade / SweetFX / или другой пост-обработки.
- Широкоформатный экран был отмечен как потенциальная причина сбоев. Тут возможна причина поддержки разрешений на ваш монитор.
- Сбои в шкафчике брони вызваны ограничением памяти: если ME3 использует более 3,5 ГБ ОЗУ, то он зависает и вылетает. Для примера, вы можете просматривать около 50 видов брони в целости и сохранности. Затем вам нужно либо подождать 30-40 секунд, чтобы освободить память ОЗУ, либо перезапустить игру. Вы можете прослеживать объем памяти во время игры в ME3, чтобы убедиться в том, когда объём памяти оптимален для просмотра. Как правило, объём ОЗУ никогда не должен превышать 3,5 ГБ, т.к. это предел для аварийной ошибки. Вы увидите примерно такой объём, когда освободится память.
6. Добавление DLC после установки:
- Если вы установите DLC после установки ALOT, то, скорее всего, вы сломаете игру. Вам придется восстановить ванильную версию игры, чтобы установить недостающие DLС и повторить установку ALOT.
7. MEM против Texmod, ME3Explorer:
- Программа установки ALOT использует MEM (MassEffectModder) для установки текстур.
- Texmod считается очень старым инструментом и подгружает все текстуры непосредственно в оперативную память, тем самым, когда вы запускаете игру, то эти текстуры заменяют ванильные по ходу их обращения, в то время как MEM заменяет текстуры непосредственно в самих файлах игры. Тактм образом, Texmod отнимает десятки минут, чтобы подгружать текстуры каждый раз при их обращении, что не слабо просаживает FPS и нагружает вашу оперативную память. К тому же с ним вы ограничены в установке модов до 4 Гб.
- AutoTOC запускается автоматически программой установки ALOT, отдельно запускать не требуется; установка файлов TPF, DDS, MOD и MEM выполняется программой установки ALOT и MEM.
- С MEM, вы не должны испытывать подгрузку текстур дольше, чем на несколько десятков секунд.
- ME3Explorer — это набор инструментов для модмейкеров, а не инструмент для установки модов. Он имеет ряд проблем, связанных с текстурами (со списком можете ознакомиться) и довольно медлительный (несколько часов отнимает в отличии от установки ALOT).
8. Некоторые текстуры не высокого разрешения / все еще выглядят не модернизированными:
- В ME3 27.379 текстуры. ALOT огромный, но не настолько большой. Потому охват может быть не всех текстур, которые вы ожидаете видеть. ALOT предоставляет большое колличество текстур, но акцент сделан на качество, а не на колличество, потому не мало времени отнимает на их компоновку. Не стесняемся создавать свои текстуры и делиться ими.