How to Install WordPress Alongside LAMP on Debian 10
First released in 2003, WordPress has grown to become one of the leading CMS systems in the internet, accounting for over 30% of the market share. WordPress is a free and opensource CMS that is written using PHP and uses MySQL as its database.
In this tutorial, you will learn how to install WordPress on Debian 10 Buster.
Prerequisites
Before we begin, perform a flight check and ensure that you have the following installed.
-
.
- A regular user with sudo privileges.
Step 1: Creating a Database for WordPress
To start off, we shall begin by creating a MySQL database for WordPress, which comes with numerous files which require a database to accommodate them.
This prompts you to type the root Password that you specified when securing the MySQL database server during installation. Type the correct password and press ENTER to access the MySQL shell.
Next, we are going to create a database called wordpress_db . Feel free to play around with any name. To create the database run:
Next, create a database user and grant him all the permissions to the database as follows.
Remember to replace the ‘password‘ string with your own strong password. To save the changes, issue the command.
Finally, exit MySQL by executing the command.
A summary of the command is as shown.

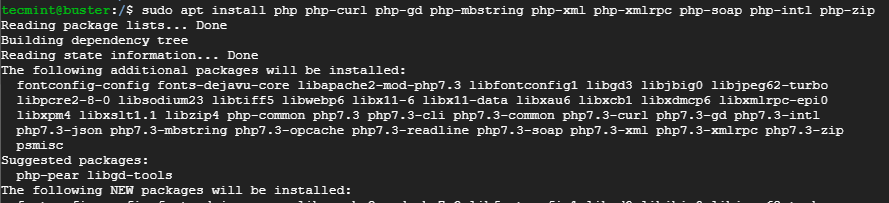
Step 2: Installing Additional PHP Extensions
WordPress requires a pack of additional plugins to function without any problems. With that in mind, proceed and install the extra PHP extensions as shown.
To effect the changes, restart the Apache web server as shown below.
Step 3: Install WordPress on Debian 10
With the database fully configured, we are now going to download and install the WordPress on the Apache web root directory.
Using curl command, proceed and download the WordPress tarball file.

Next, proceed and extract the WordPress tarball file as shown.
This will yield a folder labelled wordpress. This folder contains all the WordPress configuration files. Once extracted, it is safe to delete the WordPress tarball file.
Step 4: Configure WordPress on Debian 10
In this step, we are going to modify the WordPress folder in the web root folder. But before we do so, we need to modify file ownership and permissions. We are going to assign file ownership to all the files in the wordpress directory using the command.
Next, assign the correct permissions as shown in the commands below.
Additionally, you also need to rename the sample configuration file in wordpress directory to a filename it can read from.
Next, using your favorite text editor, open the wp-config.php file. In this case, I will use the vim text editor.
Scroll down and locate the MySQL settings section and be sure to fill with the corresponding database details a specified when creating the WordPress database as shown below.
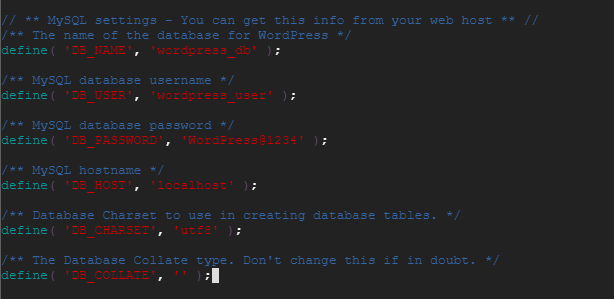
Save and exit the configuration file.
Step 5: Securing WordPress Installation on Debian 10
Moreover, we need to generate security keys to provide additional security to our WordPress installation. WordPress provides an automatic generator for these keys to eliminate the need of generating them by ourselves.
To generate these values from WordPress secret generator, run the command.
The command generates output as shown. Note that in your case, this code will be different.
Copy the output that you have generated.
Once again, open the WordPress configuration file wp-config.php .
Scroll and locate the section that contains the dummy values as shown below.
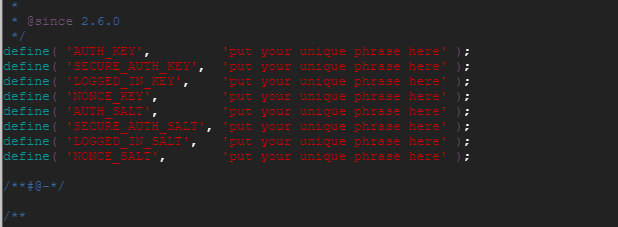
Delete those values and paste the values that you generated earlier on.

Save and exit the configuration file.
Step 6: Configure Apache for WordPress
Next, a few adjustments need to be made to the default Apache configuration file 000-default.conf located in the /etc/apache2/sites-available path.
Again, using your favorite text editor, open the default configuration file.
Next, locate the DocumentRoot attribute and modify it from /var/www/html to /var/www/html/wordpress .
Still in the same file, copy and paste the following lines inside the Virtual Host block.
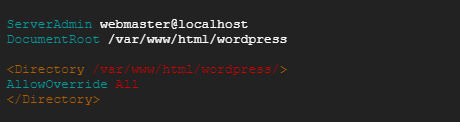
Save and exit the configuration file.
Next, enable the mod_rewrite so that we can use WordPress Permalink feature.

To verify that all went well, issue the command.
![]()
To implement the changes, restart Apache web server.
Step 7: Run WordPress Installation Setup
At this point we are done with all the server configurations needed for WordPress installation. The final step is to complete the installation via a web browser.
To do this, launch your web browser and browser your server’s IP address or domain name
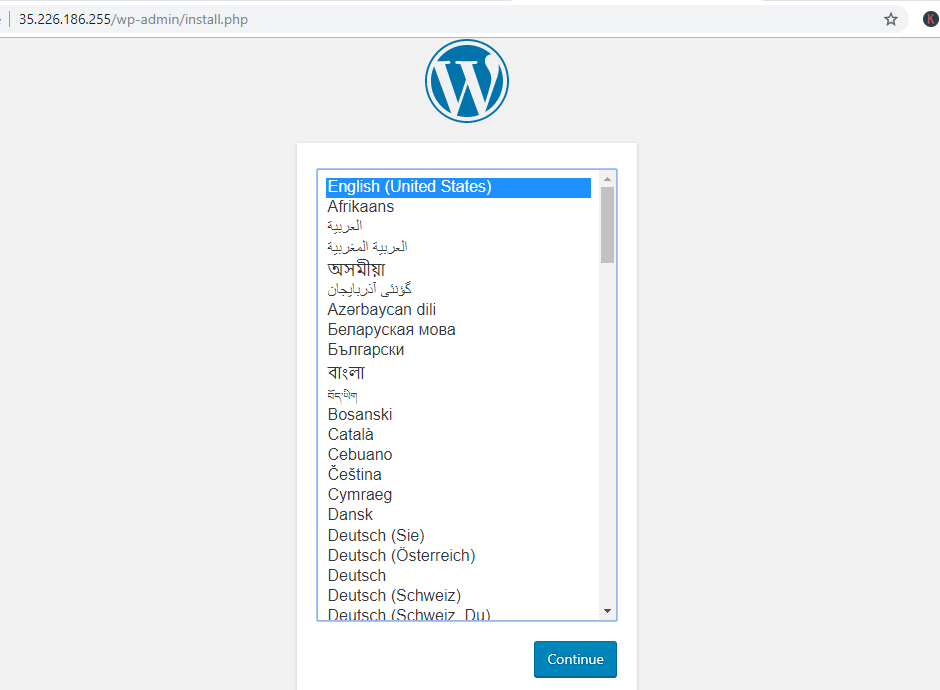
On the first page you will be required to select your preferred language. Click on your preferred Language and click on the ‘Continue‘ button.
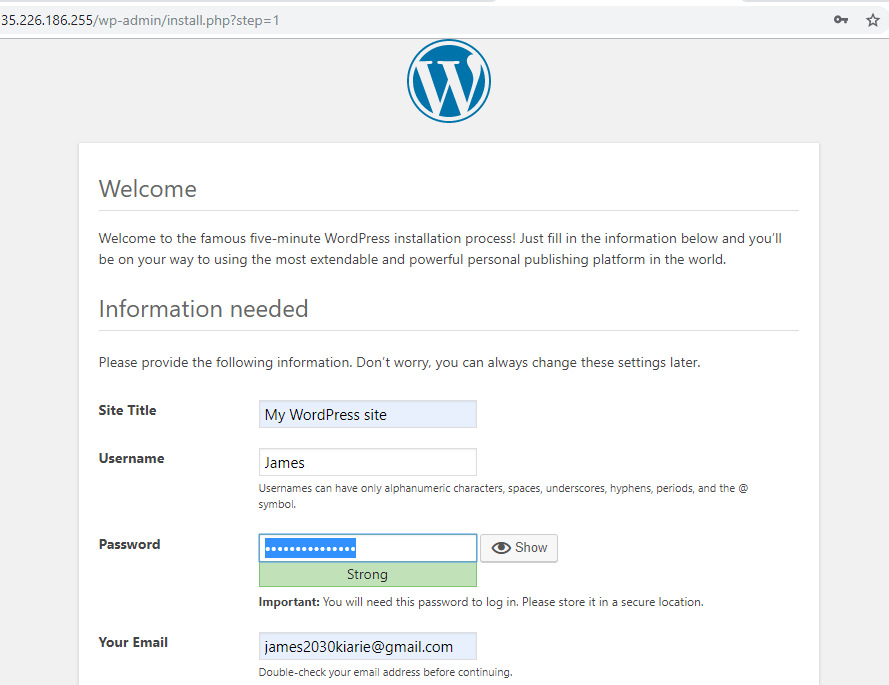
In the next page, fill in the additional information required such as Site name, Username, Password, and Email address.
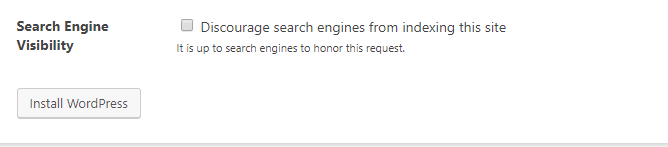
Once you have filled all the required fields, click on the ‘Install WordPress‘ button on the bottom left corner.
If all went well, you will get a ‘Success‘ confirmation.
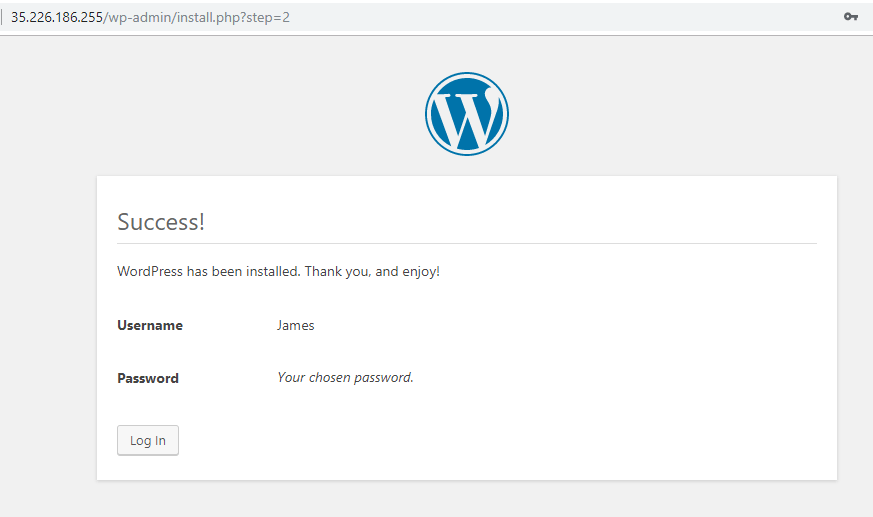
Now, to log in to your WordPress CMS, click on the ‘Log In‘ button.
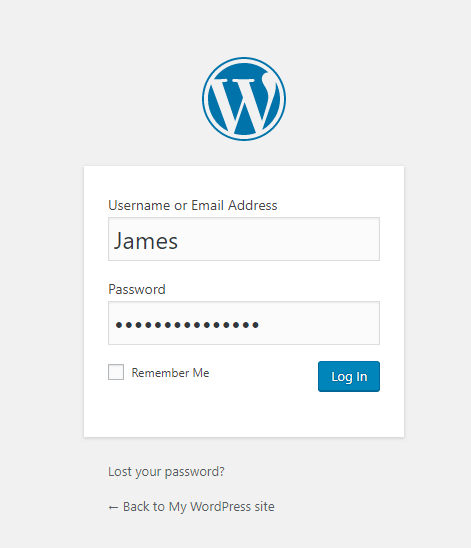
This will autofill the details you specified earlier. To access the dashboard, click on the ‘Log in‘ button
Congratulations! At this point you have successfully installed WordPress on Debian 10 buster Linux system. We have finally come to the end of this tutorial. We hope it was beneficial to you. Give it a shot and share your feedback. Thanks.
If you liked this article, then do subscribe to email alerts for Linux tutorials. If you have any questions or doubts? do ask for help in the comments section.
Шаг 1. Создание базы данных для WordPress
Для начала мы начнем с создания базы данных MySQL для WordPress, которая поставляется с множеством файлов, для размещения которых требуется база данных.
Вам будет предложено ввести пароль root, который вы указали при защите сервера базы данных MySQL во время установки. Введите правильный пароль и нажмите ENTER, чтобы получить доступ к оболочке MySQL.
Затем мы собираемся создать базу данных с именем wordpress_db . Не стесняйтесь экспериментировать с любым именем. Для создания базы данных выполните:
Затем создайте пользователя базы данных и предоставьте ему все права доступа к базе данных следующим образом.
Не забудьте заменить строку «пароль» своим надежным паролем. Чтобы сохранить изменения, введите команду.
Наконец, выйдите из MySQL, выполнив команду.
Краткое описание команды показано на рисунке.

Установка и настройка WordPress
Скачаем и распакуем архив сайта:
Установим права, чтобы пользователь, под которым выполняется Nginx мог вносить в файлы изменения:
Теперь открываем сайт в браузере и продолжаем установку:
В эту форму вы должны ввести имя пользователя и пароль для пользователя MySQL, которые вы использовали при настройке MariaDB
На этом установка блога WordPress завершена. Вы получили минималистичный сервер, для сайта на WordPress без лишних компонентов. Преимущество данной настройки не только в минимализме установки, но и в поддержке защищенного протокола HTTPS, что делает ваш сайт и данные пользователей более безопасными. Теперь вы можете использовать сайт для разработки или тестирования.
An alternate installation method
I believe this method conforms more with how the maintainer recommends it should be done. Various sources are drawn upon using this method, and it is also affected by a few bugs as of this writing. It is basically centered around a «kind of» multi-site install, but I recommend this method even for a single blog, otherwise when you decide down the road to have more than one and share the packages’ codebase, you’ll have a fair bit of work on your hands.
Run the helper script
Now run /usr/share/doc/wordpress/examples/setup-mysql, passing an argument of your site name; eg. myblog.com. You will most probably need other arguments too — just try an initial -h to get help.
At this point, as per above, you should have a database created for you, and the /etc/wordpress/config-myblog.com.php config file. Peruse that and sanity check it.
Create the Apache site
There are several ways to setup WordPress & Apache in Debian. However the maintainer’s recommended way with the helper script setup-mysql uses:
For this configuration to work you’ll also need to have mod_rewrite and mod_vhost_alias loaded and working in Apache. To enable these modules run
Place this config into something like /etc/apache2/sites-available/myblog.com and modify according to your needs (IP-based virtual host, name-based, logging, etc.)
If you’re using any WordPress functionality that requires URL rewriting (such as permalinks), then you will also need something like this in your Apache config:
The above rewrite conditions rely on Apache finding the required files in /usr/share/wordpress for non-permalinks (such as wp-admin). This may require the following line to ensure it finds the index file when requesting /wp-admin/
Final reading before actual configuration
Now would be a great time to read /usr/share/doc/wordpress/README.Debian if you haven’t already. All the rest of the pieces should fall into place once you do.
Amongst other things, it explains the great way that the Debian WordPress package utilises the WordPress wp-config.php framework, and more importantly, how to handle the infamous «themes» and «plugins» directories in a WordPress install. The key point is that by symlinking under /var/lib/wordpress, users better abide by the FilesystemHierarchyStandard, and can use the in-app upgrade mechanisms of WordPress to upgrade plugins and themes, without clobbering the package, and risking server security.
It also discusses the two choices regarding multi-site installs, of which this here describes the non-WordPress version.
Enable the Apache site
Now we enable the Apache site config made earlier using a2ensite, which basically just creates a symlink in /etc/apache2/sites-enabled from sites-available, then reload Apache:
Configure WordPress
Now, browse to your new domain, and follow the normal WP configuration process, and you should be done.
Issues
Sadly at this point, there may be some issues with symlinking, and messing around generally with WP_CONTENT_DIR.
Установка и настройка Nginx
Почему именно Nginx? Ну, тут много всяких причин: он расходует относительно мало ресурсов, отлично работает с FastCGI, умеет работать с memcached, умеет работать с дисковым кэшем, работает при необходимости с бэкендом как реверс-прокси, очень надежный, быстрый и гибкий в настройке.
После установки создаем конфигурационный файл /etc/nginx/sites-available/wordpress и записываем в него следующее (не забывая поменять «freesw.cf» на название вашего домена):
Если у вас есть кастомные странички для ошибок 40x и 50x, можно раскомментировать соответствующие строчки.
Переходим в директорию /etc/nginx/sites-enabled. Удаляем дефолтный сайт, включаем wordpress:
Следующий файл, который надо поменять, — это /etc/nginx/nginx.conf. Сделайте резевную копию оригинального файла и запишите в nginx.conf следующее:
Таким образом, мы включили кэш nginx, компрессию, и настроили отдачу статики. Странички будут сначала запрашиваться из кэша, а потом, если их нет в кэше, будут запрашиваться с бэкенда. Если бэкенд вернул код 404, то страница в кэше будет находиться 1 минуту, если 200 или 302, то 60 минут. С этими циферками еще можно поработать, посмотреть, что можно еще улучшить.
Перезапускать nginx пока НЕ НАДО. Надо его просто остановить, если он в данный момент работает.
Step 5: Configure Nginx for WordPress
Next, we will need to create a Virtual Host configuration file for WordPress. You can create a new Virtual Host configuration file with the following command:
Add the following lines:
Make sure to replace example.com with your registered domain name. Save and close the file.
Then enable the newly created virtual block with the following command:
Finally, restart the nginx and PHP-FPM services to apply the configuration changes:
Managed WordPress Hosting Starting From $10/Month
Manage your WordPress sites hassle-free with Cloudways & achieve record-breaking low load times.
- Operating System
When you purchase a server, a pre-installed OS generally comes with it. It is usually a popular Linux distro, such as Ubuntu or Debian. In this tutorial, I’ll be using Debian 9 to install WordPress.
LAMP is an abbreviation of the top four technologies that are used inc combination to host and launch a dynamic website. These open-source components are:
- Linux
Linux is an operating system for both desktop and server use. It includes the Linux kernel (the core of the operating system) and supporting tools and libraries. - Apache
Apache is a widely used open-source webserver, and according to W3Techs, it powers nearly 35% of websites today. - MySQL/MariaDB
MySQL and MariaDB are two leading open-source database management systems. Both are powered by SQL, a structured query language used to create complex database queries for the DBMS. - PHP
PHP is a well-known open-source server-side web development scripting language. It remains among the top-three most popular programming languages for building web applications.
- phpMyAdmin
This is perhaps the most commonly used database management tool in the web dev industry. You can create, alter, delete, drop, import, and export database queries directly using phpMyAdmin.
As you may already know, WordPress is a popular CMS that lets you build online stores, blogs, and eLearning sites in a very friendly way. I will be installing the latest WP version (at the time of writing this tutorial, 5.6) in this tutorial.
Если вы установили WordPress на VPS из нашего шаблона
Для наших клиентов VPS мы подготовили шаблон виртуального сервера на Debian 10 с WordPress. Автоматическая установка занимает не более 10 минут и инициируется в панели управления сервером. По умолчанию, доступен только один сайт, доступный по ip адресу. Как настроить виртуалхост по доменному имени, подробно рассмотрено в этом руководстве. Вы можете сделать свои виртуальные хосты и установить несколько сайтов, на сколько позволят технические характеристики сервера и загруженность самих сайтов.
Если вы решите использовать сайт доступный из шаблона, необходимо обязательно сменить данные доступа администратора баз данных или создать свою азу данных, удалив существующую. Изменить пароль очень просто:
Вместо newpassword укажите свой уникальный сложный пароль. Затем затем отредактируйте файл wp-config.php
изменив значение следующей директивы:


