Приложение iTunes, созданное компанией Apple для работы с устройствами на базе iOS, приносит неоценимую пользу владельцам iPhone и iPad, поскольку возможности сервиса не ограничиваются только функциями медиа плеера. При помощи Айтюнс также можно обновить, восстановить прошивку девайса или провести ряд других действий, что делает программу многофункциональной и практически незаменимой для обладателей «яблок». Но при всех своих плюсах iTunes частенько «радует» пользователей сбоями, сопровождающимися соответствующими уведомлениями. Так, вследствие отсутствия связи с серверами Apple может возникать неизвестная ошибка 50. Появляться она может как при прошивке, так и при скачивании контента из iTunes Store, при этом продолжить выполнение процедуры невозможно до устранения сбоя. Содержащийся в сообщении код, присваиваемый каждой ошибке, облегчает поиски источника проблемы.

Методы устранения ошибки 50 в iTunes.
Методы исправления ошибки 50
Точно определить, с чем связан неизвестный сбой связи с серверами, можно только путём попыток устранения проблемы. Для начала рассмотрим самые простые способы исправления ошибки 50 в iTunes, ведь даже нехитрые манипуляции по перезагрузке устройств нередко решают задачу в считанные минуты, тогда и прибегать к более серьёзным методам устранения сбоя пользователю не приходится. Иногда также можно обойтись и повторной авторизацией в программе, выход из учётной записи и вход в неё снова может спасти положение и исправить баг Айтюнс.
Способ 1. Отключение антивируса, брандмауэра
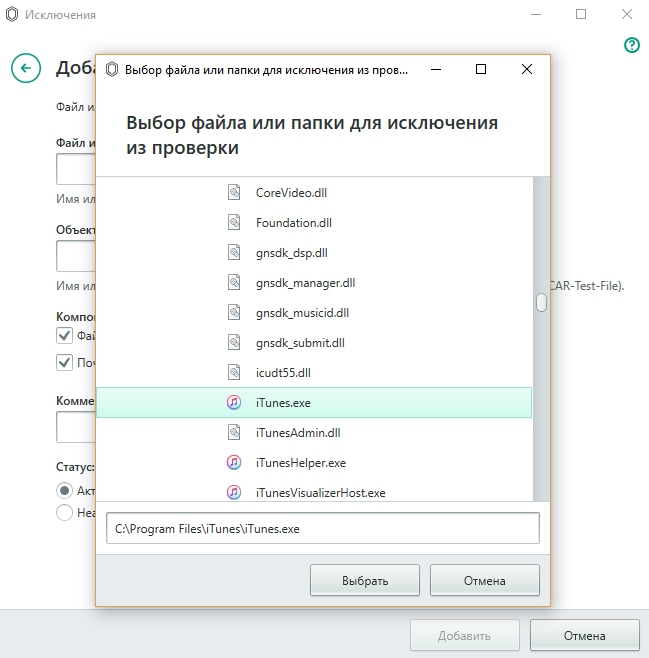
Защитное ПО системы, установленное на компьютере, нередко блокирует деятельность iTunes при восстановлении прошивки iPhone или других процедурах, расценивая работу сервиса как угрозу. Когда бдительность антивирусов или брандмауэров настолько развита, появляются ошибки, препятствующие процессам программы. Помочь может временное отключение защиты на период выполнения восстановления прошивки. В случае если ошибка 50 больше не появилась в процессе работ, следует добавить Айтюнс в настройках антивируса в перечень исключений. Также может потребоваться отключение опции сетевого сканирования.
Способ 2. Запуск проверки на вирусы
Вредоносное ПО, прописавшееся на компьютере, может повреждать или уничтожать файлы, необходимые для корректной работы программ и ОС. Для выявления вирусных угроз необходимо запустить полное сканирование ПК или ноутбука. После обнаружения и удаления вирусов требуется перезагрузить компьютер.
Способ 3. Удаление папки «iTunes_Control»
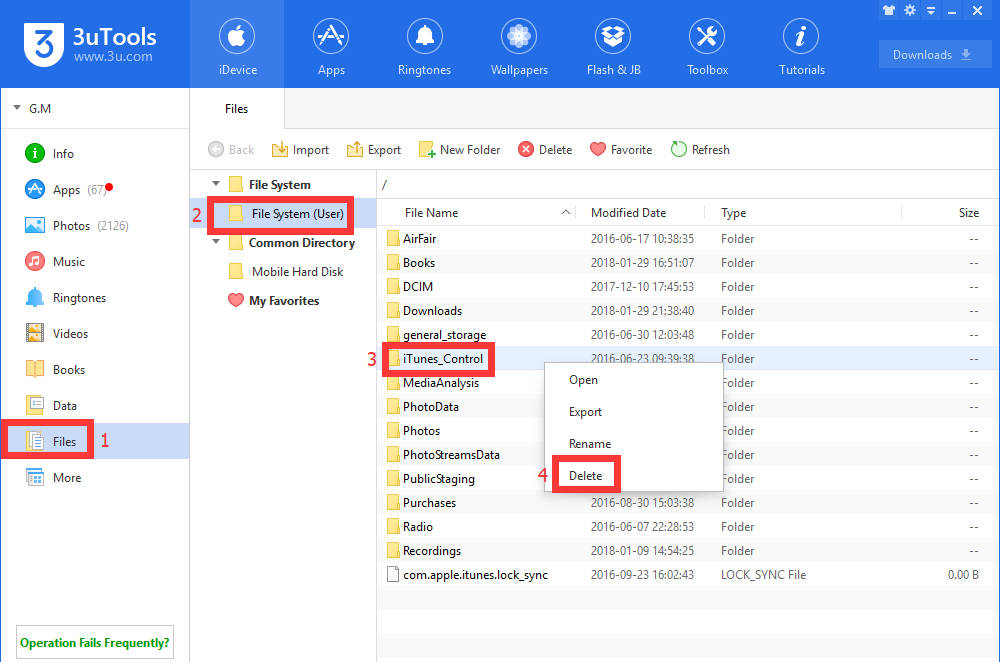
Ошибка 50 в программе может возникать из-за некорректного содержимого папки «iTunes_Control», поэтому как вариант решения проблемы её можно просто удалить с устройства. Для этой цели используется файловый менеджер, можно выполнить процедуру с помощью iTools. После удаления папки потребуется перезагрузка устройства.
Способ 4. Обновление, переустановка iTunes
Программа должна быть обновлена до последней версии, потому как Айтюнс старого образца часто становится причиной всевозможных ошибок. Проверить наличие существующих обновлений можно в разделе «Обновления» из меню «Справки». После установки доступной последней версии ПО требуется перезагрузка. Если обновление не влияет на ситуацию, нередко исправить ошибку может переустановка iTunes. Необходимо выполнить полное удаление программы и сопутствующих компонентов, для этого можно воспользоваться сторонним приложением, например, Revo Uninstaller, после чего перезагрузить компьютер и установить последнюю версию приложения.
Способ 5. Восстановление записей реестра
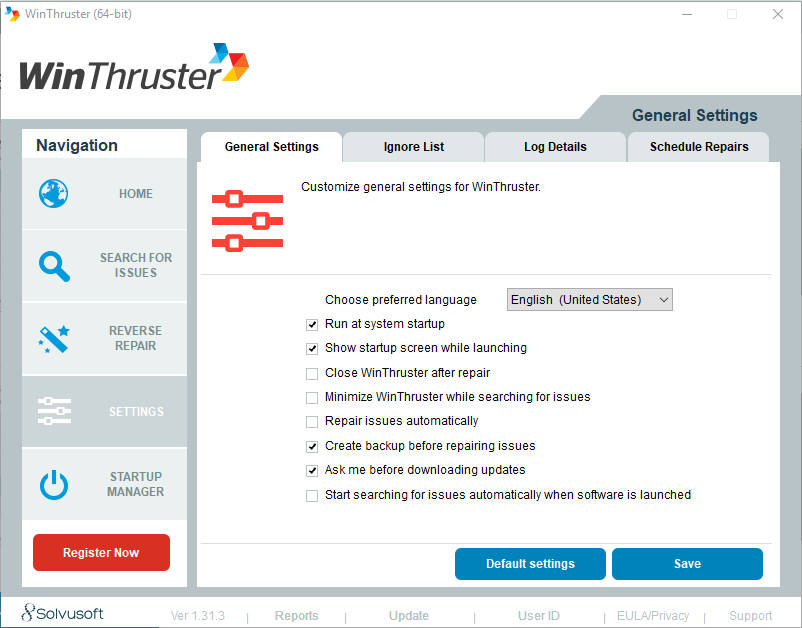
Выполнять редактирование реестра вручную без необходимых навыков нельзя, так как вы рискуете вывести из строя компьютер. Даже незначительные на первый взгляд ошибочные действия влекут за собой непоправимые последствия для операционной системы. Автоматическое исправление реестра помогает безопасно провести специальные инструменты, такие как WinThruster от Microsoft. Перед запуском сканирования создаётся резервная копия, позволяющая отменить совершённые действия в случае неверных шагов. Процесс подразумевает автоматическую замену повреждённых файлов здоровыми, вследствие чего не только устраняются программные сбои, но и повышается производительность системы.
Способ 6. Обновление драйверов
Устаревшие или повреждённые драйверы также могут стать причиной возникновения ошибки 50 iTunes. Обновить драйверы можно как вручную, так и при помощи специальной утилиты, благодаря которой весь процесс будет автоматизирован.
Способ 7. Очистка системы от мусора
Со временем неиспользуемые файлы на компьютере накапливаются, и система продолжает хранить немало ненужного хлама, что может отражаться на работе Windows. Для удаления накопившегося мусора удобно применять специальные инструменты, например, Cleanmgr.
Способ 8. Проверка системных файлов Windows
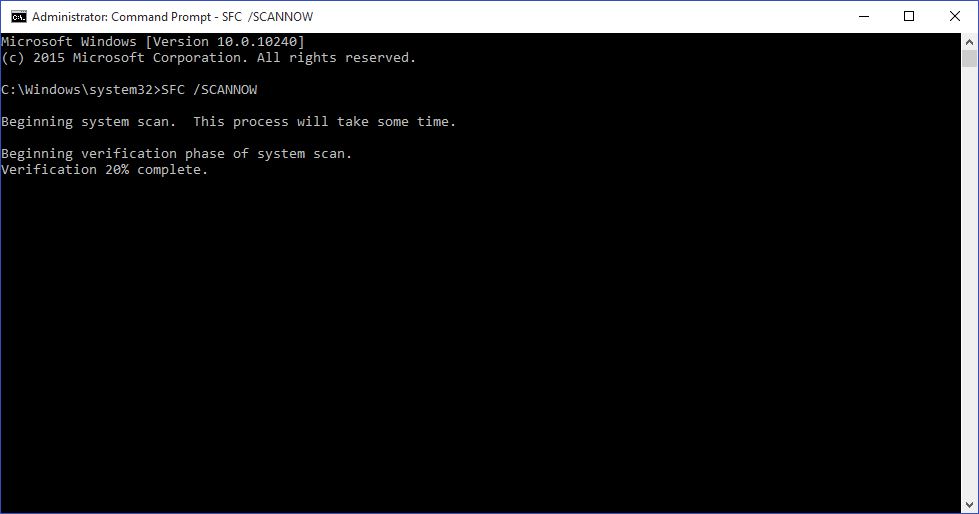
С помощью штатных инструментов Виндовс можно проверить системные файлы на присутствие неполадок. Для этого в поле окна «Выполнить» вбиваем команду «sfc /scannow». Процедура может занять некоторое время, вследствие чего возвращаются важные системные данные и исправляются ошибки.
Способ 9. Восстановление Windows
Эффективным методом является возврат к точке восстановления системы. Процедура позволит вернуть ОС в то состояние, когда ошибок ещё не возникало. Опция доступна из Панели управления, в ходе восстановления файлы пользователя остаются нетронутыми.
Способ 10. Переустановка Windows
Если все известные методы устранения ошибки 50 в iTunes испробованы, но уведомление появляется вновь, придётся перейти к кардинальным мерам, полностью переустановив систему. Процедура не отличается большой сложностью, но без соответствующих навыков лучше не браться за дело, а передать бразды правления мастеру.
Ошибка 50 в некоторых случаях может быть связана с аппаратной неисправностью, поэтому если программным способом решить проблему не удалось, лучше обратиться в сервис, где специалисты выполнят диагностику устройства и проведут ремонтные работы.
Comprehensive Solutions to Fix iTunes Error 50

Alice MJ
Jan 07, 2021 • Filed to: Fix iOS Mobile Device Issues • Proven solutions
You’re trying to sync your music or your videos from the iTunes library but you can’t. You’re being shown an iTunes Error 50 message. You try to look it up online, but iTunes claims this is an ‘unknown’ error. However, generally speaking, iTunes Error 50 is a symptom of iTunes Sync Error 39, and can be fixed in a multitude of ways. So read on below to find out how to fix iTunes error 50.
- Part 1: What Causes iTunes Error 50?
- Part 2: Fix iTunes Error 50 Simply and Swiftly
- Part 3: Check Firewall/Antivirus Settings to fix iTunes Error 50
- Part 4: Re-install iTunes to Fix iTunes Error 50
- Part 5: Restore Your iPhone via iTunes without SIM Card
Part 1: What Causes iTunes Error 50?
Before we talk about how to fix iTunes Error 50, you need to first know what iTunes Error 50 is and how is it caused. iTunes Error 50 is generally a message that comes up when your iTunes can’t access the database server, thus you are prevented from accessing your library of music, apps, etc. This can happen for one of the following reasons.
Causes of iTunes Error 50:
1. Bad internet connection or network drop.
2. Firewall Settings.
3. Anti virus Protection.
4. Windows registry errors.
Part 2: Fix iTunes Error 50 Simply and Swiftly
If you’re not being able to sync your iTunes or iPhone to your computer or access your pictures, music, etc, then you might be suffering from the iTunes Error 39. While there are a few means of fixing this, I’ve personally found Dr.Fone — System Repair (iOS) to be ideal tool, as it can ensure there won’t be any data loss. Furthermore, their instructions are so simple a 5 year old could navigate it without much of a hitch.

Dr.Fone — System Repair (iOS)
Fix iTunes error 50 without data loss.
- Fix iOS system issues like Recovery Mode, white Apple logo, black screen, looping on start, etc.
- Fix various iPhone errors, such as iTunes error 50, error 53, iPhone error 27, iPhone Error 3014, iPhone Error 1009 and more.
- Supports iPhone X / 8 (Plus)/ iPhone 7(Plus)/ iPhone6s(Plus), iPhone SE and the latest iOS 13 fully!

- Fully compatible with Windows 10 or Mac 10.11, iOS 11/12/13.


Fix iTunes Error 50 simply and swiftly using Dr.Fone — System Repair (iOS)
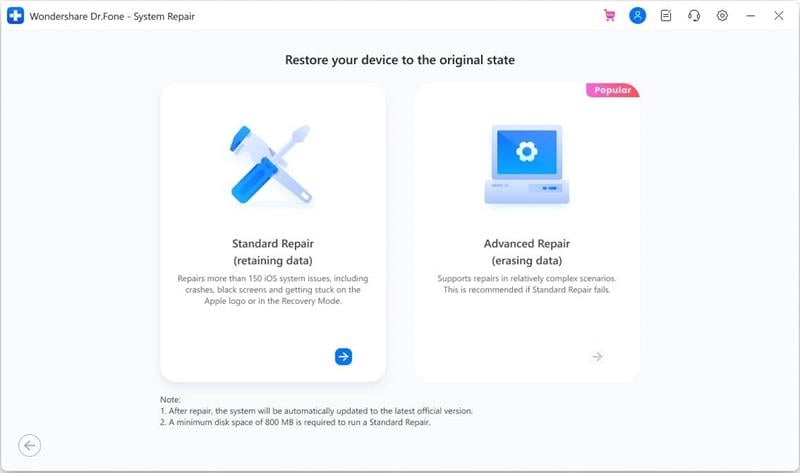
Step 1: Choose «System Repair».
Launch Dr.Fone on your computer. Go to «System Repair».

Connect your iOS device to the computer using a USB. Click ‘Standard Mode’ to continue.
Step 2: Download Firmware.
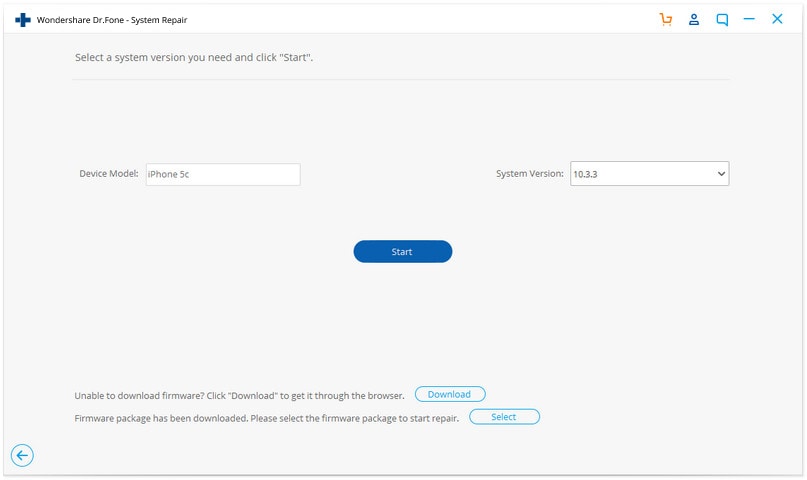
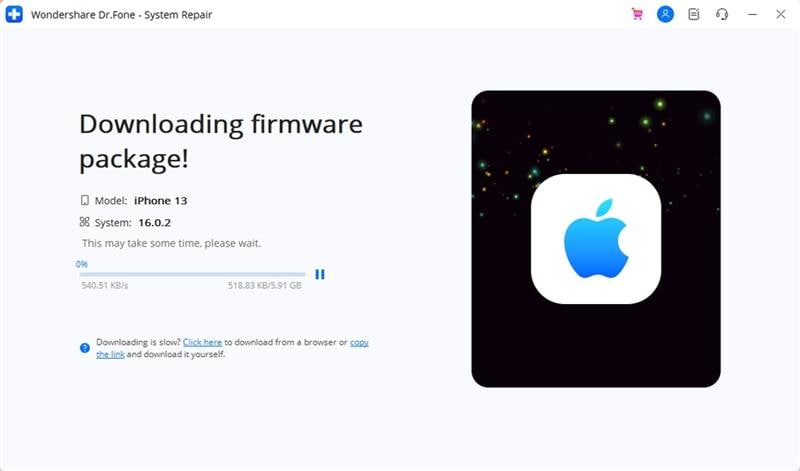
Dr.Fone will recognize your device and model once connected. You just have to click ‘Start’ in order to download the Firmware to fix your operating system.
Step 3: Fix iTunes Error 50.
After the download, Dr.Fone will start repairing your iOS. Soon, your device would be restarted back to normal.
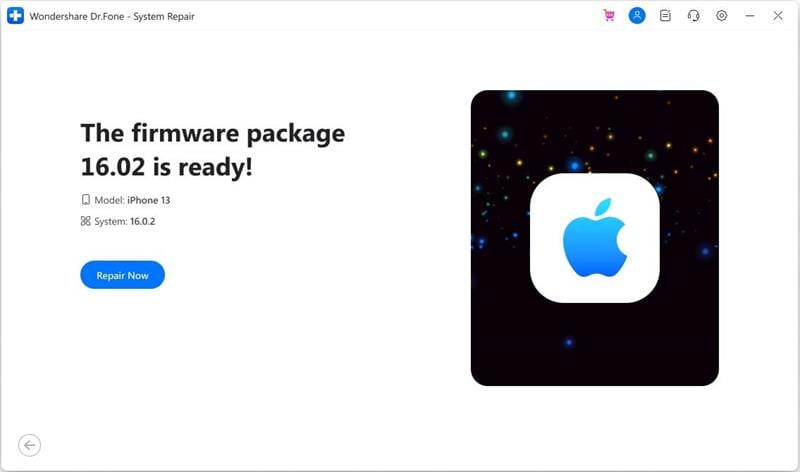
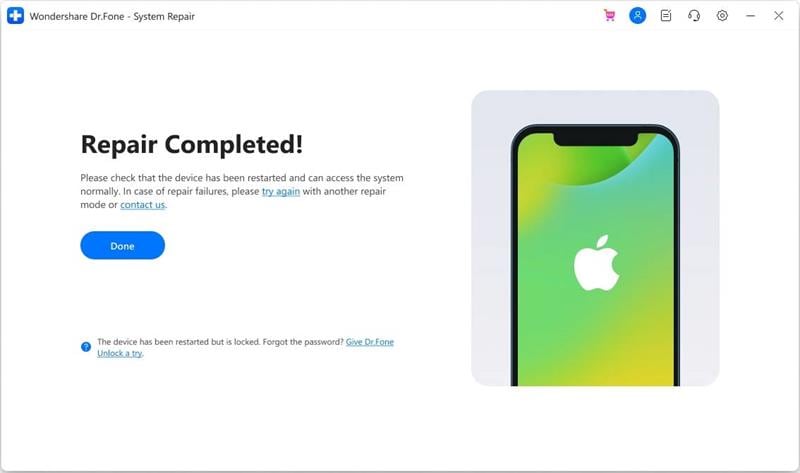


The whole process would take no more than 10 minutes, and voila! The iTunes error 50 is gone and you can continue syncing your library!
Part 3: Check Firewall/Antivirus Settings to fix iTunes Error 50
As already mentioned in an earlier part, the Firewall or Antivirus setting may be another reason for iTunes Error 50 showing up. This is because the Firewall is programmed to stop incoming traffic from any suspicious domains. iTunes isn’t supposed to be listed as a suspicious domain. However, you should check to make sure regardless.
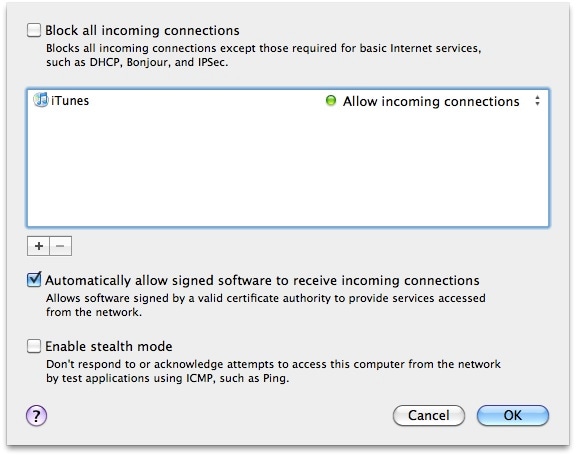
To check, log into the Firewall program, and make sure the following domains and programs are allowed to pass:
Part 4: Re-install iTunes to Fix iTunes Error 50
The other option you could try in order to fix iTunes Error 50 is to reinstall your iTunes, as your file may have gotten corrupted due to a faulty network. You should install the latest version. Here’s how you can do so.
For Windows
2. Click «Control Panel».
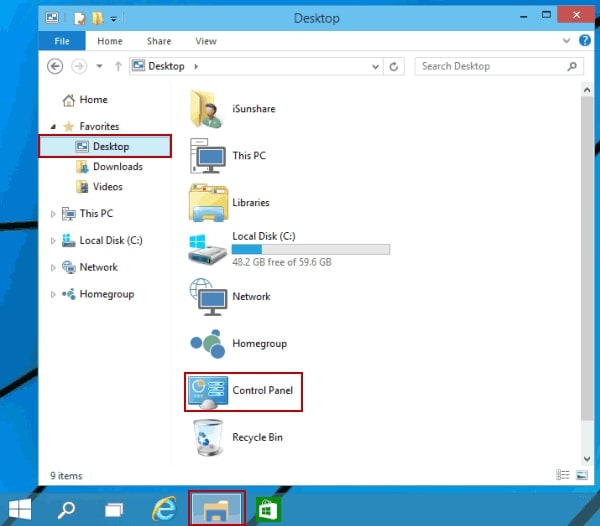
3. Click either «Add / Remove Programs» if you use Windows XP or «Uninstall A Program if you use Windows Vista & 7.
4. Remove iTunes, Bonjour and MobileMe.
5. Restart your computer.
6. Download the latest version of iTunes from this link: https://www.apple.com/itunes/download/
7. Open the installation file and follow the Setup to the end.
For Mac
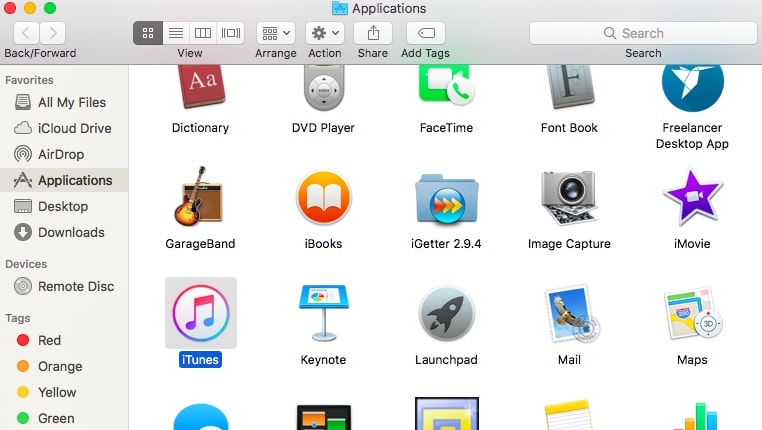
1. Delete the iTunes file from ‘Application.’
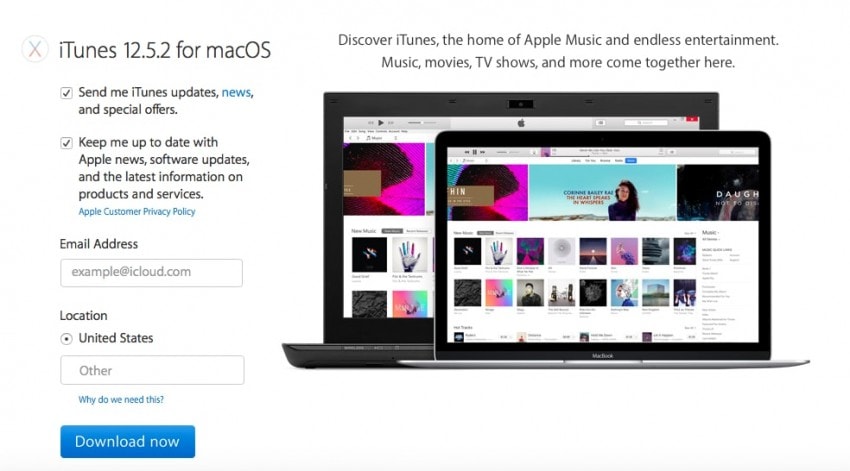
2. Download the latest version of iTunes from this link: https://www.apple.com/itunes/download/
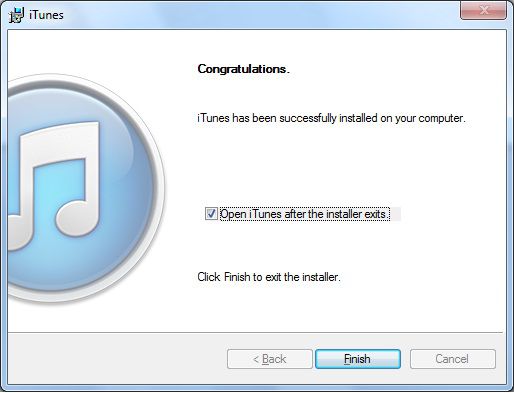
3. Double click the installation file and follow the process through to the end, and then click ‘Finish’
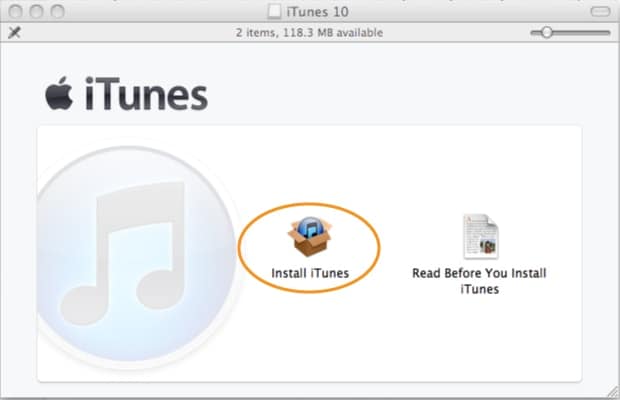
4. Finally, launch iTunes to complete the installation, and then access it to see if the iTunes Error 50 has been resolved.
Part 5: Restore Your iPhone via iTunes without SIM Card
You can try to restore your iPhone without a SIM card to try and fix the iTunes Error 50, by following these steps.
1. Eject the SIM card from your iPhone.
2. Connect the iPhone into your computer with a USB chord.
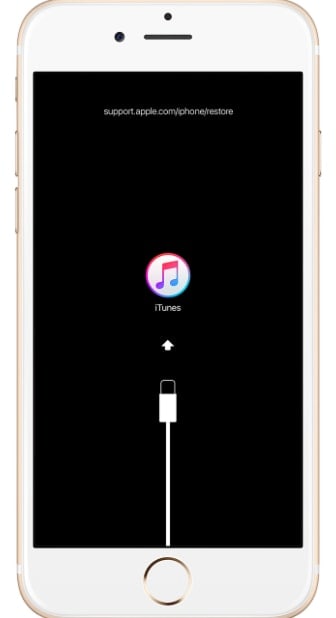
3. Launch iTunes.
4. Click on the ‘Device’ tab and then go to ‘Summary.’
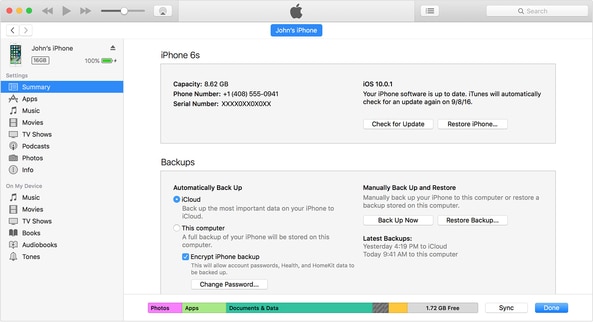
5. Click on ‘Restore iPhone.’
6 Follow the steps to restore your iPhone.
Once your iPhone has been restored, try to access iTunes, and hope that the iTunes Error 50 is no longer there.
Part 6: Clean Registry
If all the previously mentioned techniques haven’t worked on a Windows OS then your problem might be in a corrupted Registry, which is one of the most essential parts of the Windows. In this case you should download and run a Registry cleaner tool. The purpose of this tool is to remove all redundant or corrupted files from a PC. You could make use of the following link to download a Registry cleaner and wipe your Windows off all its problems: http://www.personalcomputerfixes.com/go/registry_cleaner_download
So now you know of all the different techniques and means by which you can go about trying to fix iTunes Error 50. However, I personally recommend using Dr.Fone — System Repair (iOS) for the purpose because it is more of a sure-shot one stop process. With it you’re guaranteed that iTunes Error 50 would be resolved with three simple steps. The other methods, in comparison, follow a trial-and-error structure. That is, they can mostly be used to try and figure out what exactly the problem is, by running multiple reinstallation and restoration processes. Other than being time-consuming, they can also lead to extensive data loss. However, feel free to use one of those means if you somehow manage to pin point why exactly the iTunes Error 50 is showing up in your device.
Anyway, let us know how you managed to get rid of the error and let us know whether our solutions worked for you and which one of these solutions worked best. We’d love to hear from you!
iTunes
iTunes is going places.
Download macOS Catalina for an all‑new entertainment experience. Your music, TV shows, movies, podcasts, and audiobooks will transfer automatically to the Apple Music, Apple TV, Apple Podcasts, and Apple Books apps where you’ll still have access to your favorite iTunes features, including purchases, rentals, and imports.
You can always download iTunes 12.8 for previous versions of macOS,
as well as the iTunes application for Windows.
- iTunes 12.8
- Windows
- Microsoft Store
iTunes 12.8 System Requirements
- Mac computer with an Intel processor
- To play 720p HD video, an iTunes LP, or iTunes Extras, a 2.0GHz Intel Core 2 Duo or faster processor is required
- To play 1080p HD video, a 2.4GHz Intel Core 2 Duo or faster processor and 2GB of RAM is required
- Screen resolution of 1024×768 or greater; 1280×800 or greater is required to play an iTunes LP or iTunes Extras
- Internet connection to use Apple Music, the iTunes Store, and iTunes Extras
- Apple combo drive or SuperDrive to create audio, MP3, or backup CDs; some non-Apple CD-RW recorders may also work. Songs from the Apple Music catalog cannot be burned to a CD.
- OS X version 10.10.5 or later
- 400MB of available disk space
- Apple Music, iTunes Store, and iTunes Match availability may vary by country
- Apple Music trial requires sign-up and is available for new subscribers only. Plan automatically renews after trial.
iTunes
Download the latest version for Windows.
The latest entertainment apps now come installed with macOS Catalina. Upgrade today to get your favorite music, movies, TV shows, and podcasts. You can join Apple Music and stream — or download and play offline — over 75 million songs, ad‑free.
Looking for Windows 32-bit?
iTunes
Download the latest version from the Microsoft Store.
iTunes for Windows
Windows System Requirements
- PC with a 1GHz Intel or AMD processor with support for SSE2 and 512MB of RAM
- To play standard-definition video from the iTunes Store, an Intel Pentium D or faster processor, 512MB of RAM, and a DirectX 9.0–compatible video card is required
- To play 720p HD video, an iTunes LP, or iTunes Extras, a 2.0GHz Intel Core 2 Duo or faster processor, 1GB of RAM, and an Intel GMA X3000, ATI Radeon X1300, or NVIDIA GeForce 6150 or better is required
- To play 1080p HD video, a 2.4GHz Intel Core 2 Duo or faster processor, 2GB of RAM, and an Intel GMA X4500HD, ATI Radeon HD 2400, or NVIDIA GeForce 8300 GS or better is required
- Screen resolution of 1024×768 or greater; 1280×800 or greater is required to play an iTunes LP or iTunes Extras
- 16-bit sound card and speakers
- Internet connection to use Apple Music, the iTunes Store, and iTunes Extras
- iTunes-compatible CD or DVD recorder to create audio CDs, MP3 CDs, or backup CDs or DVDs. Songs from the Apple Music catalog cannot be burned to a CD.
- Windows 10
- 64-bit editions of Windows require the iTunes 64-bit installer
- 400MB of available disk space
- Some third-party visualizers may no longer be compatible with this version of iTunes. Please contact the developer for an updated visualizer that is compatible with iTunes 12.1 or later.
- Apple Music, iTunes Store, and iTunes Match availability may vary by country
- Apple Music trial requires sign-up and is available for new subscribers only. Plan automatically renews after trial.
Looking for other versions?
macOS Windows Microsoft Store
iTunes is going places.
Visit the iTunes Store on iOS to buy and download your favorite songs, TV shows, movies, and podcasts. You can also download macOS Catalina for an all-new entertainment experience on desktop. Your library will transfer automatically to the new Apple Music app, Apple TV, and Apple Podcasts. And you’ll still have access to your favorite iTunes features, including your previous iTunes Store purchases, rentals, and imports and the ability to easily manage your library.
- Open the iTunes Store
- Get iTunes support
Music, TV, and podcasts
take center stage.
iTunes forever changed the way people experienced music, movies, TV shows, and podcasts. It all changes again with three all-new, dedicated apps — Apple Music, Apple TV, and Apple Podcasts — each designed from the ground up to be the best way to enjoy entertainment on your Mac. And rest assured; everything you had in your iTunes library is still accessible in each app. iCloud seamlessly syncs everything across your devices — or you can back up, restore, and sync by connecting the device directly to your Mac.
Presenting Apple Music on Mac.
The new Apple Music app is the ultimate music streaming experience on Mac. 1 Explore a library of over 75 million songs, discover new artists and tracks, find the perfect playlist, download and listen offline, or enjoy all the music you’ve collected over the years. And find it all in your music library on all your devices.
Apple TV. Premiering on Mac.
The Apple TV app for Mac is the new home for all your favorite movies, shows, premium channels, and Apple TV+. Watch everything directly in the app or enjoy it offline, and discover the best of what’s on in the Watch Now tab. You can even pick up where you left off on any screen, across all your devices. And for the first time, 4K 2 and Dolby Atmos 3 -supported movies are available on Mac.
Listen up. Podcasts on Mac.
More than 700,000 of the best entertainment, comedy, news, and sports shows are now available on your Mac with Apple Podcasts. Search for podcasts by title, topic, guest, host, content, and more. Subscribe and be notified as soon as new episodes become available. And in the Listen Now tab, you can easily pick up where you left off across all your devices.
iTunes Support can help answer your questions
Get help with syncing, updating to a more recent version of iTunes, or with an iTunes Store purchase — and much more.
Looking for a previous version of iTunes?
Download earlier versions of iTunes to work with compatible operating systems and hardware.
How to Fix iTunes Error Code -50 on Windows ‘temporary problem’
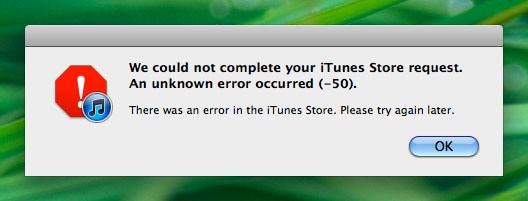
The iTunes error code -50 (An Unknown Error Occurred) appears for some users whenever they attempt to download from iTunes or sync with their iPod, iPad, or iPhone device using a Windows computer. This problem is confirmed to occur on Windows 7, Windows 8.1, and Windows 10.
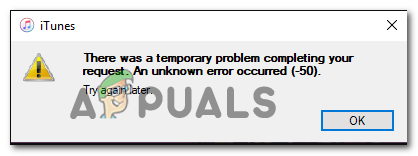 iTunes Error Code -50
As it turns out, there are two main causes that will end up producing the error code on Windows computers:
- 3rd party AV interference – If you’re using a 3rd party suite like Norton or Panda Global Protection, chances are the iTunes attempt at communication with the external server is being blocked due to a false positive. In this case, you should be able to fix the problem by disabling real-time protection while syncing your Apple device via iTunes.
- Corrupted iTunes installation – If you recently performed an AV scanned that ended up quarantining some items belonging to iTunes, chances are the syncing procedure fails due to some corrupted or missing files. In this case, you should reinstall iTunes from scratch and see if this fixes the problem.
Method 1: Disabling 3rd Party AV (if applicable)
If you’re using a 3rd party suite like Norton (AV + Firewall) or Panda Global Protection, chances are you’re dealing with an overprotective suite that is blocking the communications with the iTunes sever due to a false positive.
If this scenario is applicable, you should be able to fix this problem by disabling the 3rd party suite while you are performing the action in iTunes. Of course, this process will be different depending on the 3rd party suite that you’re using.
However, in most cases, you will be able to disable the real-time protection directly from the tray bar menu. Simply right-click on your AV icon and look for an option that allows you to disable the real-time connection.
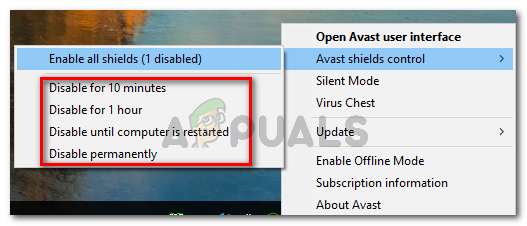 Disabling Avast’s shields
Once you manage to disable the real-time protection, open iTunes again, and repeat the action that was causing the -50 error code in iTunes.
Note: If you are using a 3rd party AV that includes a firewall component, disabling the real-time protection will likely not be enough. In this case, you might need to uninstall the AV suite and remove remnant files to complete the operation.
If this scenario is not applicable or you already disabled the 3rd party suite with no improvement, move down to the next method below.
Method 2: Reinstalling iTunes
According to some affected users, this issue can also be facilitated by some kind of corruption originating from the iTunes installation folder. In this case, reinstalling the iTunes program or app should allow you to clear the -50 error code and utilize the program normally.
In most cases, this issue is reported to occur after an AV ended up quarantining some items belonging to the main iTunes application or to dependencies like the Bonjour app.
But keep in mind that depending on the type of iTunes application you’re using (desktop or UWP), the fix will be different. If you’re using the desktop app, you’ll need to use the Programs and Features menu to do the uninstallation manually and then re-download the program from the official channels.
However, if you’re using the UWP (Universal Windows Platform) iTunes version of Windows 10, you can fix this issue simply by resetting the app via Windows Store.
Depending on the scenario in which you find yourself in, follow the sub-guide applicable to the iTunes version that you’re currently using:
A. Reinstalling the UWP version of iTunes (Windows 10 Only)
- Open up a Run dialog box by pressing Windows key + R. Next, type ”ms-settings:appsfeatures” and press Enter to open up the Apps & Features tab of the Settings app.
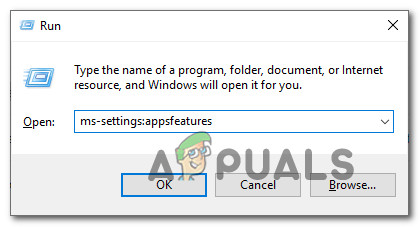 Accessing the Apps & Features menu of the Settings app
 - Inside the Apps & Features menu of Windows 10, go ahead and use the search function to search for ‘iTunes’. Then, from the list of results, click on the Advanced Options hyperlink under iTunes.
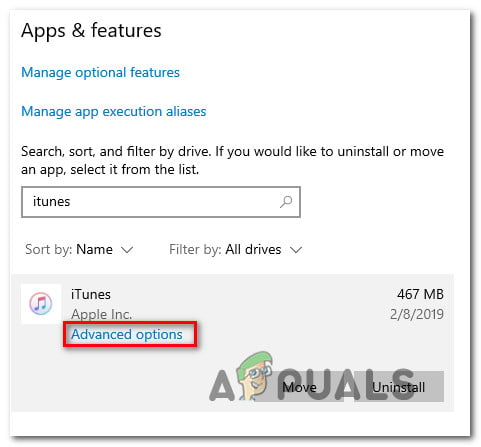 Accessing the Advanced Options menu of iTunes
 - Once you’re inside the Advanced menu of tunes, scroll all the way down to the Reset tab near the bottom o the window.
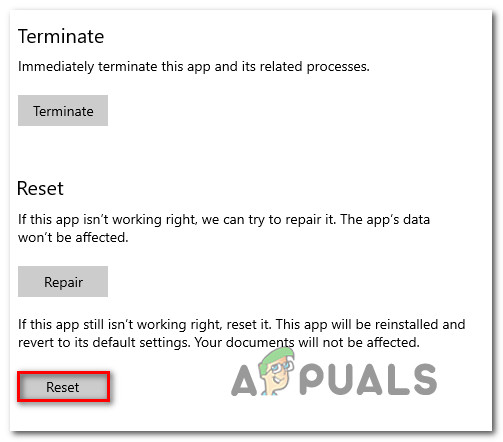 Resetting the iTunes app
 - At the confirmation prompt, click Reset once again, then wait for the operation to complete.
Note: During this process, iTunes will be reverted back to the initial state and every associated component will be reinitiated. - After the operation is complete, launch iTunes once again and see if the problem is now resolved.
B. Reinstalling the Desktop Version of iTunes
- Press Windows key + R to open up a Run dialog box. Next, type ‘appwiz.cpl’ inside the text box and press Enter to open up the Programs and Features menu.
 Type appwiz.cpl and Press Enter To Open Installed Programs Page
 - Once you’re inside the Programs and Features screen, scroll down through the list of applications, then right-click on the iTunes app and click on Uninstall. Next, follow the on-screen prompts to complete the uninstallation.
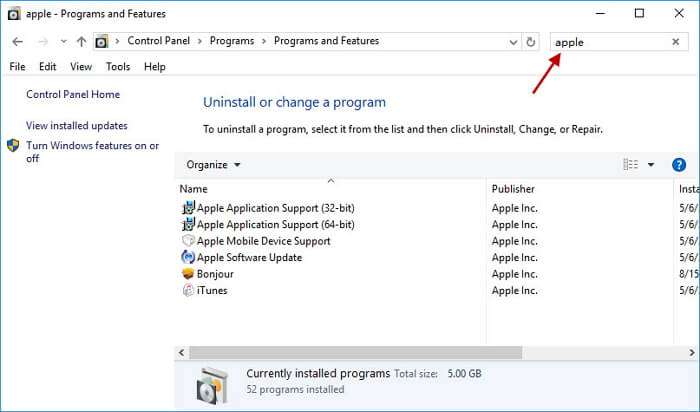
- Once the main iTunes apple is uninstalled, go ahead and uninstall the associated components. To make sure you don’t miss out on anything, filter the Programs & Files list by clicking on the Publisher column.
- Next, go ahead and uninstall everything signed by Apple .Inc. Once every relevant subcomponent is uninstalled, reboot your machine and wait for the next startup to complete.
- After your computer boots back up, access the iTunes download page and look for the latest Windows version (under Looking for other versions)
 Downloading the desktop version of iTunes
 - Once the executable is successfully downloaded, follow the on-screen instructions to install the latest version of iTunes on your computer.
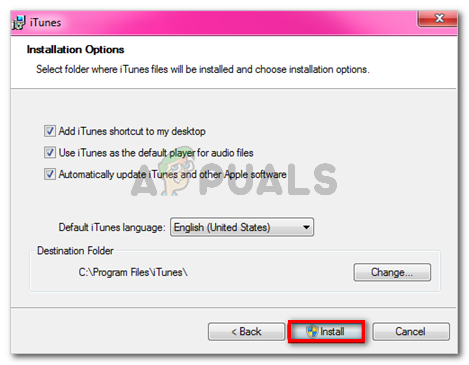 Installing iTunes on your computer
 - Reboot your computer and launch iTunes once the next startup is complete to see if the problem is now fixed.
How to Fix iTunes Error 50 (or -50)
By Gina Barrow, Last updated: December 16, 2019
What is iTunes Error 50?
iTunes error 50 or -50 usually happens when you restore your iPhone and the iTunes cannot connect to the servers. This can be caused by internet connectivity, USB and hardware connections, third-party security software and corrupted or outdated iTunes.
Part 1. What is iTunes Error 50 or -50?
iTunes error 50 or -50 usually happens when you restore your iPhone and the iTunes cannot connect to the servers. This can be caused by any of the following:
USB and hardware connections
Third-party security software
Corrupted or Outdated iTunes
Before you can determine the possible fix, you need to verify the root cause by identifying and testing the above-related causes. When you receive iTunes error 50 or -50, stop using the iOS device right away and read this article for some helpful knowledge base.

Part 2. Best 8 Solutions to Fix iTunes Error 50 or -50
If you are trying to restore your iPhone in iTunes and got stuck on iTunes error 50 or -50, you can do the following 8 fixes we have collected that would simply resolve this issue. Get ready to fix this annoying problem and have a real fix!
How to Fix iPhone Could Not be Restored Error 50?
- Update iTunes then re-install it.
- Check the internet connection.
- Check anti-virus and firewall settings.
- Delete downloads folder.
- Check the iPhone SIM card.
- Check USB cables and ports.
- Restart devices.
- Remove the Windows registry.
- Using FoneDog Toolkit- iOS System Recovery for quickly fixing.
2.1 Update iTunes/Re-install
Make it a habit to check the latest iTunes software before you perform any kinds of restore or backup. This is to ensure that the iTunes can easily connect to Apple servers. In some cases, it may be due to outdated iTunes which causes confusions in the connections and Apple does not allow the restore request.
To update iTunes (Windows)
Click Check for Updates
Follow the onscreen process to download and install
On Mac:
Check if there is an available iTunes update
Follow the onscreen prompts to download and install
If the same error occurs even after updating iTunes, try to remove the iTunes from the computer and re-install after some time.
2.2 Check Internet Connection
In restoring iPhone in iTunes, make sure that you get enough wireless internet connection to avoid such issues like iTunes error 50. Remember that most annoying iTunes error codes rely on connection even if you have already updated iTunes.
Settle in an area at home or work with the excellent internet signal
Try to update iPhone again

2.3 Check Anti-Virus and Firewall Settings
Most third-party antivirus or security software block connections on the computer and at rare times, they also block the connection between iTunes and Apple which can be the culprit for iTunes Error 50 or -50.
Go to the Setting of your antivirus software and temporarily disable while restoring iPhone
Check the Firewall setting of the computer and make sure that iTunes is not listed on the Blocked list
2.4 Delete Downloads Folder
Another possible cause of iTunes Error 50 or -50 is the conflicts or timeouts with the Downloads folder on the computer. Make sure to delete irrelevant files or completely clear out the downloads folder for smooth iPhone restore process.
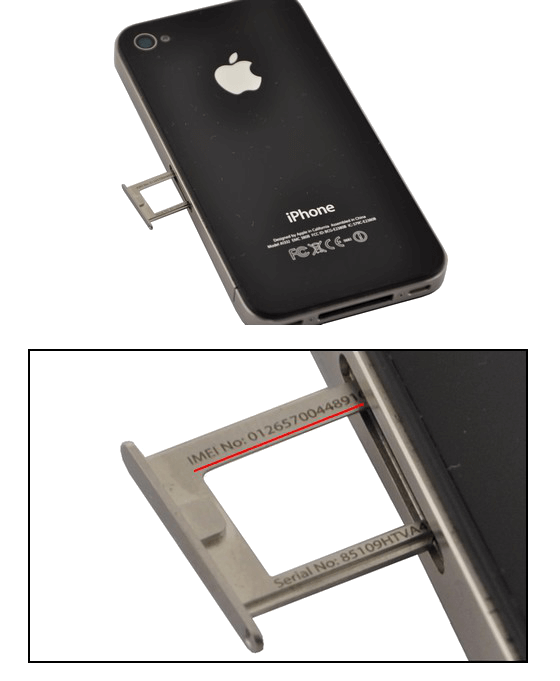
2.5 Check iPhone SIM card
If at first, you receive the iTunes error 50 or -50, try to remove the SIM card out from the iPhone and restore it without the SIM card. It may be due to network connection conflicts.
2.6 Check USB cables and ports
Ports and cables are also modes of connections. You can also check if the USB cable or the USB port are the causes of iTunes error 50 or -50. It can be due to loose cable or debris inside the ports. To better check, try another USB cable on a different computer to see if the error still occurs.
Tip: At all-cause and times, use an original USB cable to ensure that no other conflicts arise.
2.7 Restart Devices
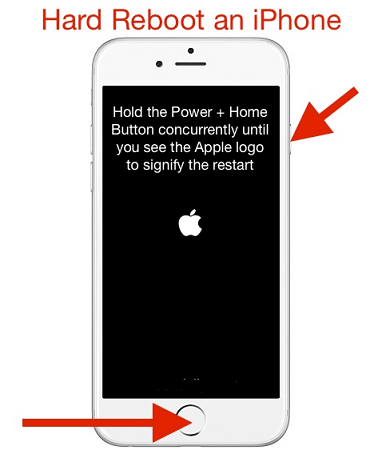
As simple as it seems but yes a simple power cycle does the job too. Basic troubleshooting like powering on and off can greatly affect the way the iPhone connects to any network. Try to reboot the iPhone and the computer, wait for at least a couple of minutes and retry the process.
2.8 Remove Windows Registry
If you are using a Windows computer, the Windows registry can cause iTunes Error 50. What you can do is to simply clear out the registry manually or by using software cleaner.
On the keyboard, press Windows key + R
Type in regedit and hit Enter
Create a backup on the Windows registry
Export the files and save to a folder
Find the programs you want to clear out
However, this task is highly technical. Do not do this process if you are unfamiliar with the steps. You can ask for help or simply download a registry program cleaner.
Part 3. Fix iTunes Error 50 or -50 Quickly
If you think doing the above methods is so difficult to fix iTunes error 50, consider using FoneDog Toolkit- iOS System Recovery. This is a program that resolves all kinds of iTunes error codes as well as other types of system issues like bootloop, DFU mode, Recovery mode, crashing, freezing, and many more.
FoneDog Toolkit- iOS System Recovery includes the following features :
100% safe, effective and reliable
Compatible with all iOS devices, iPhone/iPad/iPod touch and even the latest, iPhone X, iPhone 8, and 8 Plus
Click-through based environment
How to use?
#1. Download FoneDog Toolkit- iOS System Recovery and Launch the software.Connect the iOS device. Click on the desired issue. Click Start

#2. Enter the correct firmware package. Click Repair

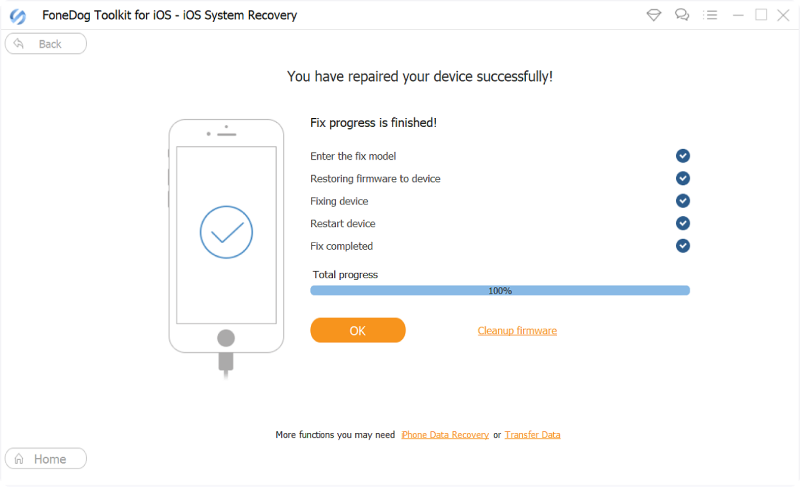
#3. Repair completed. The iOS device will reboot and starts normally. It has simply fixed iTunes Error 50 just by plugging in the device!
People Also Readпјљ
Video Guide: Quickly Fix iTunes 50 or -50
Part 4. Conclusion
There are a lot of possible iTunes errors that can interrupt our phone usage. However, these errors are so easy to fix by making sure you have identified the root cause. Once you have determined what is the main cause of the iTunes error 50, follow the recommended steps above and for sure you will resolve it in no time!
If in case it got worse or if you prefer not to prolong the agony, use FoneDog Toolkit- iOS System Recovery. This is a dedicated program for all kinds of iOS system errors like iTunes, software failures like crashing, freezing, stuck on Apple logo and many more.
Tell your friends about this good news and download the free version today!

