
Если Вас интересует то, как обновить AMI BIOS (БИОС), то следует рассмотреть подобную задачу более подробно. Может возникнуть вопрос о том, для каких целей следует выполнять подобные процедуры. Основной задачей является улучшение работы устройства. Предусматривается не только ускорение загрузки операционной системы, но и появление новых функций. Нельзя забывать про определенные опасности подобного процесса. Выполняет его необходимо строго в соответствии с инструкциями.
Подготовка
Начинать работы необходимо с определения того, какая именно системная плата используется на конкретном устройстве. Дополнительно, происходит уточнение версии БИОС. Имеется несколько способов выполнить поставленную задачу:
- Посмотреть модель платы можно непосредственно на её корпусе. Происходит вскрытие системного блока и осматривается место на плате между PCI разъемами.
- При загрузке необходимо оставить процесс и найти строку наподобие «A7380MS v1.8 133101». Расшифровка говорит об использовании платы модели MS-7380 с версией БИОС 1.8.
- Скачивается программа Everest. На скриншоте продемонстрировано, по какому пути следует пройти. Дополнительным преимуществом является предоставление сведений о том, где скачать обновленияBIOS (БИОС).

Как провести обновление
Когда все подготовительные действия завершены, необходимо провести загрузку. Один из способов поиска обновлений представлен выше. Можно найти нужные файлы на сайте производителя материнской платы. Самый удобный подход заключается в скачивании специализированных программ. В данном случае, это Live Update 5 или более поздняя версия (если на момент прочтения Вами статьи она выпущена. Программа используется для изделий MSI и не предназначается для моноблоков или ноутбуков. В любом случае, найти аналог не составит труда.
1. Запускаем сканирование с целью обнаружить обновление AMI BIOS.

2. Будет выдан перечень результатов. Среди предложенного списка требуется найти пункт, содержащий в своём названии слово «BIOS».

3. Указываем, куда именно должен быть сохранён скачиваемый файл. Теперь, когда всё готово, можно приступать к непосредственному выполнению поставленной задачи.
4. Требуется запустить исполняемый файл и просто нажимать «Next» на выдаваемых окнах. Это наглядно продемонстрировано на скриншотах.


5. Далее можно выполнить обновление БИОС АМИ непосредственно из Windows или выполнить запись на внешний носитель (флешку). Будем рассматривать первый вариант действий. Выдаётся предложение о закрытии всех работающих приложений.

6. Появится окно, в котором будет прописываться текущий ход установки. Когда она завершится, поступит предложение нажать любую кнопку. После этого осуществляется перезагрузка операционной системы.
Таким образом, процесс обновления является достаточно простым. Появляется окно с предложением нажать F1 для выполнения настройки BIOS или F2 для использования оптимальных параметров. Если у Вас нет соответствующих познаний, выбирайте второй вариант.
Обновление BIOS типа American Megatrends Inc.

Обновление AMI BIOS
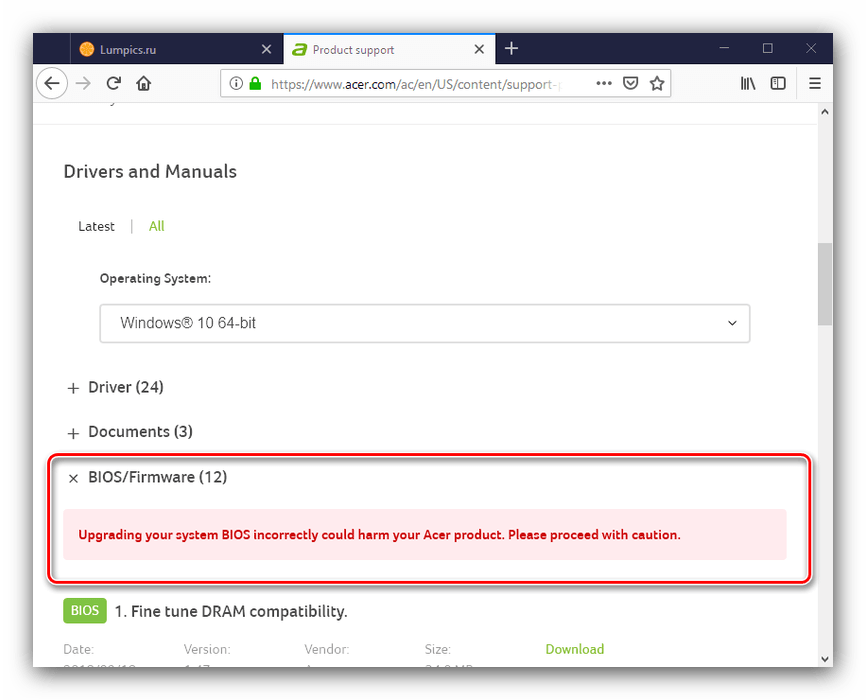
Перед тем как мы приступим к описанию процедуры, отметим важный момент – обновление БИОС требуется лишь в редких случаях. Они описаны ниже, в следующей статье.
Теперь переходим непосредственно к инструкции. Обратите внимание, что она рассчитана на владельцев настольных ПК, тогда как обладателям ноутбуков рекомендуем изучить отдельные руководства.
Урок: Обновление BIOS на лэптопах ASUS, Acer, Lenovo, HP
Этап 1: Определение типа материнской платы и версии микропрограммы
Важный нюанс, который следует знать перед апгрейдом системного ПО – определяющую роль играет не тип БИОС, а производитель материнской платы. Поэтому первый этап и заключается в определении модели «материнки», а также версии уже установленной в неё микропрограммы. Самый простой вариант – задействовать программу для определения комплектующих компьютера. Одним из лучших решений является AIDA64.
- Загрузите пробный дистрибутив программы и установите его на компьютер, затем запустите с ярлыка на «Рабочем столе».
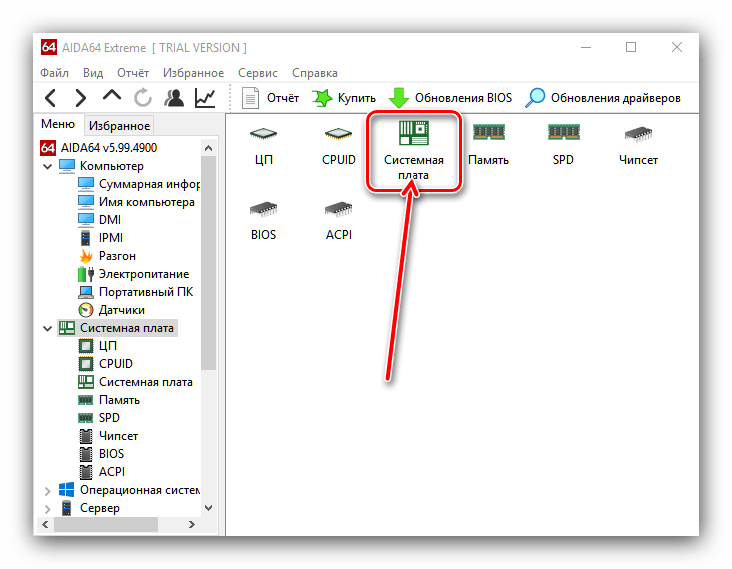
- В основной вкладке кликните по пункту «Системная плата».

Повторите действие в следующем окне.
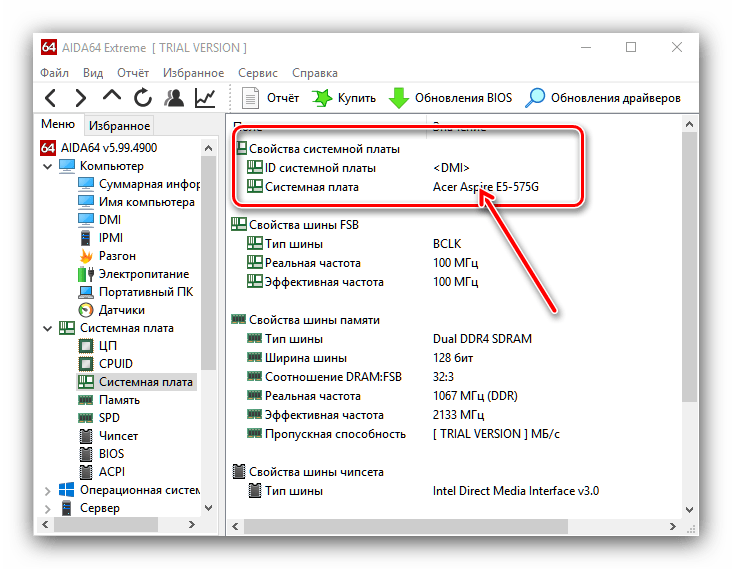
Прокрутите введения вниз, до блока «Данные о системной плате» – здесь будут размещены ссылки, нужные для обновления BIOS. Они пригодятся нам на следующем этапе.
Этап 2: Загрузка обновлений
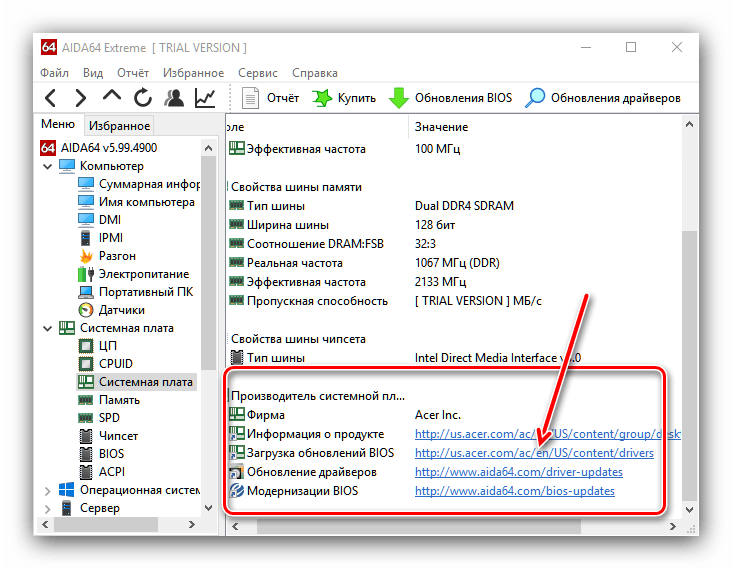
Самый важный этап – загрузка подходящих обновлений.
Напоминаем, что AMI BIOS сам по себе не имеет значения, а важны производитель, модельный ряд и ревизия материнской платы!
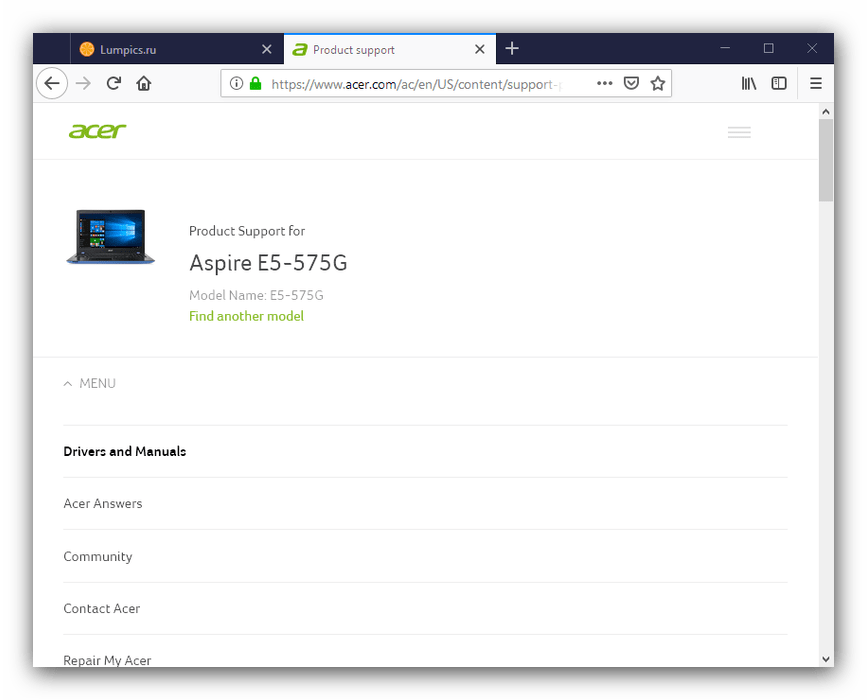
- Откройте браузер и воспользуйтесь ссылками из AIDA64, полученными на предыдущем этапе, или же перейдите к сайту производителя вашей платы самостоятельно.

Обратите внимание! Многие варианты AMI BIOS не поддерживают кумулятивные обновления: не рекомендуется устанавливать версию 1.4 на BIOS 1.0, если есть версии 1.2, 1.3 и так далее!
Этап 3: Установка обновлений
Непосредственно установить новый BIOS можно несколькими разными способами. Рассмотреть их все в пределах одной статьи невозможно, поэтому сосредоточимся на варианте с установкой через DOS-оболочку.
-
Перед началом процедуры стоит подготовить носитель. Возьмите подходящую флешку, объёма до 4 Гб, и отформатируйте её в файловой системе FAT32. Затем скопируйте на неё файлы прошивки, после чего извлеките носитель.
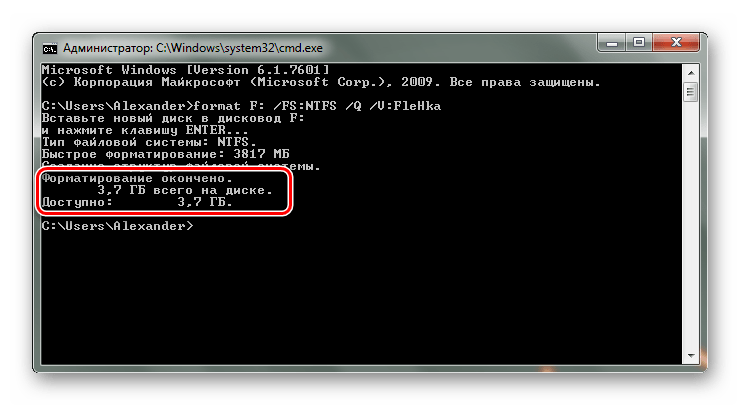
Подробнее: Как отформатировать флешку
Зайдите в БИОС и выберите загрузку с флешки. 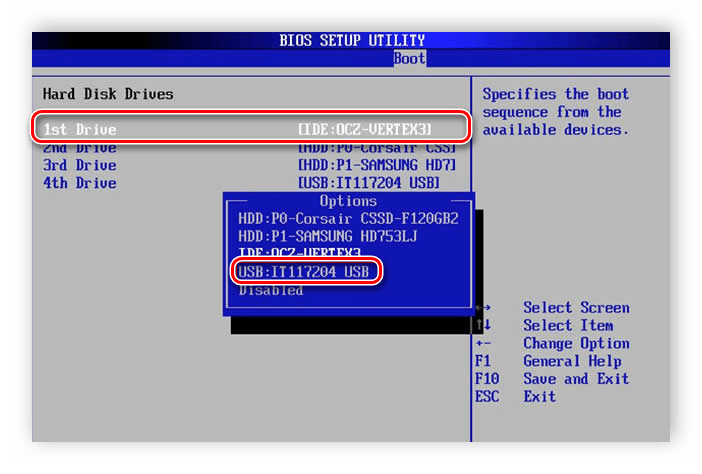
Подробнее: Настраиваем BIOS для загрузки с флешки
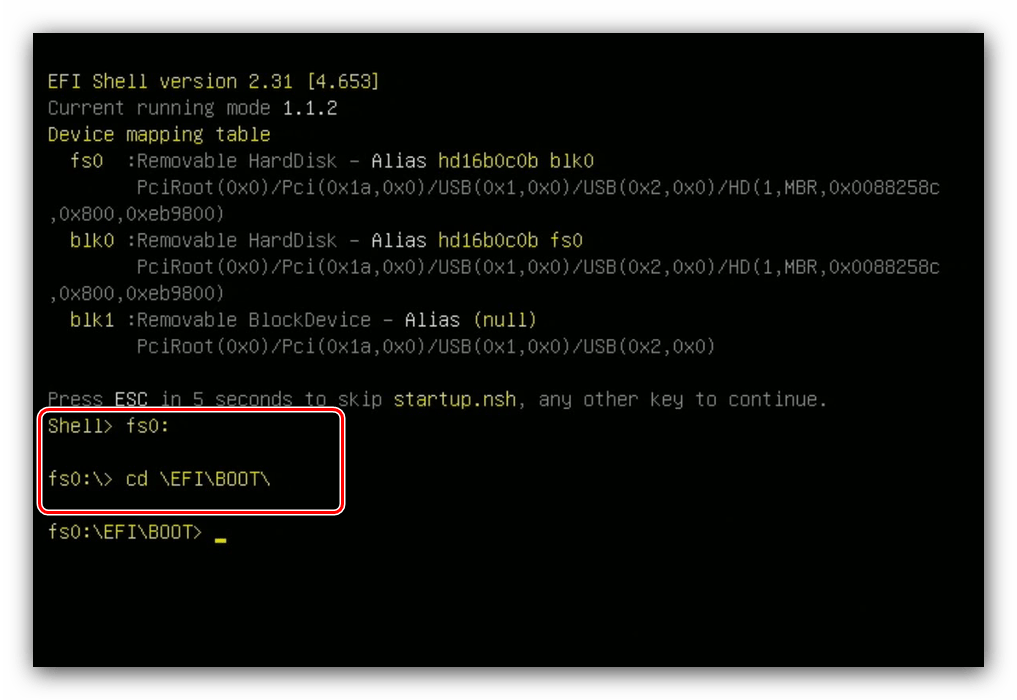
Выключите компьютер, подключите к нему USB-накопитель, и снова включите. Появится интерфейс оболочки.
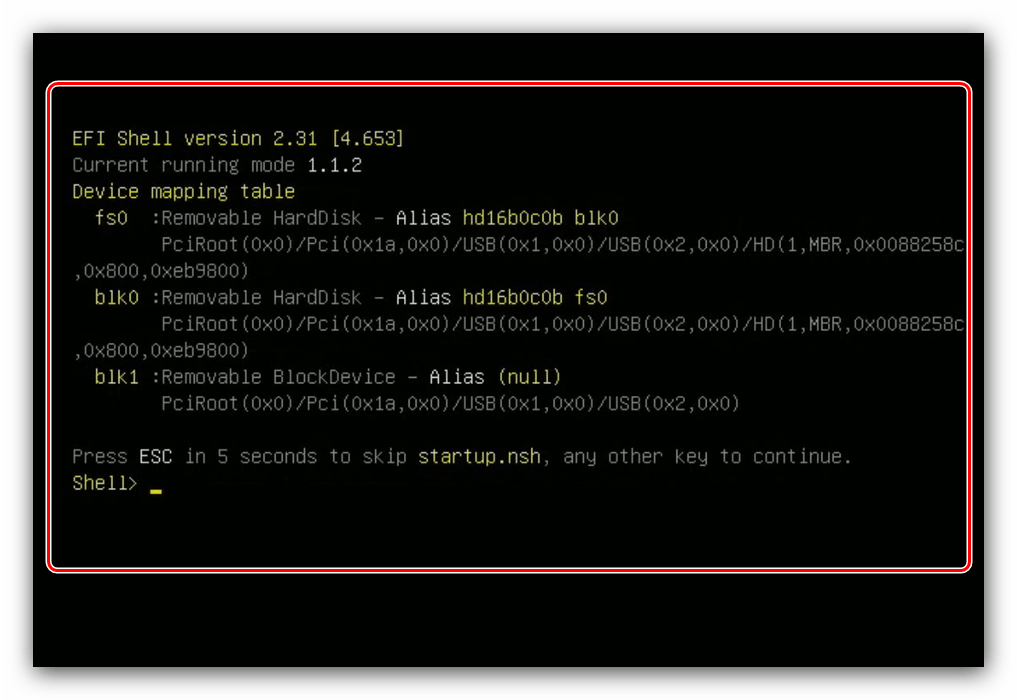
Для выбора корневого каталога введите следующие команды (не забывайте нажимать Enter после каждой):
fs0:
fs0: cd EFIBOOT
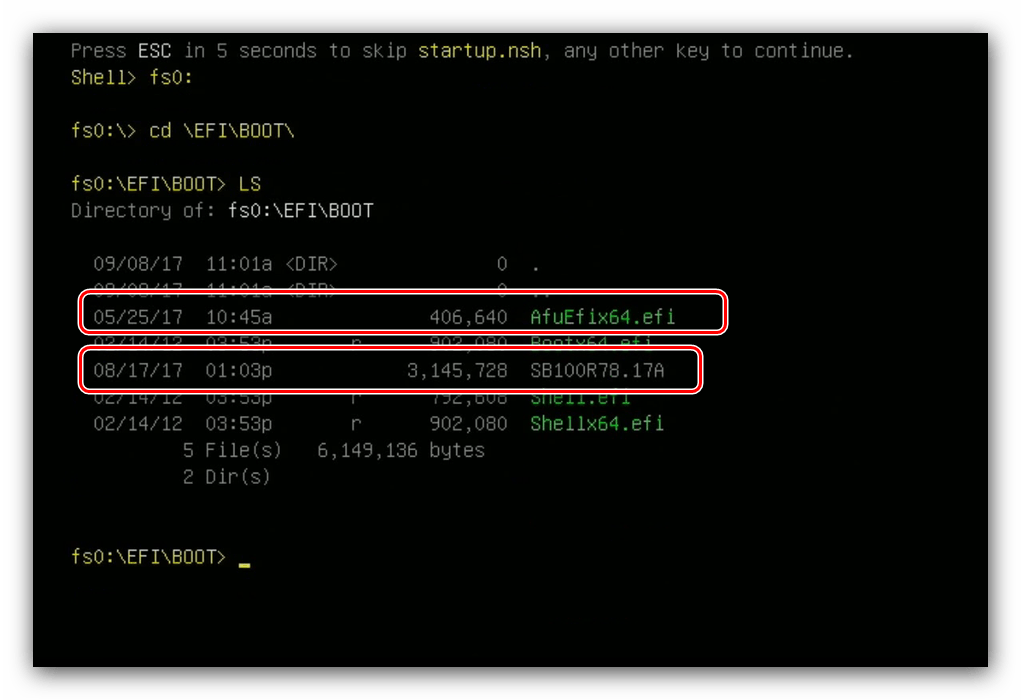
Далее введите команду ls для отображения списка файлов. Найдите в нём файл прошивки и утилиту-прошивальщик (для каждого варианта AMI BIOS названия будут разными!).
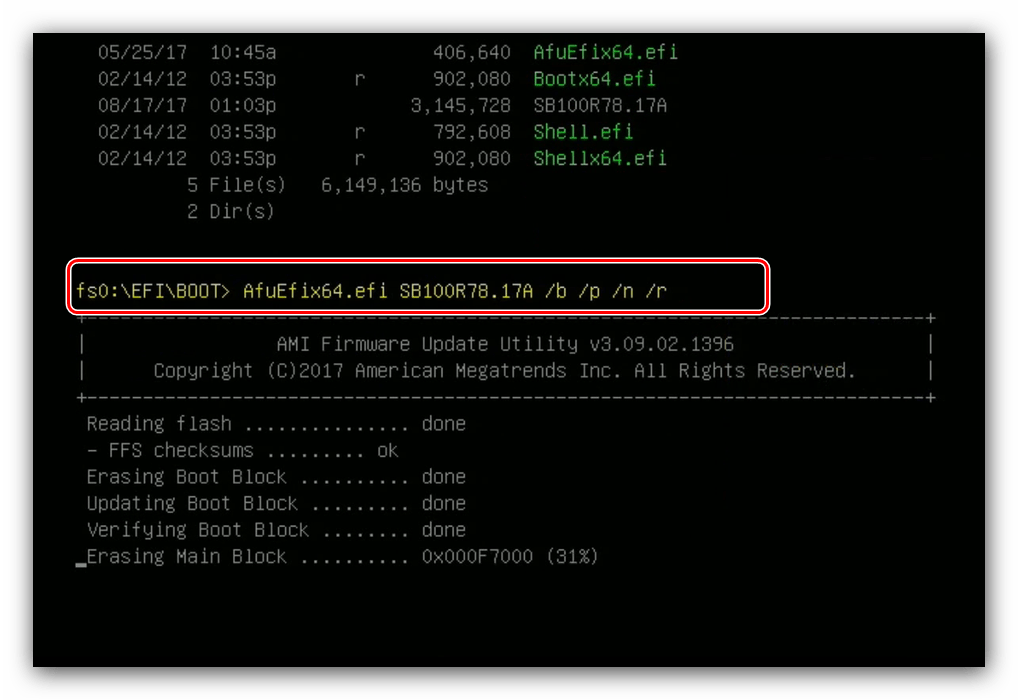
Далее введите команду следующего вида:
*имя утилиты-прошивальщика* *имя файла прошивки* /b /p /n /r

Заключение
Процедура обновления AMI BIOS имеет свои особенности, поскольку отличается для каждого из вендоровских вариантов.
American Megatrends
BIOS Update
The American Megatrends BIOS Update process is the second part in the series on the AMIBIOS.
I strongly advise reading through this how to article first, before attempting a BIOS update.
If you are still unsure, please DO NOT attempt to update. Contact your local computer repair shop, or call your computer makers support line for advice.
Part 1 introduces you to the AMIBIOS , the beep codes if there is a fault, and the BIOS Setup Utility.
There are 3 Steps in the AMIBIOS update process. Listed below is a link to each part.
Step 5 gives you the opportunity to share your expertise of BIOS updates. Is it a good idea or not? Do you know of a better way to update computer BIOS programs? Share your knowledge!
Step 6 enables you to jump directly to the thoughts and views of other visitors to this web page. Take a look. You may find out something new!
Products of Interest
Are you unable to view because of an enabled Ad Blocker in your browser? No problem! Just to let you know there are computer related adverts, or adverts personal to you, on my site, that you may find useful. If you wish to see them you can whitelist my site. Thank you for your time.
Table of Contents
- Introduction
- Motherboard Identification
- AMIBIOS ROM And Flash Utility
- American Megatrends BIOS Update Final Thoughts
- Share Your Knowledge
- Visitors Pages
Introduction
An American Megatrends BIOS Update is sometimes necessary because, like any other software, improvements are made to improve stability and performance.
You should really update your computer’s BIOS when a newer version is released.
This is easier to do these days (20+ years ago it was a nightmare!). AMI and other computer manufacturers provide free Flash BIOS Utilities which update your BIOS for you when you run the program (more on this later).
However, I think the AMI instructions are not very clear for typical home computer users. This tutorial aims to make the process as clear as possible for you.
There are a few things to do first before updating your computer’s BIOS.
Motherboard Identification
There are different AMIBIOS products on different computer systems. Most computer makers change the AMIBIOS code to suit their own computer models.
Modern computers now come with a new type of BIOS, called Unified Extensible Firmware Upgrade (UEFI). Click here for more details.
The image below is from the AMI web site, and shows you how to identify whether your home computer has a native AMI approved motherboard or not.
Where it says ‘BIOS from 1991-Present’, there is a reference to AMI and the motherboard type, if it is a AMI approved motherboard.
This reference looks something like: AMIS875-P, signifying an Series S875 AMI Motherboard (it actually says AMI123-P on the image above as an example).
If you computer does not have an AMI reference, refer to your computer providers web site for guidance. If you require more details on this step, go to the AMI BIOS (Opens New Window) web page.
If you don’t understand this step. Don’t worry! Download the AMIBID (Opens New Window) motherboard identification tool. Simply install and run on your computer.
If the AMIBID utility fails, go to the CPUID (Opens New Window) web page, download and install the CPU-Z tool. This is another motherboard identification utility.
From the example above, this computer has an AMIBIOS, but it is not an AMI motherboard . In this instance, the home computer user must visit the ASRack web site and search for the BIOS update for the ALive motherboard.
This is Very Important! You must always use the BIOS update made available by your motherboards manufacturer.
AMIBIOS ROM And Flash Utility
If you determine you have an AMI motherboard, download the AMI Firmware Update Tool (Opens New Window) .
Unzip the American Megatrends BIOS Update utility. Go to the AFUWIN folder (under the AMIBIOS parent folder), then either the 32-bit or 64-bit sub-folder. Left click AFUWIN.EXE.
Click OK if this disclaimer appears.
Click the Open Button to search for and select the ROM file you downloaded from your motherboard manufacturers web site.
Click SAVE to take a copy of your existing BIOS Settings. If anything goes wrong you have an option to restore!
Click the Flash Button. The Process tab will be displayed to show you the update BIOS process in action.
When the process is complete, exit the Flash Utility and Restart Your Computer (if it doesn’t restart for you).
Your BIOS is now updated to the latest version. Refer to the AMIBIOS Support web page if further support is required.
American Megatrends BIOS Update
Final Thoughts
The American Megatrends BIOS Update process is a little complicated. I hope the information provided on this web page is useful. Good luck with your BIOS update.
A very useful link is to the AMI FAQ (Opens New Window) . It explains common questions and issues very clearly.
Don’t forget to take a look at part 1 of this tutorial series, which introduces you to the BIOS concept, AMIBIOS beep error codes and the BIOS Setup Utility.
Top Trending Related Pages
Latest Tablet News
Find the latest Tablet news from around the world here
Support
Since 1985, AMI has been known for its class-leading support services for both Developer Partners and End Users of AMI’s BIOS, remote management, Android and data storage products.
End Users of AMI products seeking Technical Support are encouraged to use the Technical Support Contact form below. If possible, please include some details of the request / issue in the «Message» box.
For Developer Customers and Partners, AMI offers a mix of support options that are dependent on the terms of your specific sales agreement. Please contact your AMI Sales Representative at 1-800-828-9264 to review your sales agreement. You may also fill out the form below or call our main Technical Support hotline at (770) 246-8645 during our normal business hours — from 9 AM to 6 PM Eastern Time, Monday through Friday.

5555 Oakbrook Parkway
Building 200
Norcross, Ga 30093-2286
Sales: (800) 828-9264
Main: (770) 246-8600
Fax: (770) 246-8790
Support: (770) 246-8645
AMI Sales Terms and Conditions
Limited Hardware Warranty
This Limited Warranty is extended by AMI only to the original purchaser of the accompanying AMI microcomputer hardware product (the «Product») and is not assignable to any other person.
AMI offers a thirty (30) day warranty on all hardware products, excluding battery packs and keyboard controllers unless otherwise documented in a legal contract with the customer or warranty card accompanying the product. AMI warrants that the Product will be free from defects in materials and workmanship, under normal use and service and will perform substantially in accordance with the description of the Product in the AMI User’s Guide for this product. Warranty will be void if serial number labels on the AMI hardware are tampered with.
ALL WARRANTIES ARE SUBJECT TO THE TERMS AND CONDITIONS ON THE AMI WARRANTY REGISTRATION CARD.
You are solely responsible for any failure of the Product which results from accident, abuse, misapplication or alteration of the Product and AMI assumes no liability as a consequence of such events under the terms of this Limited Warranty. While AMI has made every effort to provide clear and accurate technical information about the application of the Product, AMI assumes no liability for any events arising out of the use of this technical information.
The sole and exclusive remedy for failure of the Product to conform to this Limited Warranty shall be for AMI, at its option, to repair or replace the Product, to whatever extent deems necessary to restore the Product to proper operating condition. AMI may make replacements hereunder with new or functionally equivalent products of equal value.
To obtain warranty service, you must first call AMI technical support at 770-246-8645. If tech support cannot resolve the problem you are encountering, you will be directed to submit a return materials authorization form. You must complete the form in its entirety. This form can be found on our website: ami.com under RMA Procedures or the form can be faxed to you. Upon receipt of the RMA request form, an RMA number will be processed and issued to you. Please allow at least 24 hours for a response. An RMA number will be communicated to you via email or phone call with notification of the status of your board, i.e. warranty or non-warranty.
Remember, non-warranty boards will incur a minimum charge of $100.00 plus parts and shipping. Please retain a copy of your notification for your files and future references. Upon receipt of the RMA number, return the Product, together with (a) the return authorization number, (b) proof and date of purchase, (C) a description of the problem with the Product and (d) your name and mailing address, postage prepaid to: AMI, 5555 Oakbrook Parkway, Building 200, Norcross, GA 30093. Mark the outside of your box with the RMA number. Failure to do so will delay receiving and processing your Product.
AMI requires that the Product be packed in an anti-static material and packaged adequately for shipping and be insured when shipped. AMI shall not be responsible for damage to the Product in transit. The product will be returned to you by method and carrier chosen by AMI to any destination within the United States of America. If you desire some other specific form of conveyance or shipment beyond the USA border or if the product is out of warranty, you must bear the cost of return shipment.
Please note that if you return the Product without proof of purchase or after expiration of the applicable period of coverage for this Limited Warranty, AMI will, at its option, repair or replace the Product and charge you the then effective AMI recommended Retail Price for the repair or replacement of the Product. Any such repair or replacement of out of warranty products is contingent upon the commercial availability of the required components. If AMI has discontinued the manufacture or redistribution of such Product because of technical obsolescence the product shall be held for no longer than thirty (30) days awaiting your instructions.
If Product is out of warranty, you will be contacted for billing information. Charges are based on a $100.00 minimum fee, plus parts and shipping. Should the repair costs exceed $200.00, you will be notified for prior approval before repairs are complete. Average cost of repair is $150.00. For non-warranty or out-of-warranty repairs, AMI will accept: company purchase orders, credit cards (American Express, VISA, MasterCard, & Discover) and cashier’s checks.
Please allow at least ten (10) days before inquiring about the status of your product. Upon receipt, please inspect and test your products. There is a thirty (30) day warranty on all repairs.
Software Limited Warranty
AMI grants a limited warranty only to the original licensee that the SOFTWARE will perform substantially in accordance with the accompanying written documentation prepared by AMI for a period of 30 days from the date of receipt by the original licensee unless otherwise documented in a superseding legal contract with the customer or warranty card accompanying the product.
AMI’s entire liability and the original licensee’s exclusive remedy for breach of the limited warranty above shall be at AMI’s option, either: (a) return of the price paid by the licensee solely for the SOFTWARE, or (b) repair or replacement of the SOFTWARE, which does not meet AMI’s limited warranty and which is returned to AMI and determined by AMI not to be in compliance. The limited warranty is void if failure of the SOFTWARE has resulted from accident, abuse, negligence, misapplication, or failure to use the SOFTWARE in accordance with the AMI DOCUMENTATION. Any replacement SOFTWARE WILL BE WARRANTED TO THE ORIGINAL LICENSEE FOR THE REMAINDER OF THE ORIGINAL WARRANTY PERIOD, OR 30 DAYS, WHICHEVER IS LONGER. This limited warranty gives you specific legal rights. You may have others which vary from state to state. Some states allow limitations of duration of an implied warranty, so the above limitations may not apply to you.
In no event shall AMI or its suppliers be liable for any special, indirect, consequential, exemplary, or incidental damages whatsoever, Including, without limitation, damage for loss of business profits, business interruption, loss of business information, loss of goodwill, or other pecuniary loss) whether based in contract, tort, negligence, strict liability, or otherwise, arising out of the use or inability to use the SOFTWARE, even if AMI has been advised of the possibility of such damages. Because some states do not allow the exclusion or limitation of liability for consequential and incidental damages, the above limitations may not apply to you. OTHER THAN AS SPECIFIED IN THIS LIMITED WARRANTY ABOVE, THERE ARE NO WARRANTIES, EXPRESSED OR IMPLIED, WHETHER OF MERCHANTABILITY, FITNESS FOR A PARTICULAR PURPOSE, OR OTHERWISE.
Since 1985, AMI has designed, created and manufactured key hardware and software solutions for the global computer marketplace, providing the highest quality and compatibility necessary to build today’s advanced computing systems.
Blog Posts


Twitter Feed
- Jun 16, 2020
AMI opens new East Asia Regional Headquarters Office in Hong Kong: - May 29, 2020
AMI announces the new AMI DevNet Firmware Source Code Development and Distribution Environment for AMI OEM and ODM custo.
Copyright © 2020 AMI, All Rights Reserved. Contents of this website are subject to change without notice. Products mentioned herein may be trademarks or registered trademarks of their respective companies. No warranties are made, either expressed or implied, with regard to the contents within, its merchantability or fitness for a particular use.
Фирма american megatrends inc обновить биос
1. C помощью загрузочной дискеты и прошивки (*.awd, *.bin, *.001, etc) с прошивальщиком (Award, Uniflash, AMIFlash) из под DOS. Образ загрузочной дискеты можно взять здесь, либо по ссылке в теме — Определение материнской платы , либо изготовить самостоятельно штатными средствами Windows.
2. Использовать специализированную программу от производителя материнской платы (ASUS LiveUpdate & etc).
Другие прошивальщики Подробнее.
Сохранение текущей версии BIOS — BIOS Backup TooKit
Утилиты для работы с биосами различных производителей.
|
|

|
|
||||||

|
|
|||||
|
|
|


