Как начать смотреть IPTV на VLC за пять шагов?
Пять простых шагов
Шаг 1: узнаём всё о VLC и его возможностях
Шаг 2: скачиваем VLC плеер
Шаг 3: устанавливаем программу VLC на компьютер.
Шаг 4: производим настройку плеера.
Шаг 5: смотрим IPTV на VLC
Шаг 1: узнаём всё о VLC и его возможностях
VLC медиа плеер определенно не нуждается в представлении. Он имеет прочную пользовательскую базу по всему земному шару. Однако, очень немногие знают, что VLC поддерживает практически любой формат видео, в том числе телерадиотрансляции. Его можно адаптировать под свои индивидуальные задачи, добавив уже готовый фрагмент кода в папку с программой. Выполнить Апгрейд Media Player может любой заинтересованный пользователь.
VLC является очень удобным мультимедийным комбайном с встроенным фреймвоком. Он очень многофункционален:
-Воспроизводит все виды медиа файлов, в том числе с оптических дисков;
-Поддерживает внешние устройства, например, веб-камеры;
-Для него не составляет проблем проиграть МКV или другой редкий кодек. Ведь плеер постоянно обновляется и может всё;
-Совместим с любой OS от Windоws 98 до Windоws 10-64 bit, работает на Mаc или Linuх, подходит для мобильных
платформ iОS, Andrоid;
-Доступен каждому абсолютно бесплатно – в нём нет вшитой рекламы, слежки за пользователями и шпионского софта.
Хотя VLC является всего лишь плеером, его возможности гораздо шире. Он может записывать фильм или потоковое видео и, даже выступать в роли серверной программы, которая ведёт вещание по локальной сети.
Шаг 2: скачиваем VLC плеер
Если вы затрудняетесь с инсталляцией новых приложений, то просто нажимайте на эту ссылку, перейдите на сайт программы и скачайте её. Откройте. Запустится автоматическая установка, а вы можете переходить к Шагу 3.

На главной странице нет ничего лишнего, жмите большую кнопку «Скачать» с выпадающим списком операционных систем сразу видно. Кликаем по флажку справа внизу.
В открывшемся списке выбираем нужную OS. Например, если вы зашли с iPhone или iPad, то выбирайте iOS, а я выберу Windows 32 bit версию, так как у меня на компьютере установлена 32 разрядная Windows 7 (семёрка)
Шаг 3: устанавливаем программу VLC на компьютер
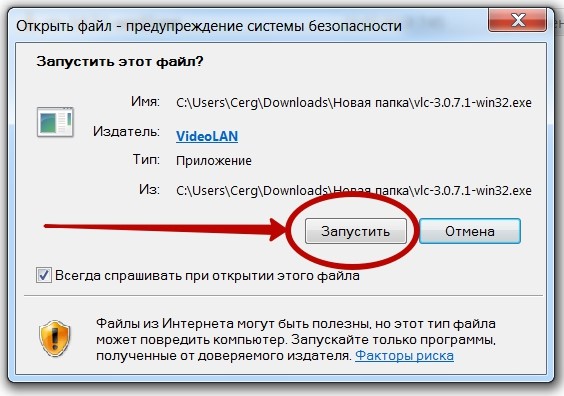
Находим в загрузках инсталляционный файл vlc-3.0.7.1-win32.exe и дважды кликаем по нему.
Если у вас активен файервол, то придётся дать разрешение на запуск нового приложения
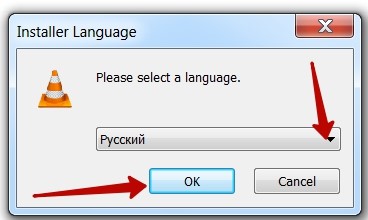
Обращаем внимание на язык устанавливаемой программы. По умолчанию, у меня выставлен «русский», но вы можете поменять его на любой другой в окошке с выпадающим списком языков. Если, всё нас устраивает, то жмём на «OK»
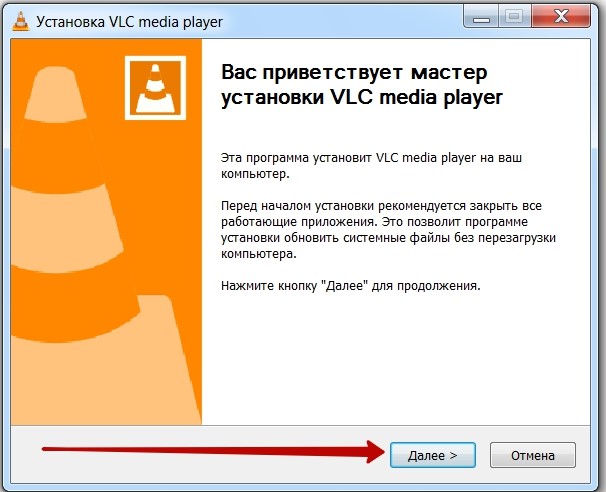
Запускается стандартная процедура установки, где вам придётся несколько раз нажать на кнопку «Далее». Чтобы на слабых системах процесс инсталляции проходил успешнее, благоразумнее закрыть все запущенные приложения.
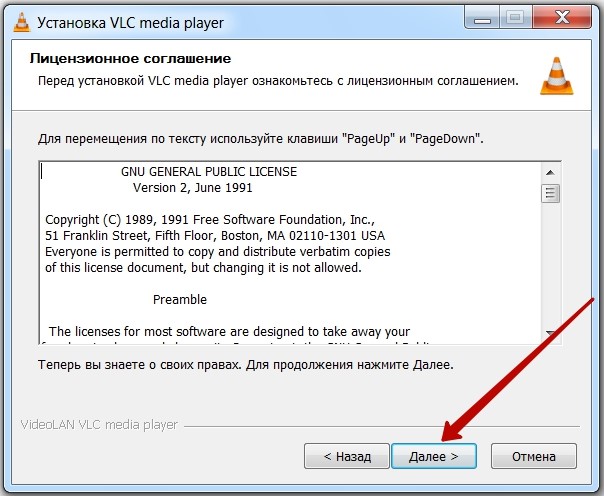
Снова кликаем по кнопке «Далее». Я даже не читаю лицензионное соглашение – оно всё равно на английском и содержит стандартный перечень пунктов. Но, при желании, можете скопировать его и перевести при помощи онлайн-переводчика.
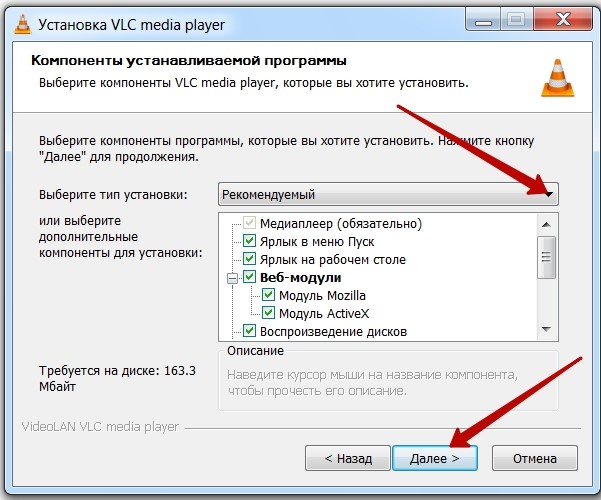
Если вы не обладаете большим опытом и не знаете, какие функции медиа плеера вам понадобятся в будущем, то на этом этапе лучше ничего не трогать и оставить стандартную конфигурацию, включив режим «рекомендуемый». В очередной раз нажимаем «Далее»
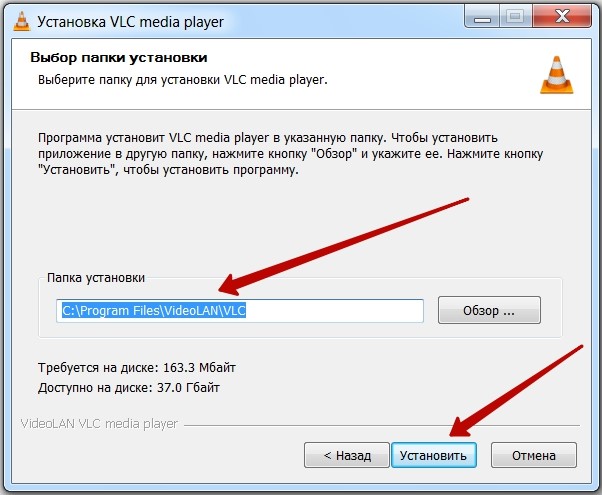
В последнем окошке предлагается выбрать место на нашем компьютере, куда будет произведена установка. Файлы с программой займут 163 Мбайт – это небольшой объём данных. Я оставляю предлагаемый путь без изменений (по умолчанию, это системный диск «С»), и просто кликаю по кнопке «Установить»
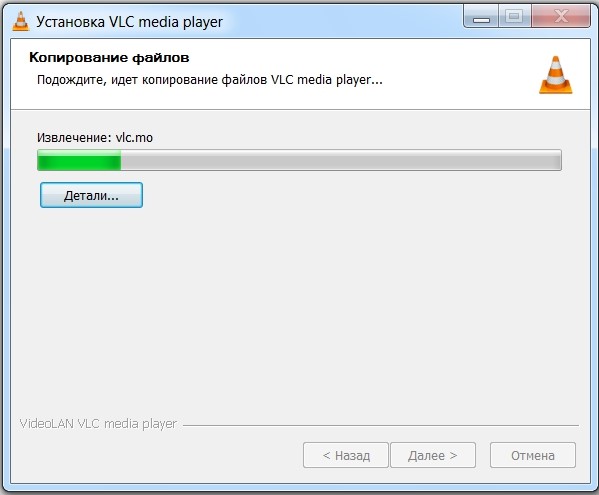
Запускается быстротекущий процесс, где придётся подождать несколько минут или секунд. Всё зависит от мощности вашей системы.
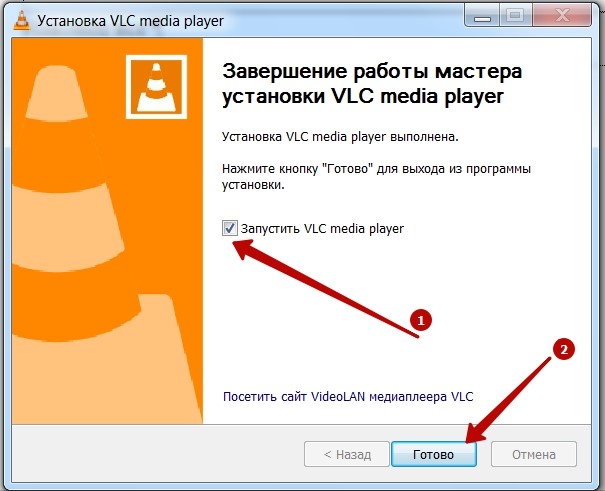
Наконец все этапы установки пройдены, и вы можете пользоваться плеером. Если вы желаете сразу перейти к настройке, то проследите, чтобы стояла галочка в поле «Запустить VLC media player» и жмите «Готово»
Шаг 4: производим настройку плеера
Русский интерфейс программы позволяет быстро разобраться, что здесь к чему. Разработчики постарались и сделали очень простое и понятное меню с большим количеством удобных настроек. Можете смело производить любые изменения и конфигурировать медиа плеер под себя.
Чтобы воспользоваться потоковым видео, которое может дать доступ к сотням различных телеканалов, необходимо заранее выбрать в интернете хорошего провайдера IPTV. Серьёзные вещатели всегда дают возможность протестировать свой сервис. Вот, например, подходящий сайт http://iptv.online
На нём нужно зарегистрироваться, взять тестовый период, который предоставляется на сутки и наслаждаться просмотром, а выполнить это можно двумя способами.
Первый способ
На сервере поставщика http://iptv.online, после регистрации станет доступно расширенное меню. В нём находим пункт «Плей листы» и нажимаем на интересующий. Для примера, я выбрал самый верхний – «m3u8». После клика по нему, он скачивается в папку «Загрузки».
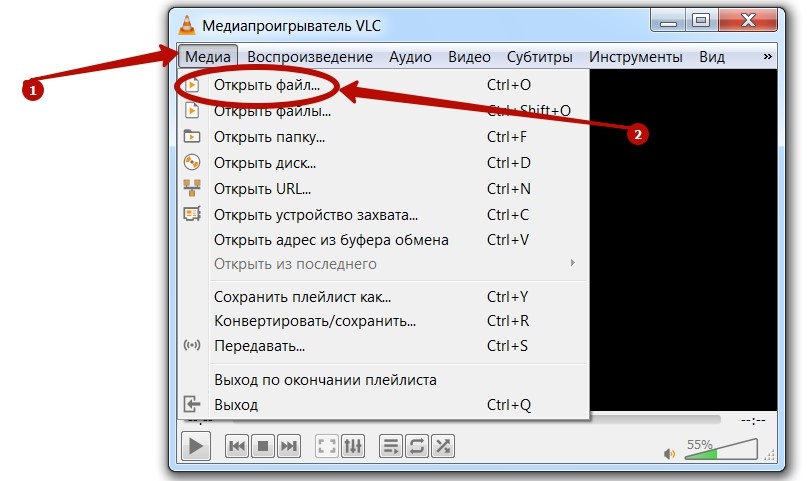
Теперь в плеере VLC можно начинать непосредственный просмотр. Идём во вкладку «Медиа» и там находим самый верхний пункт «Открыть файл».
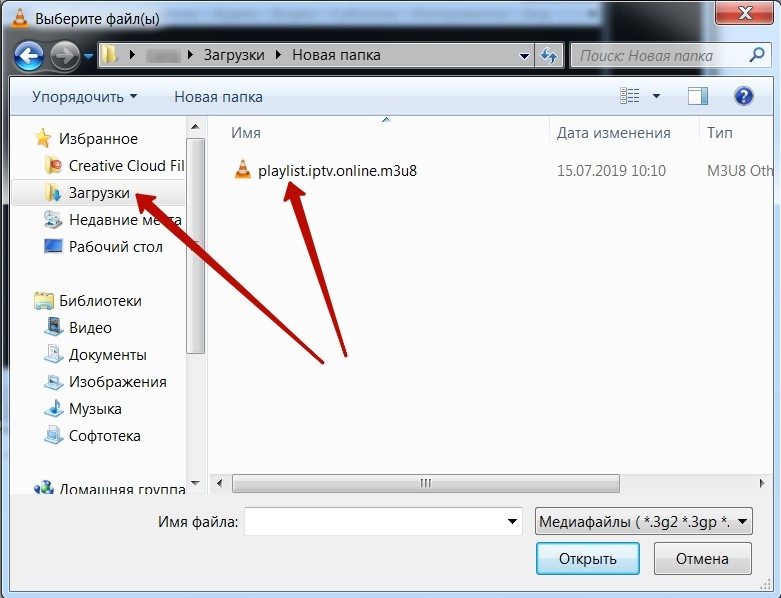
В распахнувшемся окошке проводника находим место, куда мы сохранили плейлист. В моём случае, это папка «Загрузки» с файлом «playlist.iptv.online.m3u8». Я кликаю по нему два раза или нажимаю кнопку «Открыть» внизу.
Всего, через несколько секунд вы можете наслаждаться пятью сотнями телевизионных каналов в превосходном качестве.
Второй способ
Если вы ничего не желаете скачивать, то можете на сайте того же провайдера IPTV скопировать адрес выбранного плейлиста.
Затем, во вкладке «Медиа» нужно выбрать пункт «Открыть URL…».
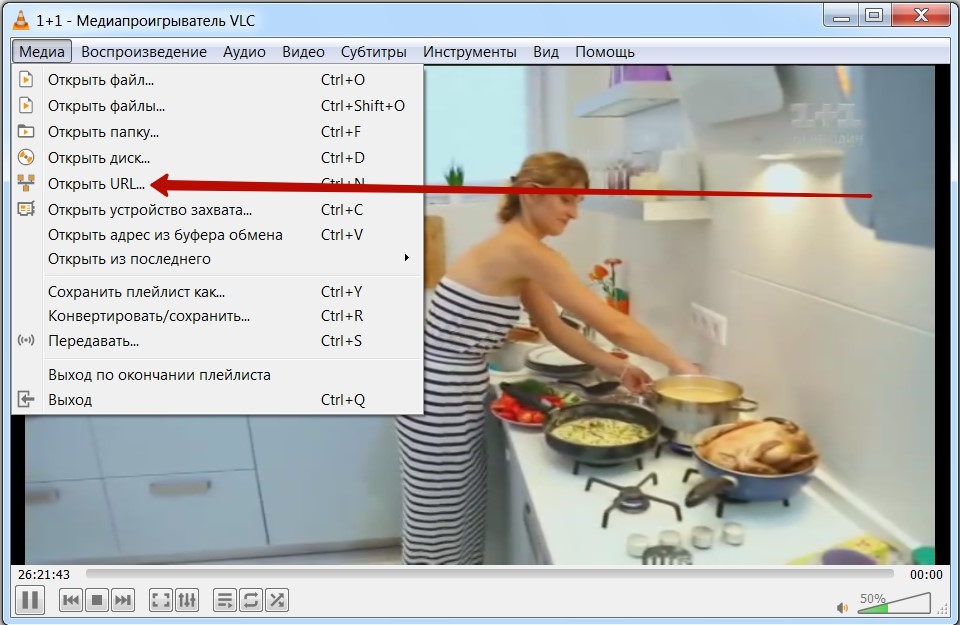
Заполнить поле с сетевым адресом, вставив туда URL скопированного плейлиста. Нажимаем на кнопку воспроизвести, и получаем тот же первоклассный сервис.
Станко Методиев
размисли и страсти на един WordPress програмист

VLC player субтитри на кирилица
Винаги когато съм инсталирал VLC player, субтитрите по подразбиране не се показват правилно.
VLC player субтитри на кирилица и решението на проблема:
Tools ==> Preferences ==> Subtitles & OSD ==> Default Encoding ==> Cyrillic ( Windows-1251 )
Надявам се това да спести време на някой, търсейки из опциите на player-а.
Сходни публикации:
- Кирилизация на Gedit – Ubuntu 10.04
- от латиница към кирилица в php
- CakePHP cake: line 30: exec: php: not found
99 thoughts on “ VLC player субтитри на кирилица ”
- ivoApril 12, 2012 at 18:08
Супер пич . Спести ми времето !! Благодаря .
- TediDecember 9, 2013 at 00:48
Много благодаря за инструкциите! Много се радвам, че попаднах на тях. Получи се!
- metodiew Post author December 9, 2013 at 09:56
Супер, радвам се! Също така се радвам, че след промените по блога, статията все още е достъпна
Благодарности за знаещите
Много благодаря! Голяма помощ.
За VLC работи, супер спести ми време да търся как става!
Радвам се, че ти е помогнало
Точно това ми трябваше.Благодаря!
- metodiew Post author July 20, 2012 at 11:28
Супер, радвам се!
Евала човече! Благодаря
- metodiew Post author August 11, 2013 at 23:14
Радвам се че е помогнало
Тъкмо това ми трябваше Радвам се, че има такива хора като теб, които се сещат за такива малки (но доста полезни) неща и са готови да ги споделят с другите. Благодаря ти много! Спести ми доста врем
Винаги така съм си оправял титрите, сега имам друг проблем. Субтитрите излизат като въпросителни знаци. От енкодинга не могат да се оправят. Някой да има идеи ?
И аз имах подобен проблем на скоро и според мен беше от Encoding-а на самите субтитри, та просто използвах други.
- BoyanovApril 4, 2014 at 16:24
От пет часа чета по форумите и не намирам начин. Използвах 10 различни субтитри. Принципно съм с Линукс, но това не би трябвало да оказва влияние.
- Stanko Metodiev Post author April 4, 2014 at 16:26
Аз също съм под линукс и имах подобен на твоят проблем. Не съм си играл с решаване, просто потърси субтитрите от друго място и сработиха. Съжалявам за проблемът ти :/
Благодаря!
много полезно-икономисва време
Много много много благодаря.
ot kade se tegli vlc pleara ?
- Stanko Metodiev Post author February 19, 2015 at 09:52
Ако субтитрите са под формата на въпросителни, сменете шрифта в настройките на субтитрите. Пробвайте с Times New Roman или Arial.
Не е от там. При моята версия от друго място се прави на български език субтитрите не от това поле, а от горното. Инструменти-Настройки-Субтитри/Екранно меню- и тук нещо се слагаше в полето Български (BG) ама не съм сигурен точно как беше…
Много много благодаря.
Sorry ama NE raboti !! Probvah s kvi li ne fonts – HebarU, TimesNewRoman, probvah vsekvy UTF-8 i UTF-16 i cyrillic i Russian i Ukrainian encoding, no NE stava, vijdam samo . ?? . . . Kakvo da napravia, PLEASE HELP .
- Stanko Metodiev Post author October 2, 2015 at 00:42
Според мен не правиш нещо както трябва и/или изпускаш някоя от стъпките. Този метод е сработвал винаги след преинсталация на VLC player-а, а както можеш да видиш, работи и при доста други хора. Пробвай отново и пиши ако имаш проблем
Благодаря много и при мен отначало не стана,защото го направих неправилно ,но след като прочетох всички коментари и отново пробвах открих грешката си и стана.
Е моя проблем е Голям проблем. Не ми излизат субтитрите няма ги и “информация за кодека” се вивдат (там са а на екрана ги няма) с VLC 1.0.5
с новата версия на плеъра излизат, но на мен ми трябва старата. Помогнете.
- Stanko Metodiev Post author December 17, 2015 at 18:50
Не знам какъв точно е проблемът, но изглежда че това което е описано помага на всички останали, така че не съм сигурен как точно мога да помогна в момента
mers i ot men, samo restart na vlc trqbva sled tova:)
Благодаря! Стана бързо и лесно!
Ееееей откога се мъча братче!! Жив и здрав!!
аз съм на мак и на vlc изобщо не зарежда файла. Показва го активен, но като кликна да го зареда все едно нищо. Не мога да намеря други субтитри. Направила съм и енкодинга на 1251, вече се чудя какво да правя…
- Stanko Metodiev Post author February 25, 2016 at 13:20
Нямам представа как работи под Mac, така че няма как да помогна. Провери дали субтитрите са със същото име като името на файла или пробвай да ги “завлачиш” в VLC, след като пуснеш видето
браво пич мерси много, бачка на 100%.
Благодаря , на мен ми помогна.
Г-н Методиев, благодаря Ви за спестеното време! Стана веднага според инструкциите Ви.
Благодарско! Спести ми много нерви
Има добри и услужливи хора по света! Благодаря !
А за mac как става?
Под Андроид няма такава опция, а ги бях оправял с пробната версия…?
- Ангел ГрозевFebruary 15, 2017 at 12:51
За да се показват субтитрите под андроид процедурата е почти същата както описано в началото на темата.Целта е кодировката на субтитрите да е windows-1251-cyrillic в противен случай ако ползвате плеър различен от BS Player ще ви излизат само йероглифи.Най-бързото решение е просто да се инсталира BS Player, които автоматично напасва кодировката според езика на субтитрите.Ако поради някаква причина държите да ползвате друг плеър, то процедурата е малко по-сложна.Инсталирате Easy Subtitles, отваряте желаните субтитри с него давате на Set Encoding и от долният ляв ъгъл избирате кодировка windows-1251-Windows Cyrillic => Save и готово, субтитрите вече са със правилната кодировка.Успех.
Много голямо благодаря за теб
Благодаря ти приятелю!
бях пред нервна криза! с твоята помощ и коментар ще пусна филм и ще зарадвам жената!
- ЖивкоAugust 17, 2017 at 13:36
Много ми помогна.Благодаря за което.
Страхотен си благодаря ти много .
Благодаря за информацията. Да почерпиш опита на миналия по пътя – безценно! Весела Коледа и Честита Нова 2018 г.!
Благодаря, въпросът е решен!
Много благодаря.
Кратко, ясно и точно в целта! Получи се идеално
А иначе се бях засилил да търся фонтове на кирилица за да ги инсталирам, да пренастройвам Windows-a…
Още веднъж Благодаря!
Google bot ако четеш това може ли да го изкараш на първо място в SERP-а.
VLC player субтитри на кирилица
bulgarian cyrillic subtitles ubuntu
How to use VLC Media Player; A Beginner’s Guide
VLC media player is a free media player capable of playing most video and audio files. Here we will be teaching you the basics of VLC that Beginner’s should know. Covering the most useful VLC features and capabilities that anyone can find useful. The uses that the software has make it optimal for being your default media player.
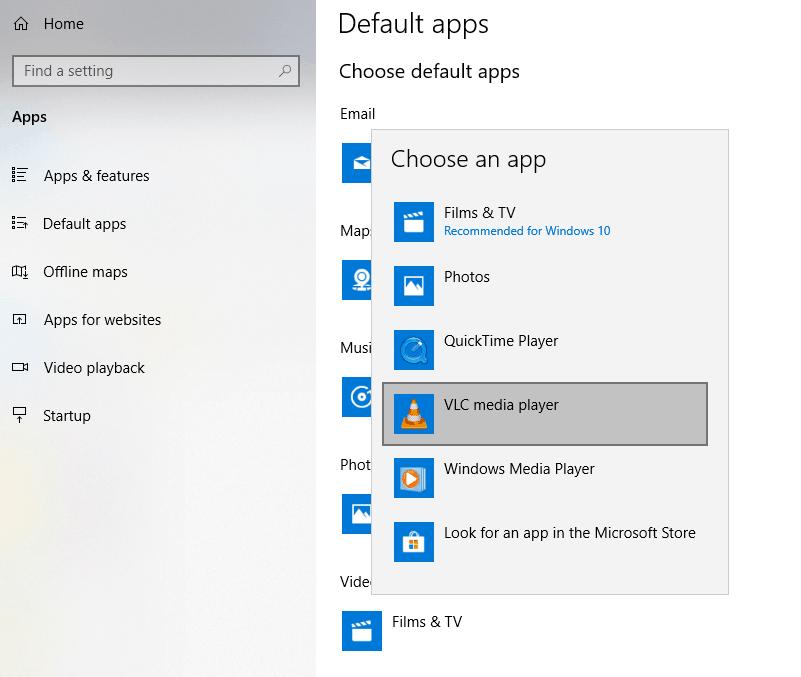
How to Change your Default Media Player in Windows 10
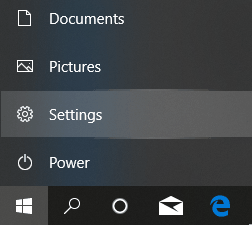
1. Open the Windows option by clicking the windows button on your taskbar. You can also open it using the Windows key on your keyboard.
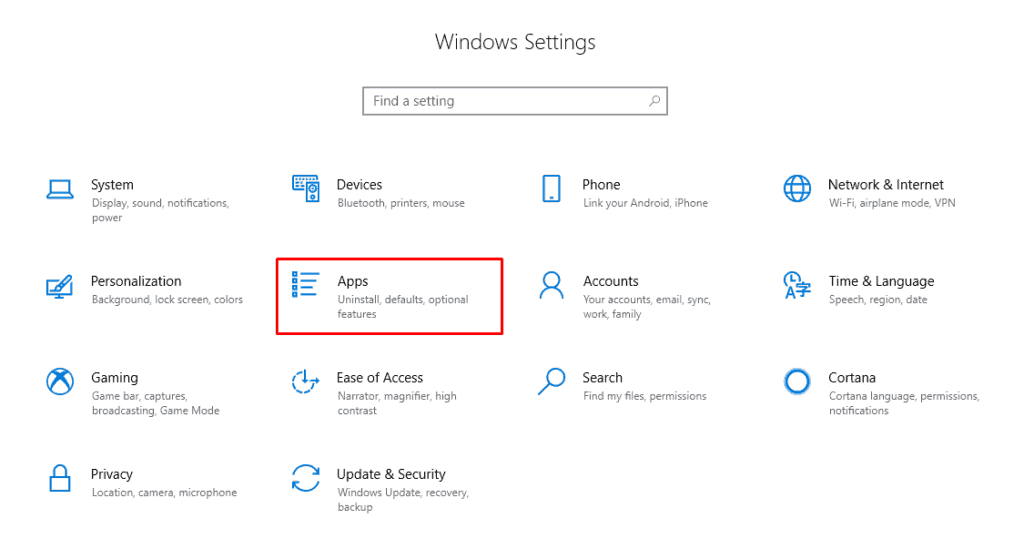
2. Select Settings and a new window will appear.
3. Choose the Apps category.
4. Navigate to Default Apps on the side panel.
5. Click on the Video player app and you will be presented with alternative options.
6. Select the program to set it as your default media player.
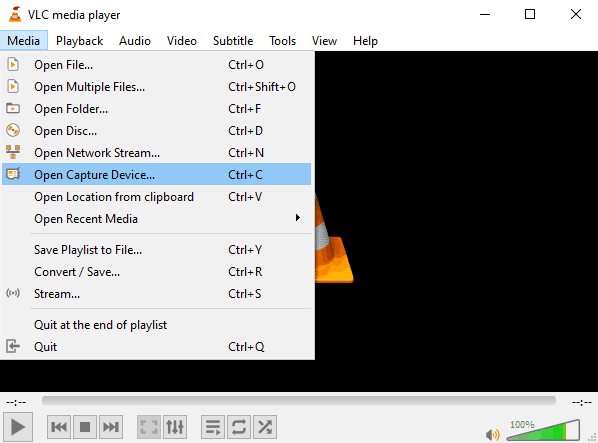
How to Record with VLC
An often overlooked feature of VLC media player is its ability to record. Making it a great alternative for screen capture. Fortunately activating the screen recording is pretty easy.
1. Click on the Media tab and choose Open Capture Device.
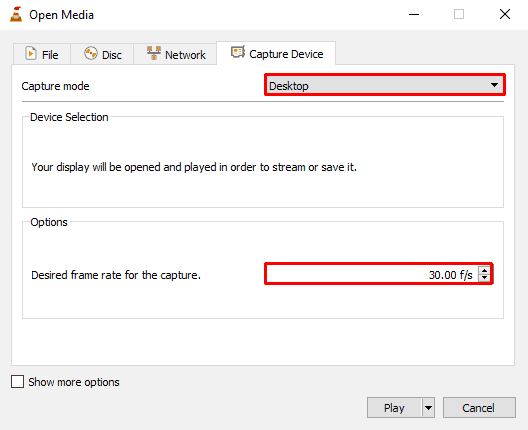
2. Change the capture mode to Desktop and set the framerate you want the video to be recorded in. A framerate of 20-30 should be fine for recording your desktop.
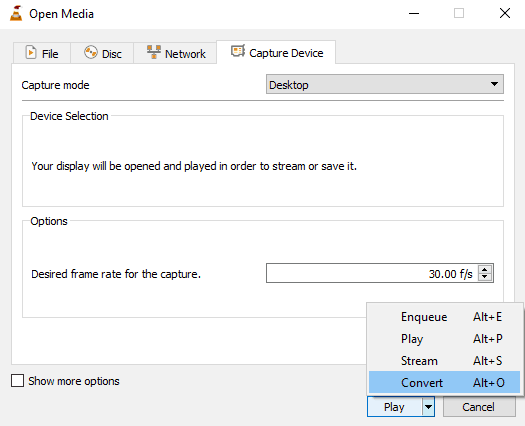
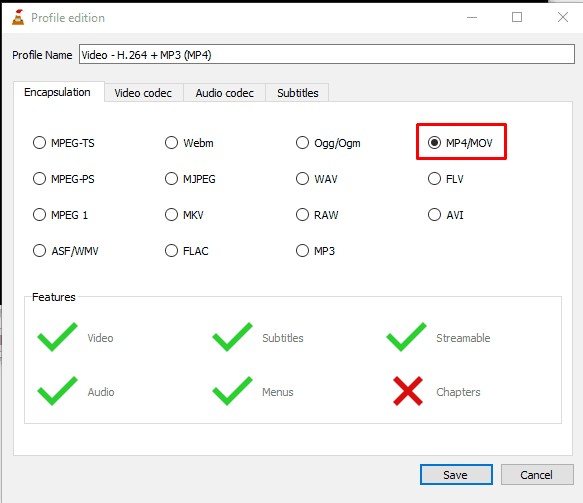
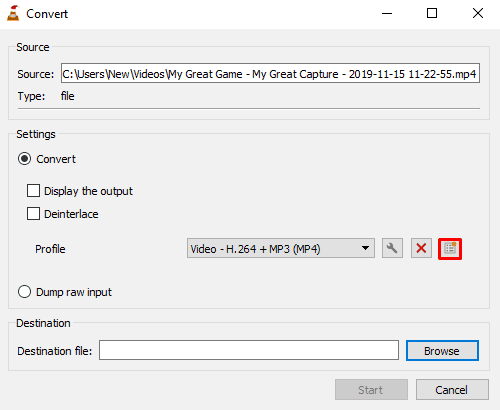
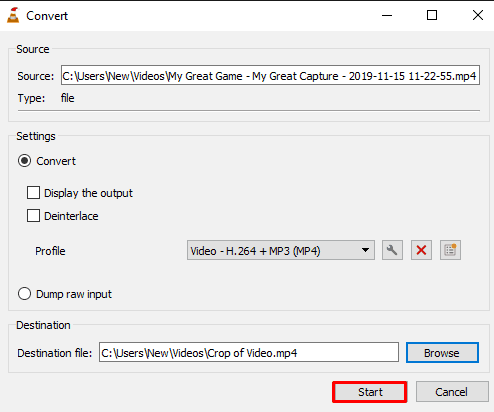
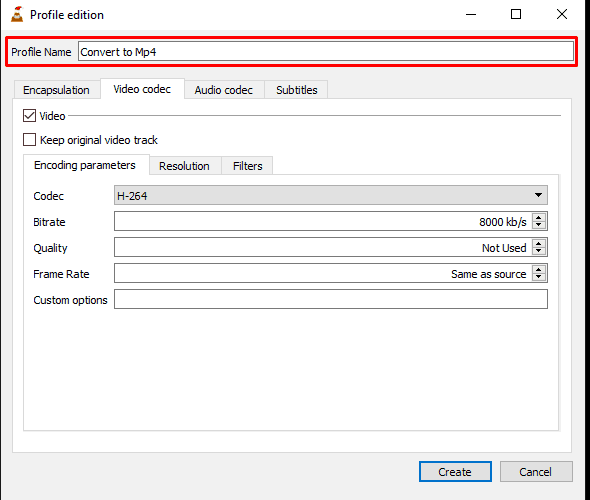
3. Select the dropdown menu from next to the Play button at the bottom and choose Convert.
4. Choose the profile settings via the tool icon.
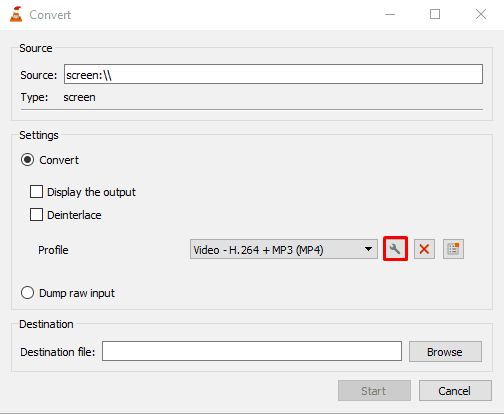
5. Select MP4/MOV as your file type.
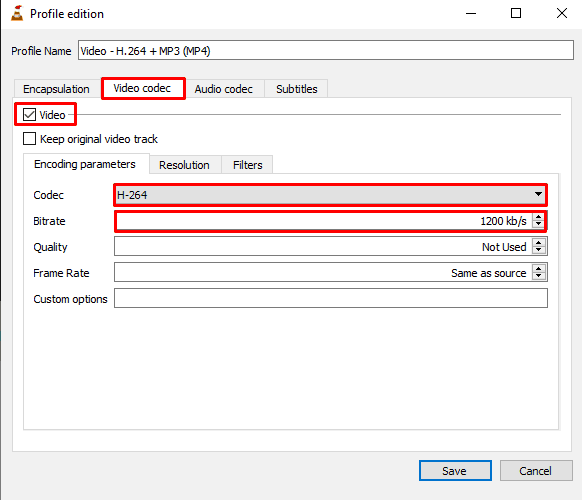
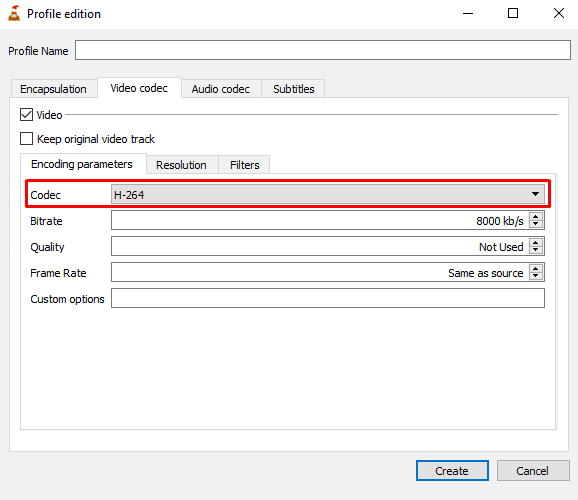
6. Switch to the Video codec tab and check the video option. Then change the Codec to H-264 and the bitrate to at least 800. The higher the bitrate the better the video quality will be.
7. Press save, you may need to give your profile a name first.
8. Now choose your file destination by pressing “Browse”.
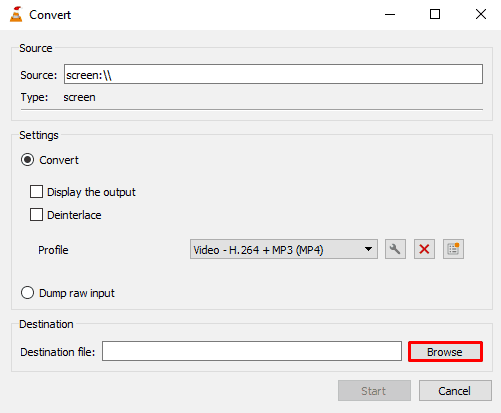
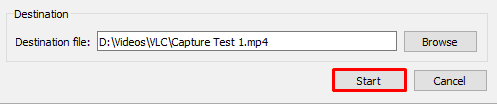
9. A file explorer window will open, navigate to the folder you want the recording to be saved to and give it a name. Press save to confirm.
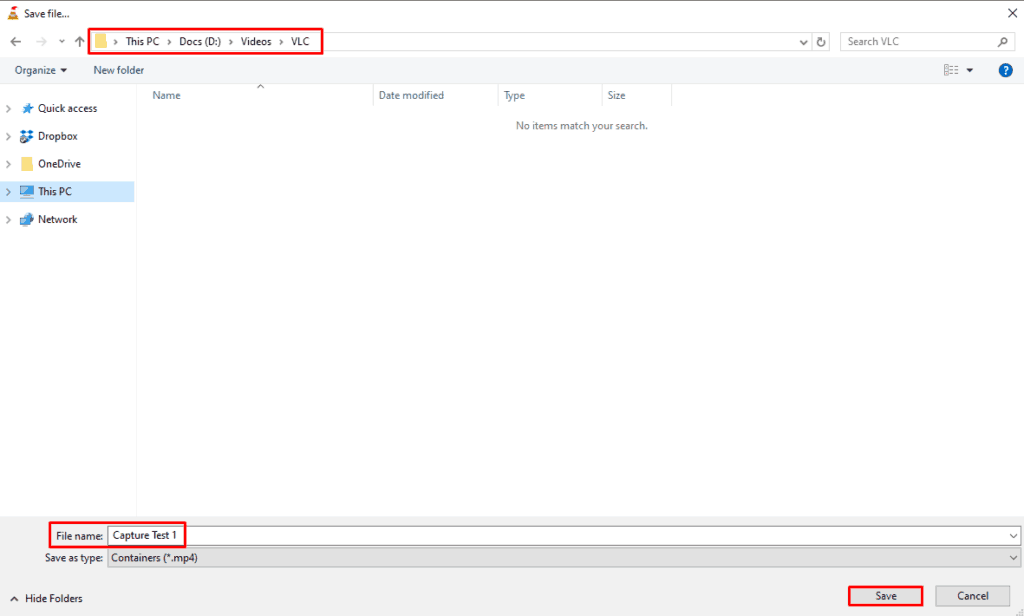
10. Now when you press start the video will begin recording.
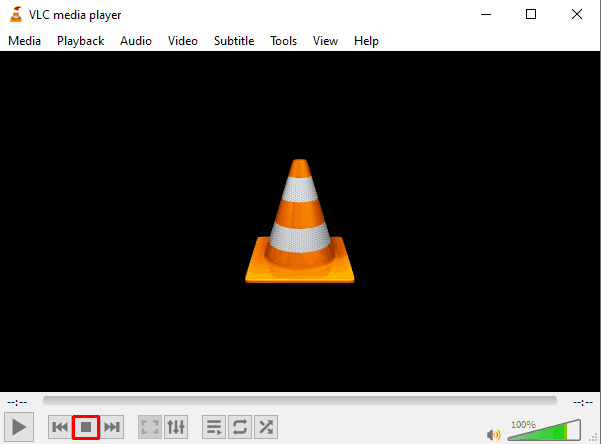
11. To end your screen capture simply open VLC and press the stop button.
How to Crop a video using VLC Media Player
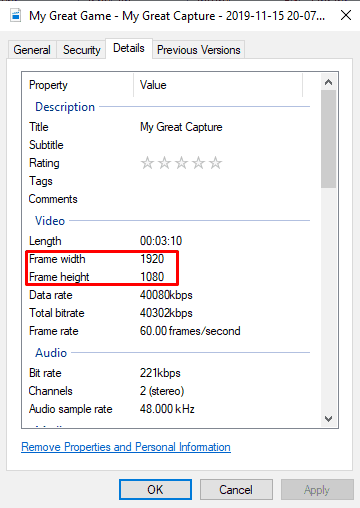
Cropping a video allows you to cut out segments of a video. You can use VLC to crop a video from the top, bottom, left and right. Before cropping your video you will need to have an idea of how much you’re trying to remove. You can find the resolution of your video file by right clicking on it and selecting properties and details. Under the details you will see the width and height in pixels.
1. Check the video file you want to crop, right click and select properties and details to see the resolution. This will be needed for working out how much of the video you want to crop..
2. Open VLC media player and select the Tools option from the top menu then preferences.
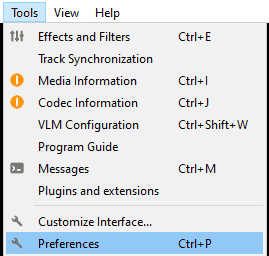
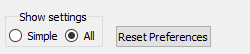
3. A new window will open. At the bottom select the All option.
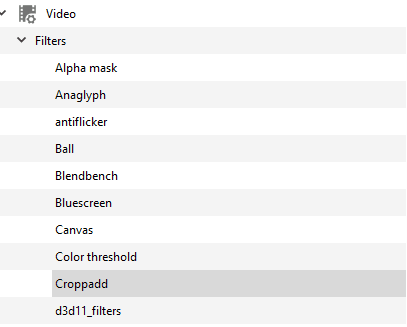
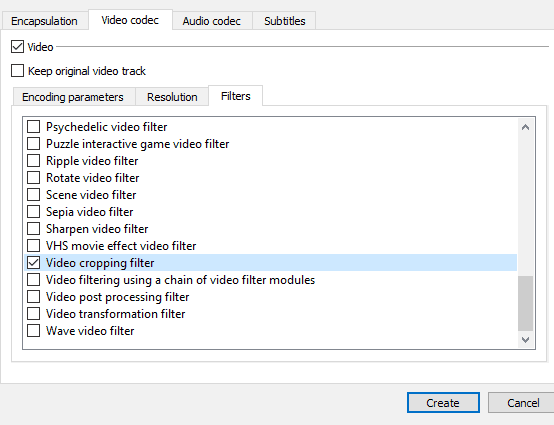
4. In the Video section open the Filters subfolder then Croppadd.
5. Choose how many pixels you want to crop from each side. Most videos have an aspect ratio of 16:9. If you want to keep this the same then for every 16 pixels you crop from the sides you will need to crop 9 from the top/bottom.

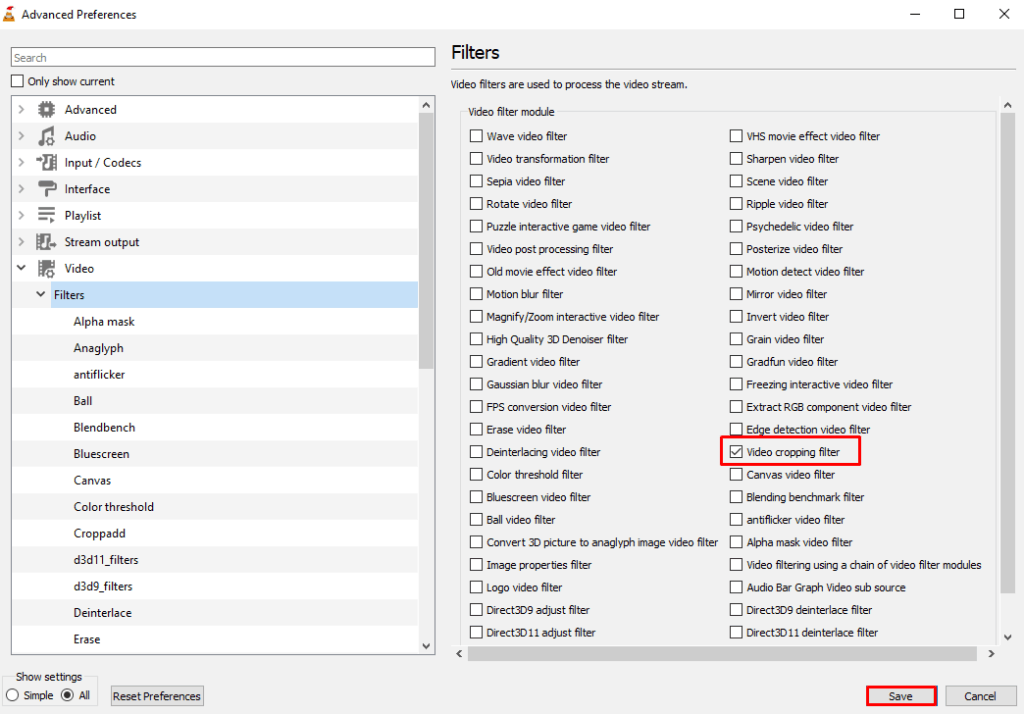
6. Click the filters heading and toggle the Video cropping filter option, then press save.
7. Open the Media menu and select the Convert/Save subheading.
8. Press “Add” and use the file explorer to locate and select the file you want to crop. Press Convert/Save to confirm.
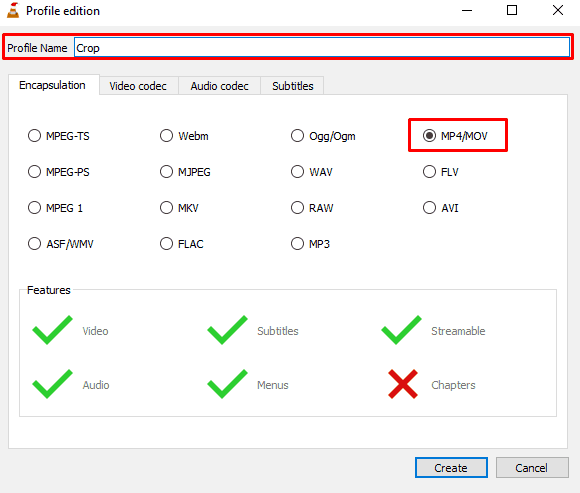
9. Choose to create a new profile.
10. Give the profile a name and choose MP4/MOV as your format.
11. Open the Video codec category. Tick the video option and switch the codec to H-264 and choose your bitrate. The higher the better quality the video will be.
12. Switch to the Filters tab and ensure that Video cropping filter is checked. Press create to confirm your Profile.
13. Select the Browse button to choose your file destination. Name the file and select the folder you want your cropped video to be placed into. Make sure to give the file a new name as to not overwrite the original.
14. When you are ready to begin cropping the video press Start.
How to Trim a Video Clip using VLC Media Player
You can also use VLC to trim video clips. This feature works well paired with the the desktop screen recording feature. When you’ve recorded a video you need to open VLC to stop the recording. This means that unless you’re using a keyboard shortcut the program will be seen at the end of the video. You can then trim that segment of the video out also using VLC.
1. Launch VLC and hit the Media tab located at the top left of the window. Choose to open a file.
2. Find the video clip that you want to cut and open it.
3. The video will automatically start playing, pause it.

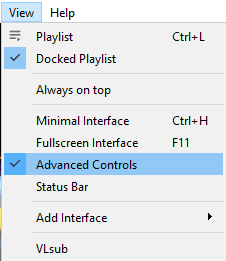
4. Open the View tab at the top of VLC and enable Advanced Controls if they’re not currently selected. If the option has a tick next to it then it is enabled. You will now notice new options under the video preview.
5. Just under the video playback there is a timeline . Click and drag the marker to where you want the video to begin.
6. You can use the frame by frame option to move one frame forward on the track. This is great for selecting precise starting points.
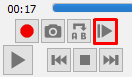
7. Once you have your starting point selected press the red circle recording button.
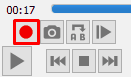
8. Press play and let the video play through. Press the recording button again when the video reaches the point you wish to end the trim.
9. The trimmed clip will automatically be placed into your videos folder.
How to Convert Video File Formats
If you are noticing playback or compatibility issues with a program converting the file may help. Some video editing programs may have trouble with less common media formats. This makes being able to switch a video to MP4 or another format useful. Converting video formats with VLC is easy and fairly fast.
1. With VLC open select Convert / Save under the Media tab.
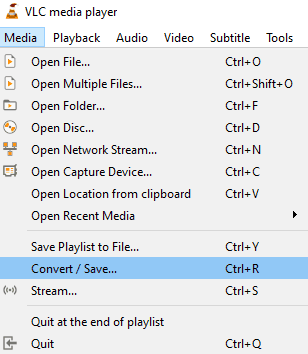
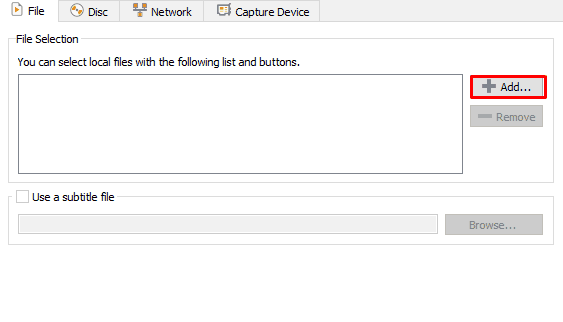
2. Select “Add” then locate and open the video that you want to convert.
3. Press the Convert / Save button at the bottom of the window.
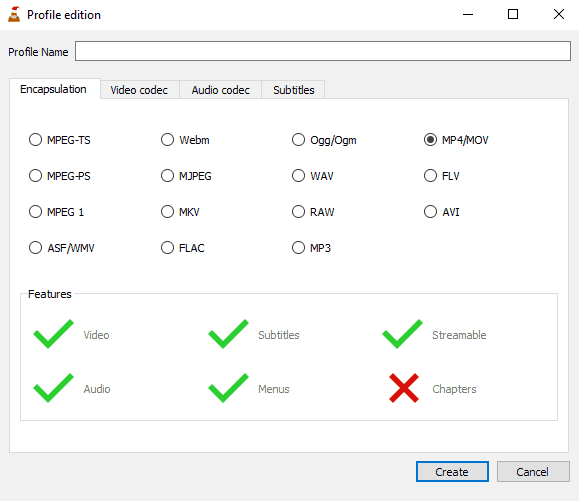
4. Create a new profile for converting.
5. Select the format that you would like to convert your video to.
6. Switch to video codec, toggle video and select H-264.
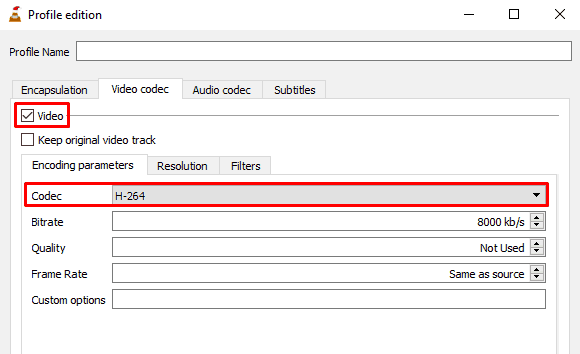
7. Set your Bitrate, the higher the better quality your newly converted video will be. If you convert and notice the quality isn’t as good as you would like then you increase it.
8. Name the Profile and press Create to confirm.
9. Select Browse and choose a location and a name for your file.
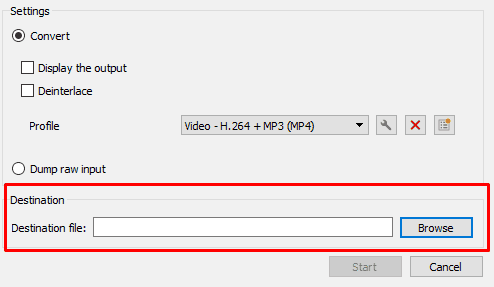
10. Press Start and VLC will begin to convert your file.
Add Subtitles to Movies and Shows using VLsub
You can add subtitles to shows and movies that don’t already have them. This is done entirely inside of VLC media player using VLsub. There are usually multiple subtitles available for popular shows and movies, including in different languages.
1. Open the show or movie that you want to watch.
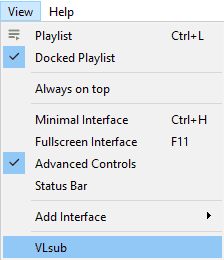
2. At the top of the window you will see several different options. Select View and then VLSub. This may be called “Download subtitles” in some versions of VLC.
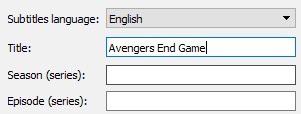
3. Once VLSub has been selected a new window will appear. If your video is a movie then type the name into the title section. For a show you can enter a title, season and episode.
4. Press “Search by name” and VLC will start to load any subtitle options available.
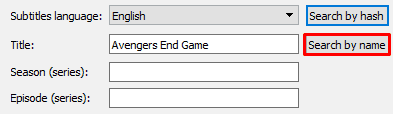
5. Select the subtitle you want to use and press “Download selection”.
6. Press the “Subtitle” heading at the top of the player, then hover over “Sub track”. Ensure that the track is selected.
7. Play the video and enjoy.
Adjusting Subtitle Speed to Sync in VLC
1. At the top of the window select Subtitles and then hover over Sub track. Here you should be able to see if there is a subtitle active. If there isn’t one you will need to load it.
2. Start to watch the video and get a rough idea of how far out of sync the subtitles are.
3.. Select Tools and choose Track synchronization. A new window will appear.
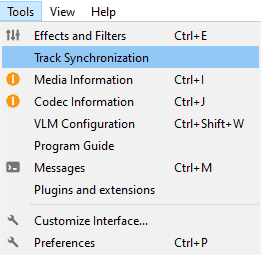
4. You will notice a “Subtitles/Video” section. Here you can change the offset of the subtitles. Enter the amount (in seconds) that the subtitles are out of sync. If your subtitles are appearing before the vocals then enter the number is positive form (eg 7.000 s). However, if the audio is before the subtitles then enter a minus sign before the amount (eg. -7.000 s).

5. Close the window.
6. Begin to play the video and ensure that the subtitles are now inline with the vocals.
7. If the audio is not synced readjust the settings.
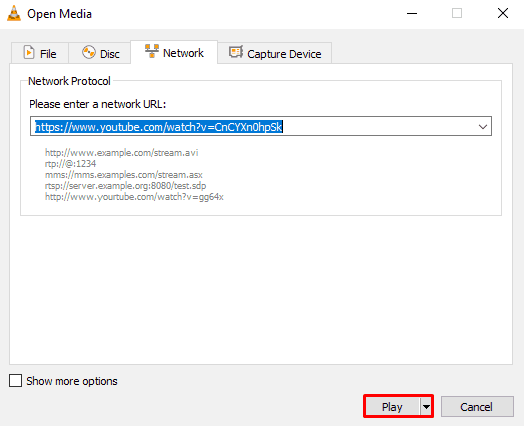
Watch YouTube Videos with VLC
A lesser known feature is the ability to watch YouTube videos with VLC Media Player. This feature isn’t only limited to YouTube however, you can watch most online videos with VLC. If the video doesn’t play the video may not be compatible. This could be because of copyright issues.
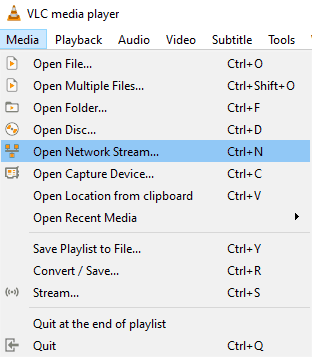
1. Copy the YouTube video URL to your clipboard. Either right click and select copy, or use Ctrl + C.
2. Click Media at the top left and select “Open Network Stream” (Ctrl + N).
3. Paste the URL in the provided location.
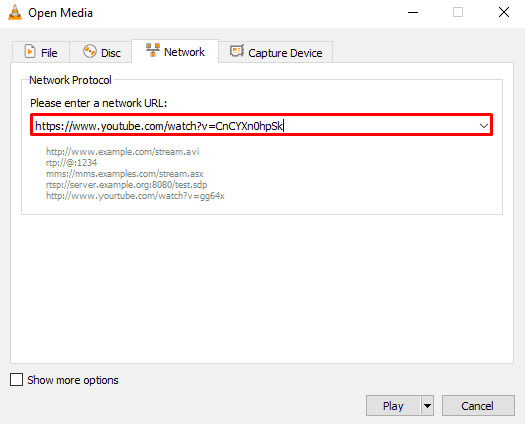
4. Press Play and the video will begin to load, then play.
Add Skins or Themes to VLC Media Player
The default appearance of VLC is fairly bland. Fortunately you can customize the appearance of your VLC media player by installing skins. This can be a good way to add a dark theme or modern appearance to the player.
1. Download the skin that you want to use.
2. Open preferences by pressing Ctrl + P or by choosing it under Tools.
3. Check the “Use custom skin” option.
4. Select Choose so that you can navigate to the skin file. Open it and then save.
5. Close and Reopen VLC. The new skin should now be applied.
How to watch 3D videos in VLC Media Player
It is possible to watch 3D videos inside of VLC media player. However when you first try to play a 3D video you will notice a side by side will begin playing. This is quickly changed to allow for 3D compatibility.
1. Open the 3D video that you want to watch in VLC media player.
2. Head over to Tools and choose “Effects and Filters”.
3. Select the Video Effects category and then the Advanced subcategory.
4. Check the 3D Anaglyph box and save the settings.
5. Play the video and the content should now be working properly.
Final Thoughts
VLC media player is an all around great program, worthy of being your default media player. The features and compatibility allows for you view almost any video file without having to switch between players. The variety of uses give you great functionality and allows for one program to complete many tasks. With the ability to instal skins you can even tailor VLC to the appearance you want. VLC media player is definitely one of the better and more robust options available.
Documentation:Streaming HowTo/Stream a DVB Channel
Note: This is possible under GNU/Linux only. Install the DVB driversIf you want to be able to stream from a DVB card (a satellite card or a digital terrestial TV card), you need to install the DVB drivers:
The following sections assume that you have a working linux-dvb installation, either from stock kernel 2.6 or from kernel 2.4 with DVB patches. If you have any problem with the linux-dvb drivers, please report the problem to the maintainers of the drivers, not to us. Thanks. Stream with VLSNote: VLS is currently deprecated and hasn’t been maintained for years. It is strongly advised to use VLC instead, which now supports the same features as VLS, and many more. The only advantage of VLS is to support the dvbrc file syntax, and it requires a bit less CPU horsepower. However, we do not support VLS any longer. Put a .dvbrc file containing the DVB channels (satellite or digital terrestial TV channels) you want to stream in your home directory (some are provided in the libdvb tarball for the satellite channels). Run VLS with the following command line:
/.dvbrc file,
Stream with VLCNote: VLC has many more features than VLS. First you can use the advanced stream output options such as transcoding and all kinds of output supports. Second VLC can take advantage of the Common Interface supported by some DVB adapters to descramble one or several services. Currently released versions of VLC only support the low-level API so some adapters won’t work (budget-ci cards work, twinhan doesn’t). Some CAM modules aren’t compatible with some DVB cards, check the linux-dvb documentation for more information. So-called «professional» CAM modules are able to descramble up to twelve services, whereas customer-oriented modules are often limited to one or two services unless otherwise specified. VLC must be compiled with —enable-dvb and you need the linux-dvb headers installed in your system. An example command-line is as follows: The example above shows the minimum set of options needed to stream out two services. Here is a list of frontend options, depending on the frontend type:
We also ought to explain the other non-dvb-specific options of the example command-line:
How to use VLC media player: A beginner’s guide
Are you interested in using a VLC media player but don’t know where to start? If so, we are here to help you figure out what a VLC media player is and how to use it. VLC media players can be a useful tool for watching videos and editing them. To see how to use VLC media player keep reading below. What is a VLC Media Player?The VLC media player is an alternative media player that can be downloaded onto your Windows or Mac computer. The VLC player is usually more powerful than the default video player that comes installed on your system. The VLC player can play audio and video from almost any source and without the need for additional codecs. The player is packed with tools and various options to help you get the best quality playback available. Another upside is that it also supports third-party features and plug-ins such as web-based and browser ones. First Step: Download and InstallThe nice part about VLC for Mac and any other operating system is that it’s powerful and customizable. To get access to this amazing application you will need to download and install it onto your computer. You will need to proceed to the VLC website and follow the instructions on how to download the application. The installer is pretty straightforward and won’t require you to change any default options on your computer to properly install. When you get to the “choose components” section you should pay attention to what elements you’ll be installing. Here you can pick and choose what elements you want and which ones you don’t. Second Step: Load a FileThe VLC interface is pretty simple and straightforward when it comes to using it. The first thing you may want to do is load a video into the player. To load a video into the VLC player all you have to do is drag the file and drop it into the program’s window. If this may be too difficult to do then you can go to the media menu in the top bar and then select open file. This will lead you to a window where you can open files and open the video file of your choice. When watching the video you will see common video controls such as play and pause on the bottom of the screen. You will also be able to open video streams and discs in the VLC player. Editing Choice 1: Adjust Audio as NeededThe VLC player will give you a decent amount of control over your videos. This will include things such as tweaking the way your video looks or sounds. To do so you will need to select the audio equalizer button on the bottom of the screen. This button will be the sixth button from the left. You can also access it through the menu by going to Tools and then Effects and Filters. To adjust your video’s sound you will need to select the Enable box and then use the sliders to achieve the best sound. You will also have the option to work with more advanced features through the Compressor and Spatilizer tabs. Editing Choice 2: Synchronize the Audio and VideoWhen adjusting your audio you may venture into the Synchronization tab. This section can be used to cure the annoying issue of a video and its audio not being in sync. You can insert a pause in the audio or even bring it forward in the video to help the audio line up perfectly with the picture. After this, you can move onto the Video Effects tab that will be in the middle of the open window. When opening this tab you will see that there are a lot of controls. All these controls can be used to improve the appearance of the video’s footage by changing the color, hue, brightness, and so on. You will even find the option to rotate the video. This is a great option for videos that were shot in the wrong mode, such as on a phone. Editing Choice 3: Add SubtitlesWhile you’re in the Synchronization tab you’ll see that the VLC player supports subtitles. If there are subtitles already in your program you’re watching through the player, you can download them directly. Go to the View menu and then select the Download Subtitles function. Editing Choice 4: Change Your Viewing OptionsThere are many ways that you can experiment with your VLC player. One of these ways is to change the way you’re viewing your video. The default view for videos is in the window mode. You can easily change this view to fullscreen by going to the View menu to change it. By pressing control + H you can hide those pesky video controls that may prove to be distracting while watching your video. You can even play your video in the background of your computer as a wallpaper so you can work and watch. This can be done by going to the View menu and selecting the Wallpaper option. Now You Know How to Use VLC Media PlayerWe have given you an in-depth guide on how to use VLC media player for any operating system. You now know how to download the program and how to view and edit videos with the VLC player. For more business information and tips be sure to check out the rest of our website. 
Жесткий диск Western Digital WD Caviar 160 GB (WD1600BB)

Скачать Microsoft PowerPoint бесплатно В программе
Ремонт компьютерного блока питания Для более доступного
Исправлено Принтер Canon не печатает в Windows 10 Прочтите
Как подключить жесткий диск от Xbox 360 к компьютеру?
Система не заводится — работают только кулеры
Подключение наушников к ПК: пошаговые инструкции Подключение
Проблемы с модемом Yota и способы их решения Для некоторых
Причины, по которым компьютер не видит ТВ через кабель
detector |