
Alice MJ
Mar 08, 2021 • Filed to: Fix iOS Mobile Device Issues • Proven solutions
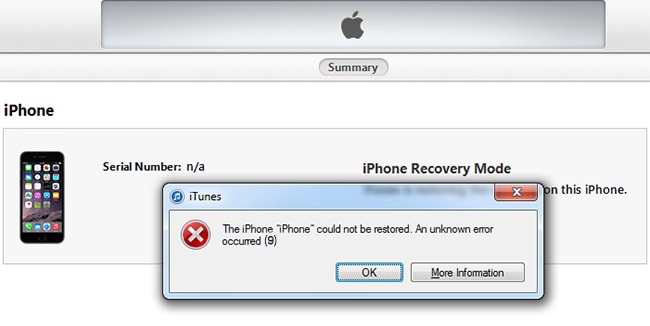
Most of you who’ve experienced iTunes error 9 (iPhone error 9) on their iPhones will probably want a solution quickly, as everything on your iOS 14 device just stops working. The problem occurs when you restore iPhone from backup or upgrade your iPhone; however, several reasons are attributed to the problem, and you need a specific solution for your iPhone.
- Part 1: How To Fix iTunes Error 9 with No Data Loss (Simple and Fast)
- Part 2: How To Fix iTunes Error 9 with an iTunes Repair Tool
- Part 3: Five Common Ways To Fix iTunes Errors 9 and 9006
- Tips: Avoid iTunes error 9 by restoring iPhone without iTunes
Part 1: How To Fix iTunes Error 9 with No Data Loss (Simple and Fast) on iOS 12.3
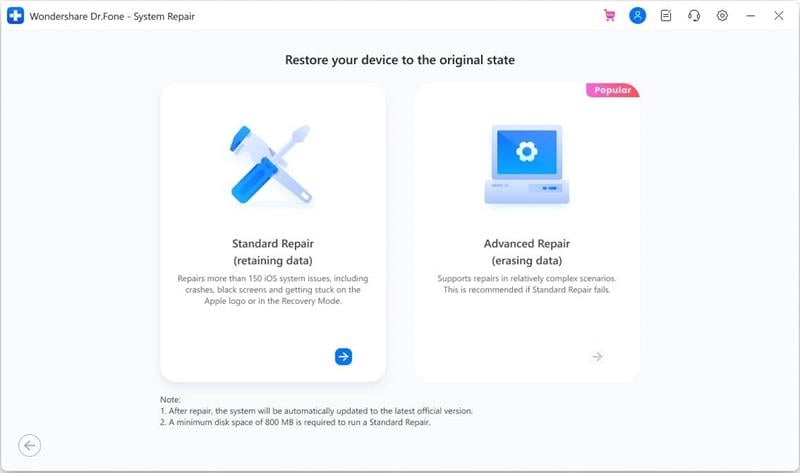
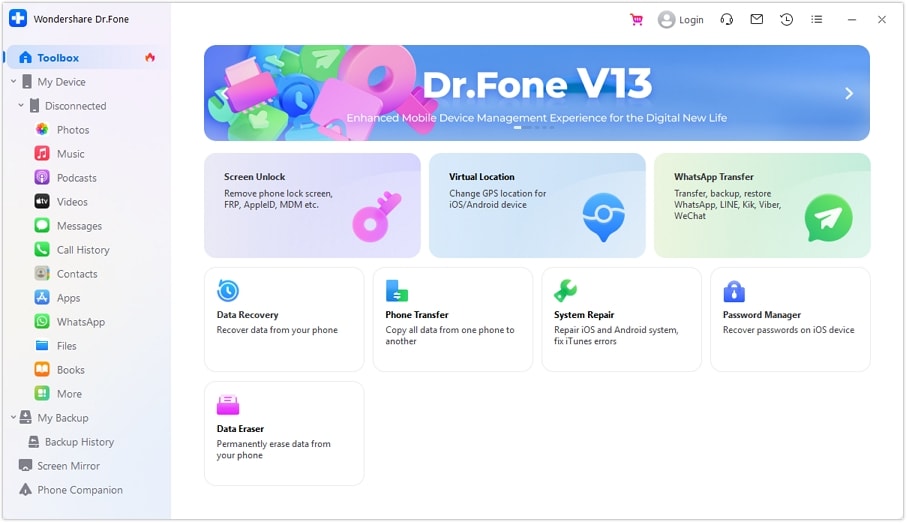
Here comes Dr.Fone — System Repair (iOS), a total fix for iPhones and other iOS 14 devices to recover from booting issues like white screen, black screen, iPhone errors, stuck in recovery mode, and boot loops with no data loss. These are typical problems leading to abnormal performance.
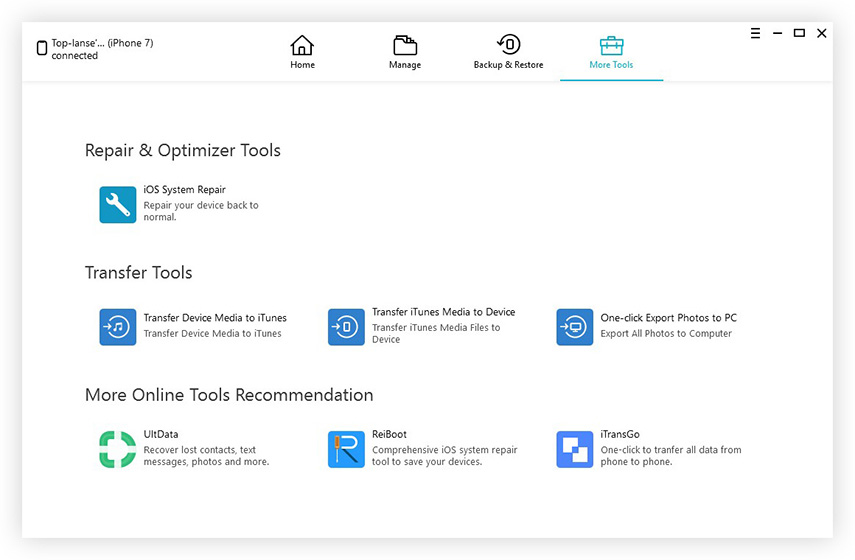
![]()
Dr.Fone — System Repair (iOS)
Fix iPhone error 9 or iTunes error 9 without losing data!
- Fix various iOS 14 system issues stuck in recovery mode, white Apple logo, black screen, looping on start, etc.
- Only fix your iOS 14 to normal, no data loss at all.
- Fixes other iPhone error and iTunes errors, such as iTunes error 4013, error 14, iTunes error 27 and more.
- Works for all models of iPhone, iPad and iPod touch.
- Fully compatible with the latest iOS.


A major plus is the Dr.Fone software repairs the operating system without causing any loss of data. At the same time, your iPhone or other device is updated to the latest non-jailbroken version even in an unlocked device.
Steps to fix iPhone error 9 with Dr.Fone on iOS 14
Step 1. Launch Dr.Fone and select «System Repair» Feature
- Click on «System Repair» to start the function.
- Connect the iPhone to the computer using the USB cable. The software recognizes the iPhone or any other attached device.
- Click on «Standard Mode» within the software to begin.
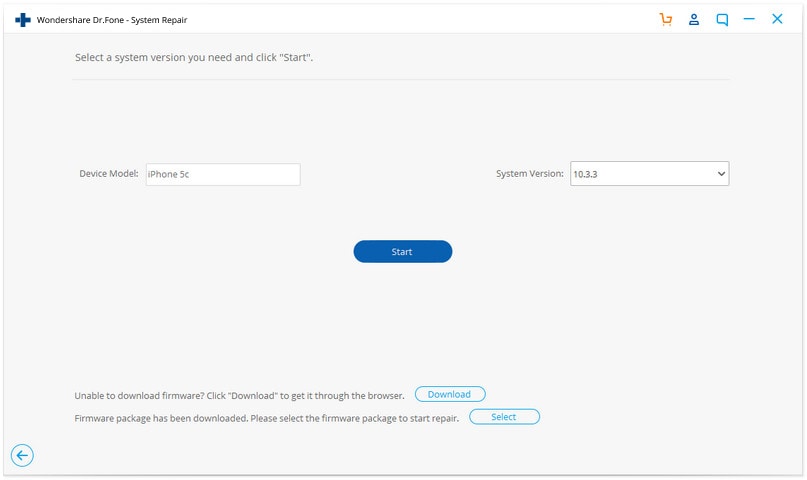
Step 2. Enable Firmware Download
- To recover from an operating system failure, the latest firmware must be downloaded to the iOS 14 device.
- The software recognizes the model, asks for confirmation, and suggests the latest download.
- Click Start. The process completes automatically.
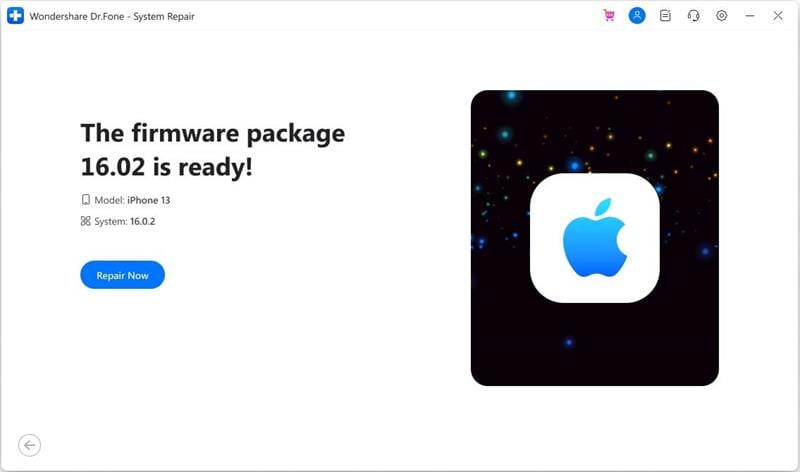
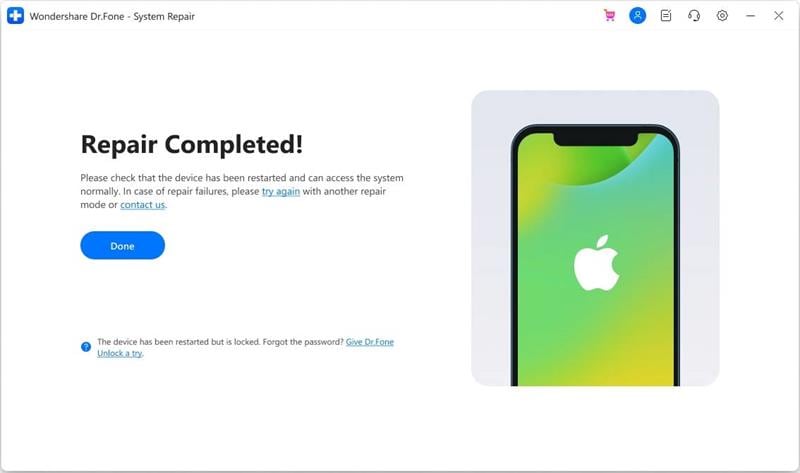
Step 3. Returning To Normal
- Once the firmware is installed, the software begins preparing the iPhone.
- The iOS 14 device comes out of recovery mode. If the Apple logo had earlier persisted within a loop, it begins acting normally. You longer get the iPad error 9 message. It takes around 10 minutes for the iOS 14 device to recover and function normally.
- Visual instructions are clearly shown on the screen.
- Use the device only after the process is complete, as indicated by the software.
With iTunes Error 9 or iPhone Error 9 bothering so many iOS 14 device users, the new Dr.Fone solution simplifies the process of recovering from booting errors and when the iOS 14 device does not respond to laborious manual methods.
Part 2: How To Fix iTunes Error 9 with an iTunes Repair Tool
When the iTunes error 9 occurs, have you doubted there is something wrong with the iTunes itself? Many users are seeking methods to fix this error but only forget about the corrupted iTunes components.
The result, of course, is not ideal.
In this case, you should have your iTunes repaired to fix iTunes error 9. Luckily, with the below iTunes repair tool, you can have iTunes repaired and fix any errors without any hassle.
![]()
Dr.Fone — iTunes Repair
One-Stop Solution to Fix iTunes Error 9 and other issues
- Fix all iTunes errors like iTunes error 9, error 2009, error 9006, error 4015, etc.
- Fix all issues in the connection and sync of iOS 14 devices with iTunes.
- Lose no existing data while fixing iTunes issues.
- Repair iTunes to normal within 5 min
By following these steps, you can fix iTunes error 9 with few clicks:
- Download Dr.Fone — iTunes Repair by clicking the above button. Install and start it up, and click «Repair».
- In the new window, click «iTunes Repair». Then connect your iPhone or other iOS 14 device to the computer.
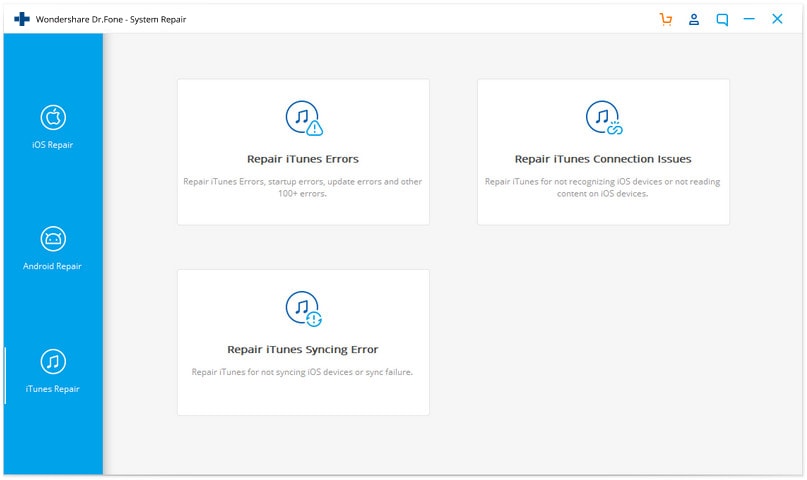
- First, let’s choose «Repair iTunes Connection Issues».
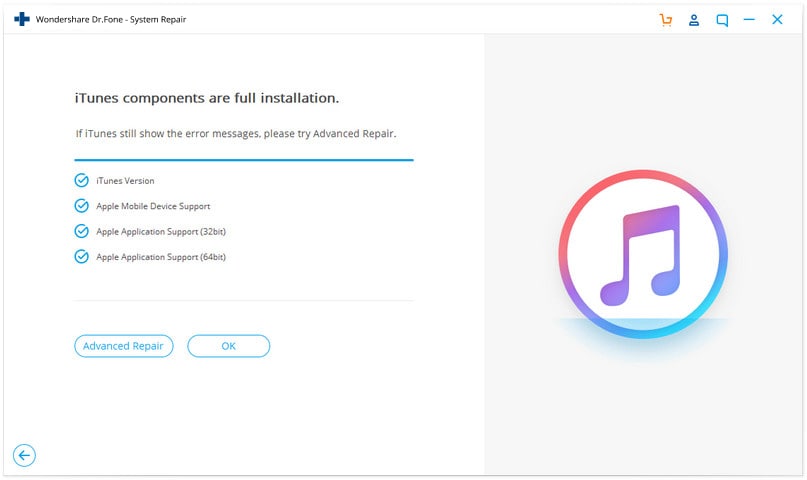
- If iTunes error 9 still pops up, click «Repair iTunes Errors» to have all iTunes components verified.
- After the verification, if iTunes error 9 does not disappear, click «Advanced Repair» to have a thorough fix.
Part 3: Five Common Ways To Fix iTunes Errors 9 and 9006 for iOS 14
There are several ways to attempt a fix. When you get a message asking you to restore your system and you click «restore». Nothing happens. In fact, you’re confronted with a hung phone. Here are 5 of the most successful ways to get rid of iPhone error 9 and iPhone error 9006.
Solution 1: Recovery Mode on iOS 14
We can try to enter recovery mode to fix iPhone error 9, but this method will lead to data loss. So you’d better think about this method. And in order to fix iPhone error with no data loss, we show you a method in Part 1. You can choose the proper one for you.
- Disconnect the iPhone.
- Try Reboot Program.
- Enable the phone again.
- Relaunch iTunes.
The system should restore. Try the method once or twice before adopting another.
Solution 2: Update to the Latest iTunes Version
Check if the latest version of iTunes is installed on the Mac or another computer. If not, update to the latest version. But this method is not 100% effectual.

For A Mac
- Launch iTunes.
- On the top menu bar click on iTunes>Check for Updates.
- Follow the steps to install an updated version.
For a Windows-based Computer
- Launch iTunes.
- Enable Help > Check for Updates on the menu bar. If you can’t see it, click on CTRL and B keys.
- Follow the simple instructions to update.
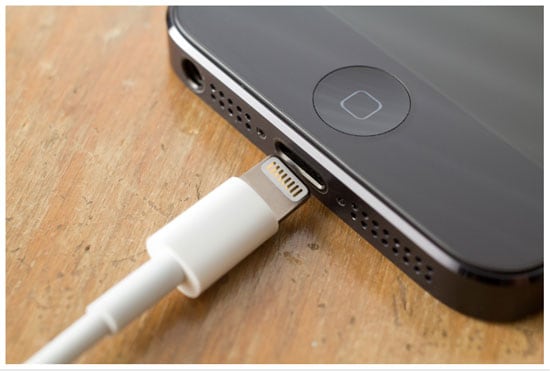
Solution 3: Ensure USB Cable Connection
The USB cable could be faulty if you happen to use a cable that did not come with your device. Here are the steps to ensure the USB cable is okay.
- Ensure the original USB cable is used. You could also try a standard Apple USB cable.
- Make sure the cable is not dislodged or unplugged. You may get an iPhone error 9006 as well.
- Plug the cable into another USB port. It should connect directly to the computer and not the keyboard.
Solution 4: Checks USB connection
Connection with the computer could be faulty. Complete the following checks to enable a proper connection. Test the process at every step.
- Check if cable connections at both ends are firm. To be sure, unplug the cable from the computer first and reconnect it. Then unplug the cable from the iPhone or other iOS 14 device and reconnect.
- Disable any third-party battery pack.
- Connect the USB cable directly to the device port.
- If you find a 30-pin or lightning cable connected to a USB hub, keyboard, or display, unplug it and connect it to your computer’s USB port directly.
- If any virtualization apps are running such as VMware or Parallels, disable them. It could interfere with your communication over the USB port, especially if they are not up-to-date or are improperly configured. If the method works, promptly complete the app update.
- Restart the computer.
- Restart the iPhone or other iOS 14 device.
- If iTunes error 9 (iPhone error 9) or iPhone error 9006 still persists, see if any software updates are needed. For example, an OS X update may be due on a Mac or you could download the latest iTunes version.
- If a Windows-based computer is used, check if your USB card or computer firmware update is required. It can be downloaded from a manufacturer’s site.
- Finally, connect your iPhone or iOS 14 device to another computer.
Solution 5: Check Security Software (Complex)
It is possible security software installed on your iPad cannot communicate with Apple on its update server. The problem could also occur when you try to sync the device or download content like songs, and you get the iPad error 9 message.
- Inspect your security software settings and make sure connection to Apple is enabled.
- Make sure your iPad or other device is recognized by iTunes.
- Now check whether the time, date, and time zone are set properly on the computer.
- Use your computer as an administrator and not in guest mode.
- Ensure the latest version of iTunes is available.
- Update the OS version on the Mac or Windows-based computer.
- Make sure the security software is updated.
5 Ways to Fix iTunes Error Code 39
by Jenefey Aaron Updated on 2019-07-25 / Update for Fix iTunes
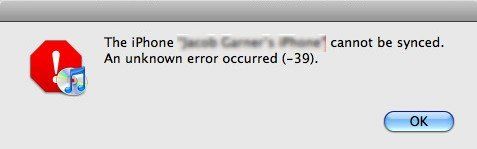
“When I go to sync I get the message: “The iPhone «Name of iPhone» cannot be synched. An unknown error occurred (-39).» It shows up when iTunes goes to delete photos from the iPhone. Anyone know how I can fix this? Thanks in advance.”
When using iTunes on Mac/PC to update or restore your iPhone/iPad, you might see an error code or alert message, such as iTunes error code 39. Don’t worry too much. You can easily get rid of this predicament with 5 ways we concluded. Learn how to fix iTunes error 39 below.
What Causes iTunes Error Message 39?
So far as I can tell, in most cases iTunes Error -39 occurs when you try to sync you iOS devices with iTunes on Mac/PC, or when deleting photos and videos from iPhone/iPad. Other situations may also lead to the error report, and here you can find step by step guides on fixing iTunes sync error 39 in both PC and Mac.
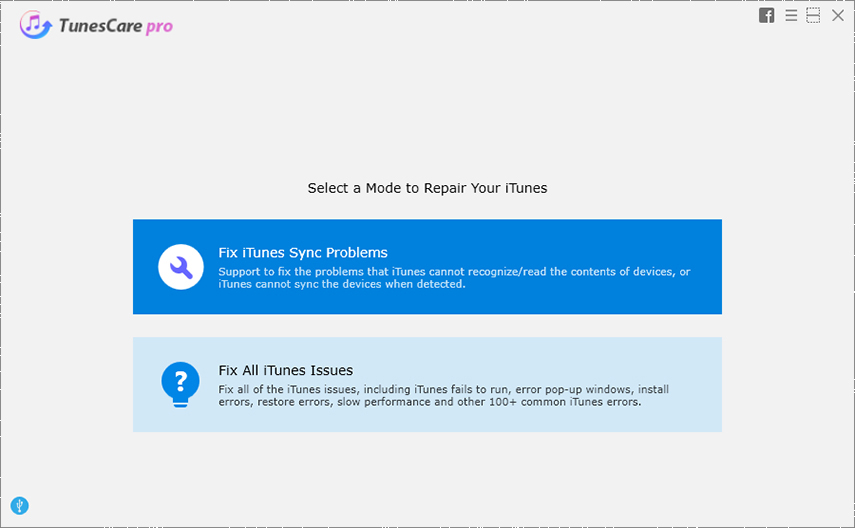
Way 1: Fix iTunes Sync Error -39 with Free Tenorshare TunesCare
Tenorshare TunesCare is a totally free iTunes error repair tool to fix iTunes sync error, iTunes not working, update error, installation error, and other 100+ iTunes related errors. Within 1-click and all iTunes problems, as well as error code 39, can be perfectly settled.


-
Step 1: Launch Tenorshare TunesCare and then connect your iPhone/iPad with computer.
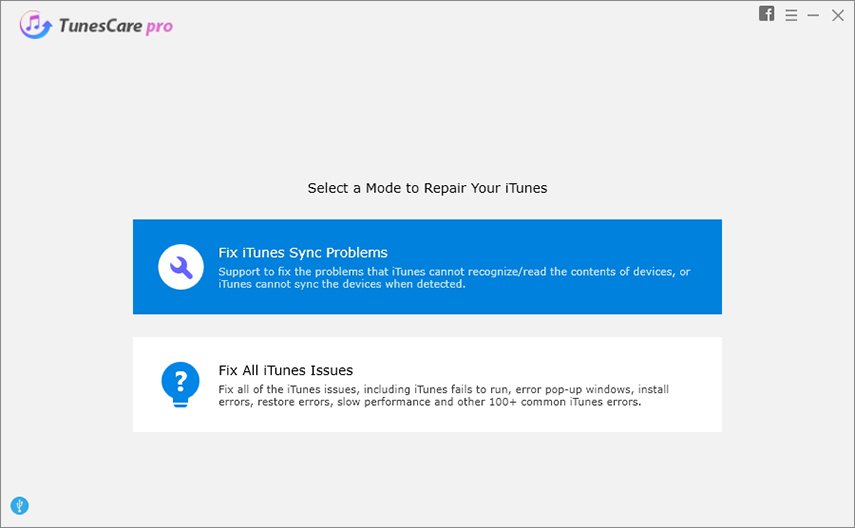
Step 2: Click “Fix iTunes Sync Problems” to repair crashed iTunes Library if you have encountered iTunes error 39 when syncing iPhone/iPad.

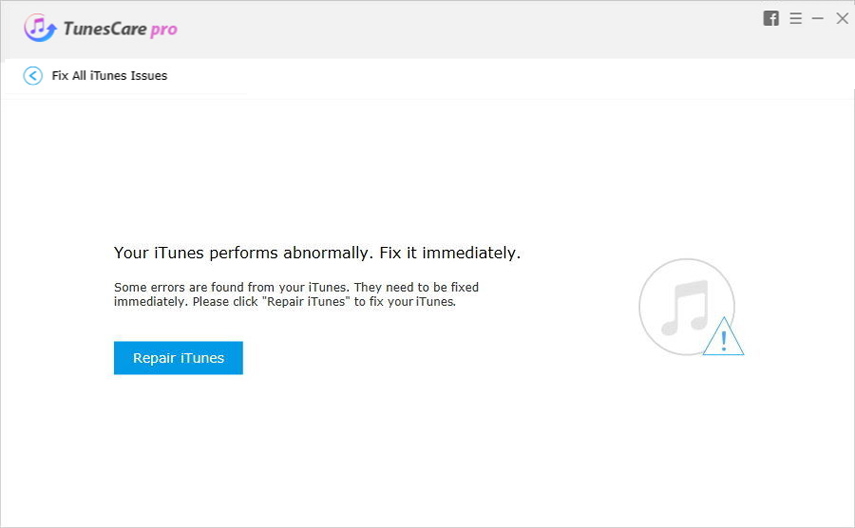
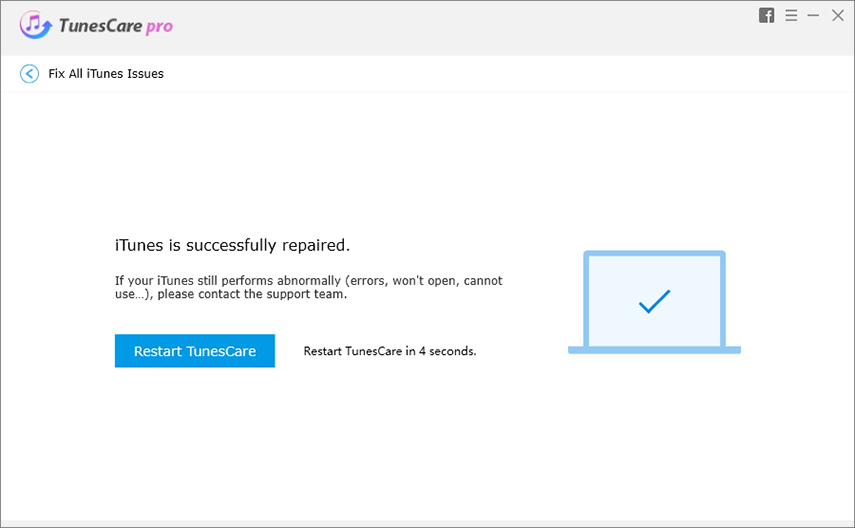
Step 3: Should your iTunes still performs abnormally, switch to “Fix All iTunes Issues” under. You will be prompted with below interface. Click “Repair iTunes” to fix it immediately.
Step 4: Tenorshare TunesCare will automatically download repair drivers to fix iTunes. The whole process takes less than 2 minutes. When done, try to sync up with iTunes again.
Way 2: Restore iTunes Error Message 39 on Windows
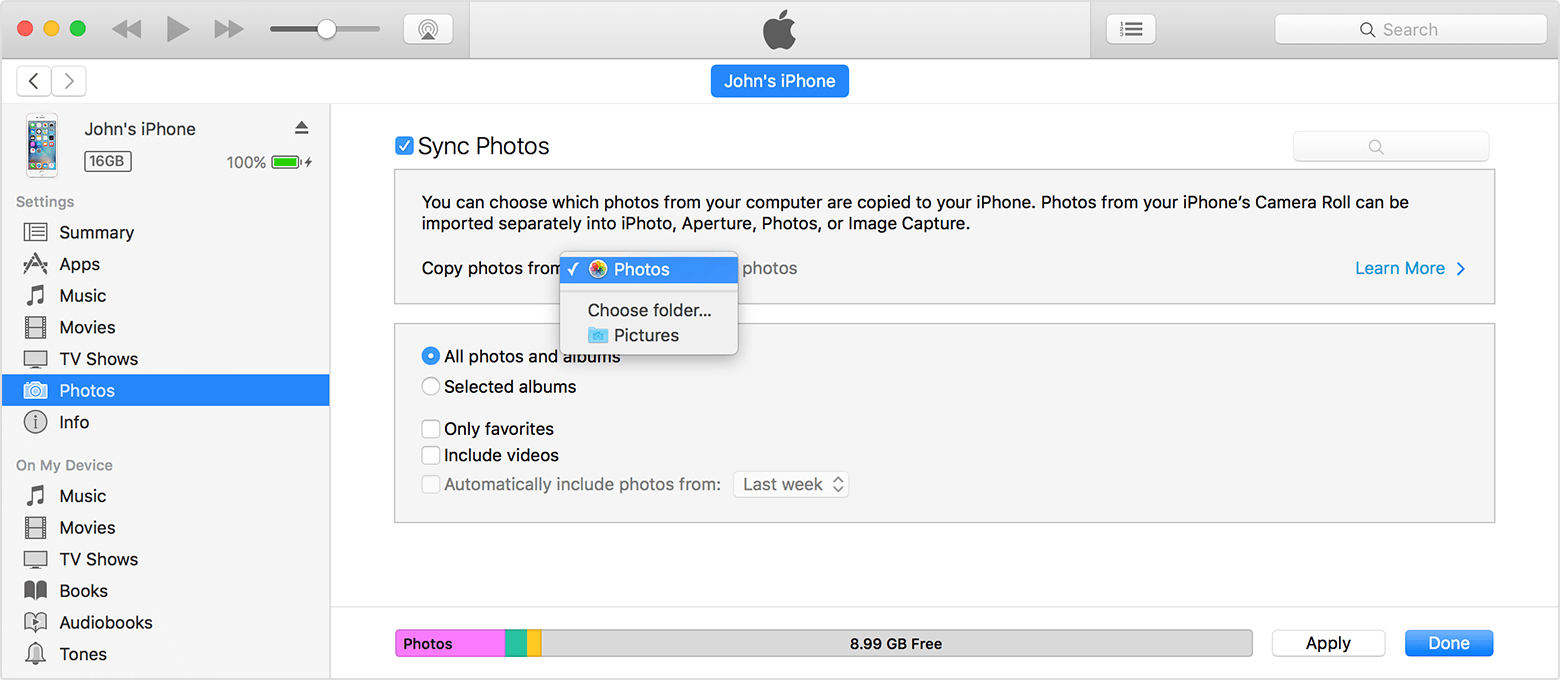
- Step 1: Launch iTunes on PC and sync your iOS devices. Better to perform it manually rather than automatically in order to restore iTunes error (-39) properly.
- Step 2: Navigate to Pictures option, uncheck all photos shown on the panel. You will be prompted by iTunes whether to delete all photos from your iPhone. Click “OK” to continue.
Way 3: Get Rid of iTunes -39 Sync Error on Mac
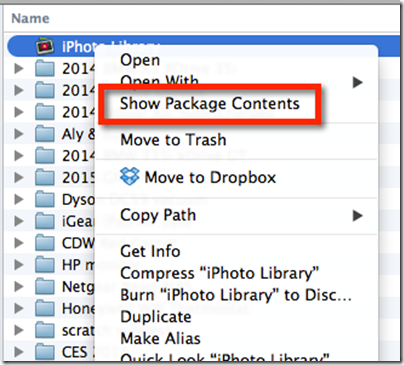
This error is associated with your iPhoto Library. If you sync from Photos, iPhoto, or Aperture library, try to find or remove the Photo Cache folders.
-
Step 1: Go to Username/Pictures/iPhoto Library and right click to show package contents.
There you go. You will find unknown occurred error 39 has been fixed.
Way 4: Check Your Computer’s Security Software
If you can’t open iTunes, download contents, sync your devices, the security software might be the cause.
- Step 1: Check host file to make sure it won’t block iTunes from communicating with Apple’s servers.
- Step 2: Test your security software. If you have more than one type of security software installed, you might experience some iTunes performance issues. It might require you to temporarily remove your security software to prevent unknown iTunes error codes.
Way 5: Update Software on Your PC/Mac
Try to update your PC/Mac if you can’t still solve iTunes error 39.
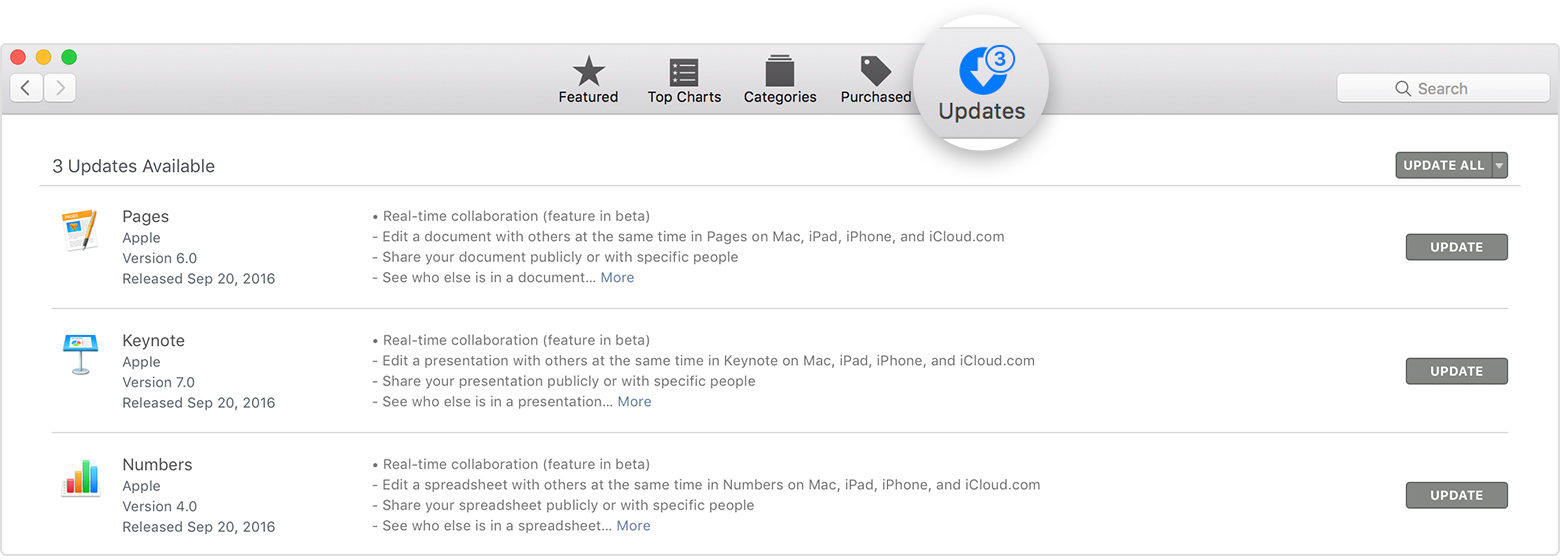
For Mac users:
Open the App Store on your Mac OS X devices, and then switch to Updates in the toolbar. If updates are available, click the Update buttons to download and install them.
For Windows users:
Go to Start button > All Programs > Windows Update.
Hope these methods can help you to successfully repair iTunes error code 39. If you also see other iTunes error numbers, please refer to below to find more error messages and solutions. Understand common iTunes Errors & How to Fix now.
Updated on 2019-07-25 / Update for Fix iTunes
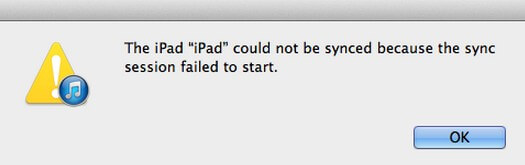
How to Do When iTunes Sync Session Failed to Start
iTunes is a smart tool for iOS users to transfer files between iPhone/iPad/iPod and PC. But when iTunes sync session failed to start, it could trouble a lot. Reviewed from Apple Support Communities, Mac Rumors forum and other iOS-related forums, quite a few users have complained that:
“When I try and sync my iPhone 6 with iTunes I’m now getting a message ‘iTunes sync session failed to start’! Any idea of how to resolve this?”
This error usually occurs when you’re trying to sync iPhone/iPad/iPod with iTunes. If you stuck in this situation, it means you can’t proceed to any steps on iTunes. Don’t give up, things will turn better. The following listed solutions can usually resolve this issue. Try them and actually fix sync session failed to start in iTunes.
Part 1. How to Fix iTunes Sync Session Failed to Start on iPhone/iPad/iPod
- 1. Check USB Connection
- 2. Reboot All
- 3. Update All
- 4. Delete iPhone/iPad/iPod Backups and Reset Sync History
- 5. Use iTunes Repair Tool to Fix Sync Session Failed to Start Problem
- 6. Use iTunes Alternative Tool to Sync Data
1. Check USB Connection
A broken cable connection between iPhone/iPad/iPod and your computer may cause iTunes sync problem. The loose or damaged USB cable can hinder proper communication between iOS device and the iTunes. In addition, the problem with your computer’s USB port may cause iTunes sync session failed to start. To fix this problem, you’d better to check the USB cable to make sure that you have the Apple-supplied USB cable directly connect to your device.
2. Reboot All
1. Restart your computer and your iPhone, iPad or iPod is a good way to fix the error like «iPhone could not be synced because the sync session failed to start».
How to restart iPhone X or 11:
- Press and hold either volume button and the side button until the power off slider appears. Drag the slider, then wait 30 seconds for your device to turn off. To turn your device back on, press and hold the side button (on the right side of your iPhone) until you see the Apple logo.
How to restart iPhone 8, 7 or 6:
- Press and hold the side button until the power off slider appears. Drag the slider to turn off your iPhone, and then press and hold the Side button until Apple logo appears.
How to restart iPhone SE, 5 or earlier:
- Press and hold the top button until the power off slider appears. Drag the slider to turn off your iPhone, and then press and hold the Top button until Apple logo appears.
2. Close iTunes then launch it again to try to sync iTunes to iOS devices.
3. Update All
1. Install all required updates for your computer/laptop.
2. Install the latest version of iTunes on PC.
- To update iTunes on Mac, you can open App Store on Mac, and tap Updates at the top bar, press Install if iTunes update is available.
- If you have downloaded iTunes from the Microsoft Store, iTunes will update automatically once new versions released. If you have downloaded iTunes from Apple’s website, just launch iTunes, and go to «Menu» bar > Tap «Help» > Click «Check for Updates».
3. If all updates were applied, reboot computer and restart iTunes to sync iPhone/iPad/iPod.
4. Delete iPhone/iPad/iPod Backups and Reset Sync History
Each time when you sync, iTunes doesn’t create new backup file, it only overwrites or attaches old backups. If a backup become corrupt, it can lead to the iTunes sync error even result in an iTunes sync session failed to start error.
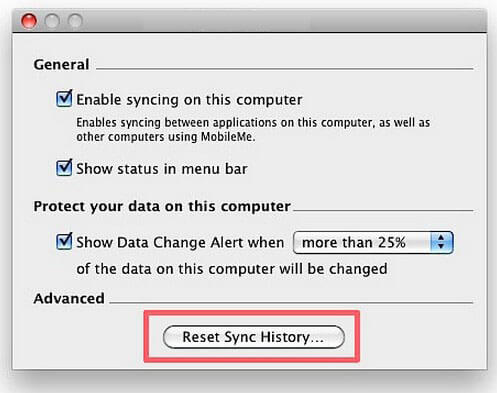
For Windows users: click Edit on the menu bar > click Preferences > click the Device tab
For Mac users: open iTunes – COMMAND + > open preferences > click the Device tab
If multiple devices appear under Device Backups, select the correct one.
Then click Delete Backup button > click Reset Sync History button (if applicable) > close iTunes > restart iPhone/iPad/iPod (instructions above) > reboot computer > open iTunes – Try to sync iTunes to iPhone/iPad/iPod.
5. Use iTunes Repair Tool to Fix Sync Session Failed to Start Problem
TunesCare is professionally aimed to fix iTunes sync problems. Having a neat interface, you can repair the iTunes library just by one click.
1. Open this free iTunes repair tool, and connect an iOS device to computer with USB cable. You can click «Fix iTunes Sync Problems» to start repairing the iTunes sync issue.
6. Use iTunes Alternative Tool to Sync Data
If your iOS still can’t sync to iTunes with the methods above, the database which holds your iTunes information may go wrong. All to be good, there’s a professional iTunes alternative tool iOS Data Manager for you to trasnfer data and backup & restore iOS data without using iTunes. It supports Windows 10/8.1/8/7/XP/Vista and Mac os Catalina, Seirra, OS X 10.11 EI Capitan, 10.10 Yosemite, 10.9 Mavericks, and OS X 10.8.
The Bottom Line
Hopefully the methods above can fully solve iTunes sync session failed to start problem. You can use the free iTunes repair tool as the first choice, and even it can’t help, it is time to consider using iTunes alternative tool — iOS Data Manager to avoid sync session failed to start error.
Home >>
How to Fix iTunes Unknown Error 2005 When Restoring iPhone/iPad
by Jenefey Aaron Updated on 2019-07-25 / Update for Fix iTunes
iTunes error message 2005 usually appears when restoring iOS firmware on your iPhone/iPad. The most likely reason should attribute to a USB connection, but many other situations can also lead to this problem.
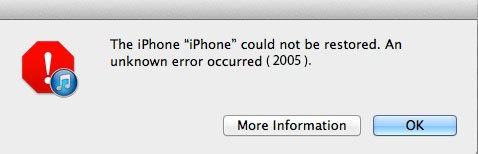
Not too long ago, I have upgraded to iOS 11 on my iPhone 7 for testing, only to find it runs not as smoothly as the previous version, so I decided to restore with iTunes to downgrade iOS 11 to iOS 10. I was not expecting iTunes to say The iPhone could not be restored an unknown error occurred 2005. Switching different USB cables and USB ports didn’t have iTunes restore error 2005 fixed until I tried free TuneCare. Therefore I would like to share this handy software with you, as well as other helpful ways here to get rid of iTunes error 2005.
How Tenorshare TunesCare Fixes iTunes Error Code 2005?
As mentioned above, iPhone restore error 2005 is usually related to an issue with the USB cable you used to connect your device, but sometimes iTunes should be blame for this error as well. If the attempts to change USB cable or port turn out to be in vain, you may take Tenorshare TunesCare into consideration. Freeware as it is, it can repair corrupted iTunes and fix various iTunes errors within one click. Let’s check how to fix unknown error 2005 iTunes:
- 1. Open Tenorshare TunesCare on your PC/Mac and choose Fix All iTunes Issues on the homepage.
- 2. Click Repair iTunes to start downloading iTunes drives for repairing.
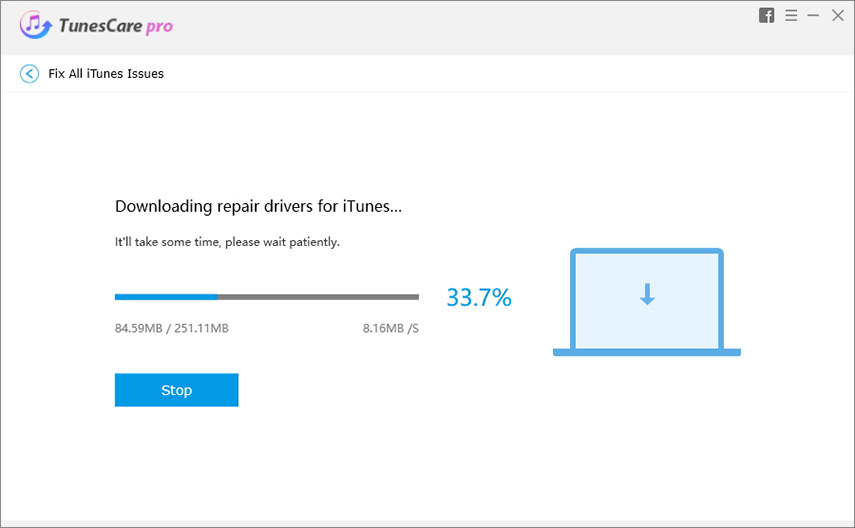
3. Once the downloading finished, the program will automatically proceed to repair iTunes.
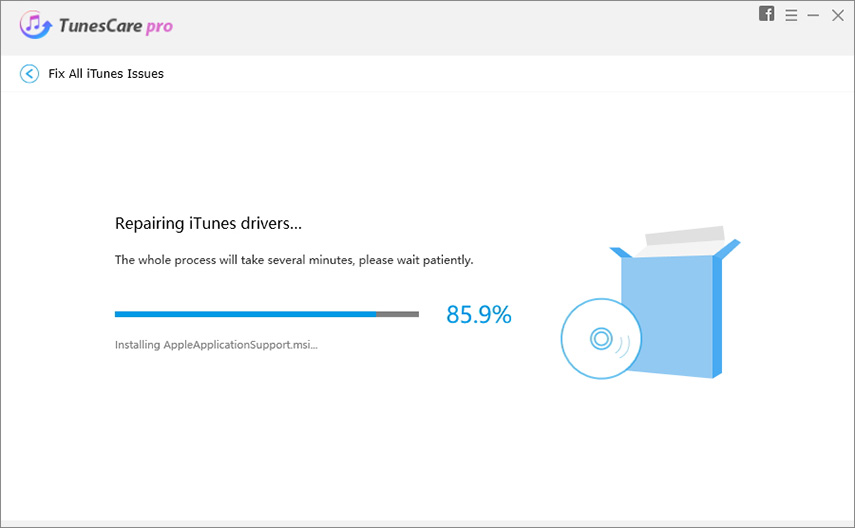
4. As soon as iTunes has been successfully repaired, connect your iPhone/iPad and try restoring iOS again.
Other Feasible Methods to Solve iTunes Restore Error 2005
- Check your USB connection, USB cable, USB dock on your device, USB port on computer to see whether they can work normally. Switch to a different one if necessary.
- Update iTunes to the latest version. If it’s already up-to-date, close iTunes and unplug the device. Reconnect it later.
- Restart your PC/Mac and iPhone/iPad.
- Try another available computer with iTunes installed to restore your device.
- Check third-party security software that may block iTunes connection. It might require you to temporarily remove the security software to correct iTunes error code 2005.
Best iTunes Alternative Software for Windows/Mac: Tenorshare iCareFone
Rather than being bothered by numerous iTunes errors and iTunes crash, you might as well try Tenorshare iCareFone to systematically manage your device and transfer iOS files. With it, you can:
- Transfer Photos, Music, Videos, iBooks, Notes, Contacts, Apps and other files between devices without restriction.
- Selectively backup and restore iDevices files with PC/Mac
- Clean up all junk files, temporary caches and useless content that slow down your iPhone/iPad performance.
- Fix all iOS stuck issues related to boot loop, Apple logo, screen unresponsive, iTunes errors during upgrading or downgrading.
Find more about Tenorshare iCareFone now.
Updated on 2019-07-25 / Update for Fix iTunes
Comprehensive Solutions to Fix iTunes Error 50
Alice MJ
Jan 07, 2021 • Filed to: Fix iOS Mobile Device Issues • Proven solutions
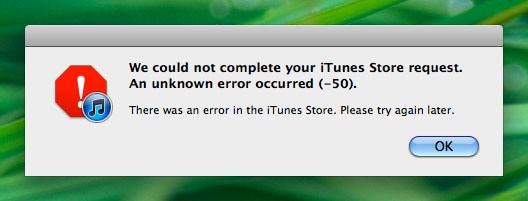
You’re trying to sync your music or your videos from the iTunes library but you can’t. You’re being shown an iTunes Error 50 message. You try to look it up online, but iTunes claims this is an ‘unknown’ error. However, generally speaking, iTunes Error 50 is a symptom of iTunes Sync Error 39, and can be fixed in a multitude of ways. So read on below to find out how to fix iTunes error 50.
- Part 1: What Causes iTunes Error 50?
- Part 2: Fix iTunes Error 50 Simply and Swiftly
- Part 3: Check Firewall/Antivirus Settings to fix iTunes Error 50
- Part 4: Re-install iTunes to Fix iTunes Error 50
- Part 5: Restore Your iPhone via iTunes without SIM Card
Part 1: What Causes iTunes Error 50?
Before we talk about how to fix iTunes Error 50, you need to first know what iTunes Error 50 is and how is it caused. iTunes Error 50 is generally a message that comes up when your iTunes can’t access the database server, thus you are prevented from accessing your library of music, apps, etc. This can happen for one of the following reasons.
Causes of iTunes Error 50:
1. Bad internet connection or network drop.
2. Firewall Settings.
3. Anti virus Protection.
4. Windows registry errors.
Part 2: Fix iTunes Error 50 Simply and Swiftly
If you’re not being able to sync your iTunes or iPhone to your computer or access your pictures, music, etc, then you might be suffering from the iTunes Error 39. While there are a few means of fixing this, I’ve personally found Dr.Fone — System Repair (iOS) to be ideal tool, as it can ensure there won’t be any data loss. Furthermore, their instructions are so simple a 5 year old could navigate it without much of a hitch.
![]()
Dr.Fone — System Repair (iOS)
Fix iTunes error 50 without data loss.
- Fix iOS system issues like Recovery Mode, white Apple logo, black screen, looping on start, etc.
- Fix various iPhone errors, such as iTunes error 50, error 53, iPhone error 27, iPhone Error 3014, iPhone Error 1009 and more.
- Supports iPhone X / 8 (Plus)/ iPhone 7(Plus)/ iPhone6s(Plus), iPhone SE and the latest iOS 13 fully!
- Fully compatible with Windows 10 or Mac 10.11, iOS 11/12/13.
Fix iTunes Error 50 simply and swiftly using Dr.Fone — System Repair (iOS)
Step 1: Choose «System Repair».
Launch Dr.Fone on your computer. Go to «System Repair».
Connect your iOS device to the computer using a USB. Click ‘Standard Mode’ to continue.
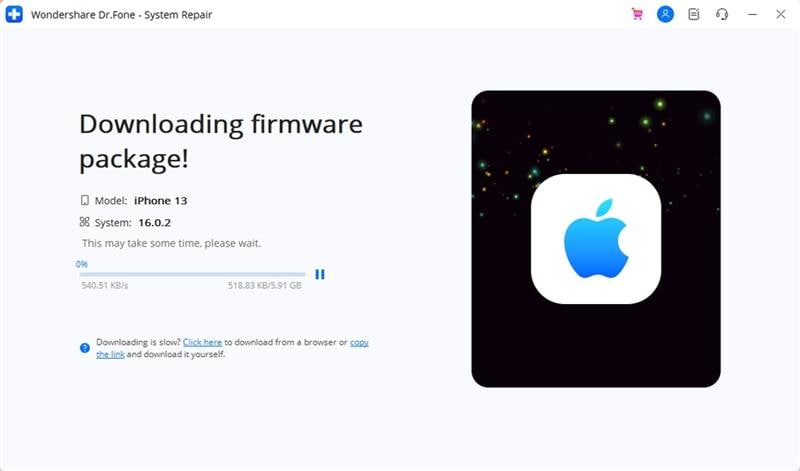
Step 2: Download Firmware.
Dr.Fone will recognize your device and model once connected. You just have to click ‘Start’ in order to download the Firmware to fix your operating system.
Step 3: Fix iTunes Error 50.
After the download, Dr.Fone will start repairing your iOS. Soon, your device would be restarted back to normal.
The whole process would take no more than 10 minutes, and voila! The iTunes error 50 is gone and you can continue syncing your library!
Part 3: Check Firewall/Antivirus Settings to fix iTunes Error 50
As already mentioned in an earlier part, the Firewall or Antivirus setting may be another reason for iTunes Error 50 showing up. This is because the Firewall is programmed to stop incoming traffic from any suspicious domains. iTunes isn’t supposed to be listed as a suspicious domain. However, you should check to make sure regardless.
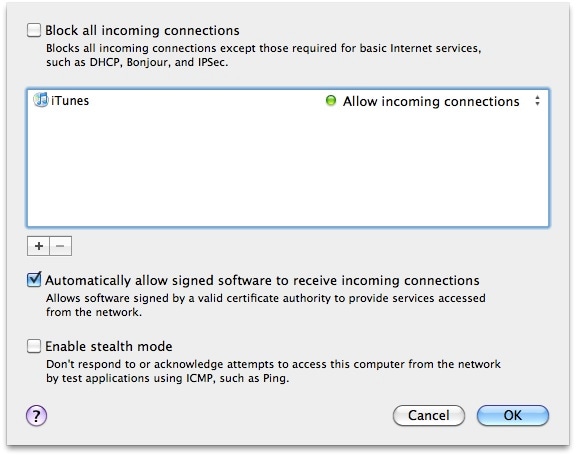
To check, log into the Firewall program, and make sure the following domains and programs are allowed to pass:
Part 4: Re-install iTunes to Fix iTunes Error 50
The other option you could try in order to fix iTunes Error 50 is to reinstall your iTunes, as your file may have gotten corrupted due to a faulty network. You should install the latest version. Here’s how you can do so.
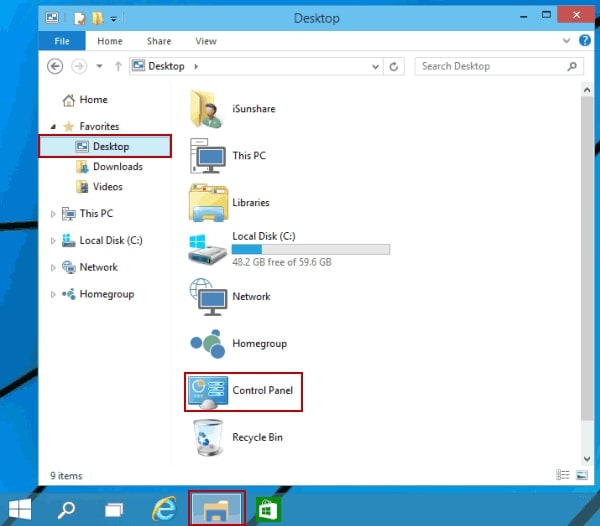
For Windows
2. Click «Control Panel».
3. Click either «Add / Remove Programs» if you use Windows XP or «Uninstall A Program if you use Windows Vista & 7.
4. Remove iTunes, Bonjour and MobileMe.
5. Restart your computer.
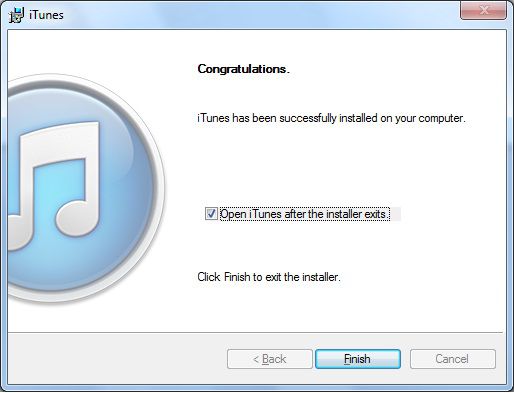
6. Download the latest version of iTunes from this link: https://www.apple.com/itunes/download/
7. Open the installation file and follow the Setup to the end.
For Mac
1. Delete the iTunes file from ‘Application.’
2. Download the latest version of iTunes from this link: https://www.apple.com/itunes/download/
3. Double click the installation file and follow the process through to the end, and then click ‘Finish’
4. Finally, launch iTunes to complete the installation, and then access it to see if the iTunes Error 50 has been resolved.
Part 5: Restore Your iPhone via iTunes without SIM Card
You can try to restore your iPhone without a SIM card to try and fix the iTunes Error 50, by following these steps.
1. Eject the SIM card from your iPhone.
2. Connect the iPhone into your computer with a USB chord.
3. Launch iTunes.
4. Click on the ‘Device’ tab and then go to ‘Summary.’
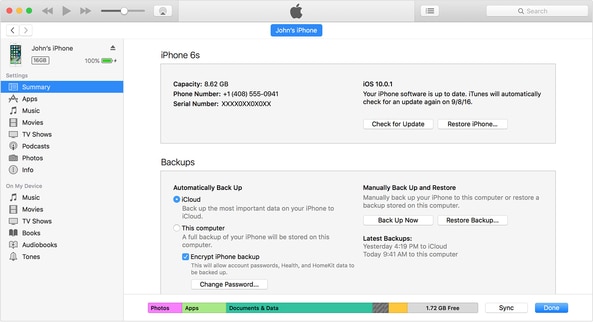
5. Click on ‘Restore iPhone.’
6 Follow the steps to restore your iPhone.
Once your iPhone has been restored, try to access iTunes, and hope that the iTunes Error 50 is no longer there.
Part 6: Clean Registry
If all the previously mentioned techniques haven’t worked on a Windows OS then your problem might be in a corrupted Registry, which is one of the most essential parts of the Windows. In this case you should download and run a Registry cleaner tool. The purpose of this tool is to remove all redundant or corrupted files from a PC. You could make use of the following link to download a Registry cleaner and wipe your Windows off all its problems: http://www.personalcomputerfixes.com/go/registry_cleaner_download
So now you know of all the different techniques and means by which you can go about trying to fix iTunes Error 50. However, I personally recommend using Dr.Fone — System Repair (iOS) for the purpose because it is more of a sure-shot one stop process. With it you’re guaranteed that iTunes Error 50 would be resolved with three simple steps. The other methods, in comparison, follow a trial-and-error structure. That is, they can mostly be used to try and figure out what exactly the problem is, by running multiple reinstallation and restoration processes. Other than being time-consuming, they can also lead to extensive data loss. However, feel free to use one of those means if you somehow manage to pin point why exactly the iTunes Error 50 is showing up in your device.
Anyway, let us know how you managed to get rid of the error and let us know whether our solutions worked for you and which one of these solutions worked best. We’d love to hear from you!


