I recently got a new monitor and wanted to run at 1920×1080 resolution but I keep getting «Input not supported» on the screen.
I’ve updated all my drivers and contacted Acer for drivers for their monitor as well (not sure if that’ll make a difference) and still no luck.
I’m running XP and not really in a position to upgrade to Vista or 7 for a while. Any tips?
- Subscribe to RSS Feed
- Report Inappropriate Content
- Permalink
317285 Page Views
- Posts: 4096
- Registered: 01-05-2008
- Location: Germany
- Views: 317285
- Message 2 of 3
Re: Input not supported T60 Acer V243H monitor
Hello cstevio, welcome to Lenovo forums!
Please tell us your model number, not S/N, that´ll help us to help you.
_________________________________________________________
Follow @LenovoForums on Twitter! Try the forum search, before first posting: Forum Search Option
Please insert your type, model (not S/N) number and used OS in your posts.
I´m a volunteer here using Lenovo Yoga C930, ThinkPad X1 Carbon 5th Gen. Silver Edition, ThinkPad 13, Yoga 900, ThinkPad T460s, IdeaCentre B540.
TIP: If your computer runs satisfactorily now, it may not be necessary to update the system.
- Subscribe to RSS Feed
- Report Inappropriate Content
- Permalink
![]()
Microsoft MVP Contributor
444194 Page Views
![]()
Microsoft MVP Contributor
- Posts: 21115
- Registered: 12-20-2008
- Location: Australia, Melbourne
- Views: 444194
- Message 3 of 3
Re: Input not supported T60 Acer V243H monitor
try updating the bios.
Also what GPU do you have?
May this year, be the year of ‘DO’!
I am a volunteer, and not a paid staff of Lenovo or Microsoft
- Introduction
- Community Spotlight
- Welcome & FAQs
- Forum Housekeeping
- Recently Released Service Tips — Read Only
- Recently Released Critical Drivers — Read Only
- Special Events
- Lenovo @ CES 2021
- Lenovo @ IFA 2019
- Lenovo @ MWC 2019
- Lenovo @ CES 2019
- Special Event Archive
- ThinkPad Notebooks
- ThinkPad X1 Fold
- ThinkPad: T400 / T500 and newer T series Laptops
- ThinkPad: P and W Series Mobile Workstations
- ThinkPad: X Series Laptops
- ThinkPad: X Series Tablet and Helix Laptops
- ThinkPad: S Series, ThinkPad Yoga and Twist Laptops
- ThinkPad: 11e (Windows), 13, E and Edge series Laptops
- ThinkPad: L, R and SL series Laptops
- ThinkPad Chromebooks: 11e, X and Yoga
- ThinkPad; T61 and prior T series plus Other Legacy ThinkPads
- ThinkBook Notebooks
- ThinkBook Notebooks
- ThinkBook Plus Notebooks
- Lenovo Notebooks
- Lenovo Yoga Series Notebooks
- Lenovo IdeaPad 1xx, 3xx, 5xx & 7xx, Edge, LaVie Z, Flex Notebooks
- Lenovo B and G Series Notebooks
- Lenovo U and S Series Notebooks
- Lenovo P, Y and Z series Notebooks
- Lenovo C, E, K, M, N and V Series Notebooks
- Lenovo Chromebooks
- Lenovo Phones
- A5 [L18021] Smartphones
- A Series, Vibe B & Vibe C Smartphones
- P1, P1m, P70 & P90 Series Smartphones
- P2 [P2a42] Smartphones
- K9 [L38043] and K9 Note [L38012] Smartphones
- K8 [XT1902] Smartphones
- K and Vibe Z Series Smartphones
- S and Vibe X Series Smartphones
- Smartphone Accessories and Wearables
- Legion Phone Duel
- Legion Phone Duel 2
- Lenovo Mirage AR
- Mirage AR Hardware – Technical Questions
- Star Wars™: Jedi Challenges
- MARVEL Dimension of Heroes
- Gaming – Lenovo Legion
- Gaming Laptops
- Gaming Desktops
- Y Gaming Accessories & Curved Gaming Monitors
- Legion Game Hub
- ThinkPad Tablets
- ThinkPad Tablets
- Lenovo Tablets
- Android Yoga Series Tablets
- Lenovo Android based Tablets and Phablets
- Windows based Tablets
- Yoga Book Community
- Yoga Book C930
- Yoga Book (Android)
- Yoga Book (Windows)
- ThinkCentre Desktops
- ThinkCentre A, E, M, S Series
- Lenovo Desktops
- Lenovo All In One (AIO) Desktops
- Lenovo Desktop Towers
- Lenovo Beacon, Stick 300, D, J and S Series Desktops
- ThinkStation
- ThinkStation Workstations
- Datacenter Systems
- BladeCenter / Flex Systems
- Converged Systems — HX Series
- ThinkSystem
- System x — X6, M5, M4
- ThinkServer
- Lenovo Sales Configurators
- Datacenter Storage
- Enterprise Storage
- LenovoEMC Storage
- Lenovo Iomega Networking Storage
- Datacenter Networking
- Datacenter Networking Hardware
- Networking Management/Devops
- Datacenter Systems Management
- Server System Management
- Lenovo XClarity
- Solutions on Lenovo Servers
- LiCO — Lenovo Intelligent Computing Orchestration
- External Displays, Options and Accessories
- Displays, Options and Accessories
- Virtual & Mixed Reality
- Lenovo Explorer
- Mirage Solo & Mirage Camera
- VR Classroom
- VR Classroom Hardware
- VR Classroom Software, Content, and Educator Resources
- Software and Operating System
- Pre-Installed Lenovo Software and Applications
- Enterprise Client Management
- Lenovo Patch for SCCM
- Security & Malware
- Windows 10
- Windows 8.1, 8, 7, Vista and XP Discussions
- Smart Office
- ThinkSmart
- Smart Home
- Lenovo Smart Display & Lenovo Smart Clock with Google Assistant
- Lenovo Link App, Smart Home Essentials and Smart Frame
- Lenovo Smart Tablets with Amazon Alexa
- Lenovo Smart Tablets with Google Assistant
- Lenovo Developer Community
- Windows Ecosystem Developers
- Android Ecosystem Developers
- Lenovo Technologies
- Special Interest Discussions
- General Discussion
- Feedback on the support site
- Linux Operating Systems
- Fedora
- Red Hat and CentOS
- Ubuntu
- Debian
- Other Linux Discussions
- Ideation — Idea Exchange
- XClarity Ideation
Community Guidelines
Please review our Guidelines before posting.
Check out current deals!
Most Popular Posts
- Lenovo Community Participation Rules 6
- Re:T14 gen1 AMD and Hyper-V => bluescreen on boot 3
- T14/T14s/X13/P14s AMD-based various issues 3
- Re:How to disable or change RGB profile during start up — Legion 7i 3
- Re:Flex 5 1470 shuts down on battery 2
- Re:Legion T5-26AMR5 — noisy CPU cooler. Is it possible to replace it? 2
- Re:how to change the font style in the Ubuntu operating system? 2
- Re:Model Assistance Needed 2
- Re:Model Assistance Needed 2
- Re:Yoga 920-13IKB Won’t Turn On 2
- Username
- Match exact username (no wildcards)
- User ID
- Email address
- Match exact email address (no wildcards)
- IP address
- Match any of the above criteria
- Duration of ban(Days)
- Duration of ban(Hours)
- Duration of ban(Minutes)
- Make ban permanent
- Internal reason for ban
- Public reason for ban
Welcome to Ideation!
Ideation sections have been created for customers to engage with us by discussing and promoting ideas and improvements relating to Lenovo’s products and services.
As a reminder, your participation in Ideation is governed by Lenovo’s website Terms of Use [link] and by Lenovo’s Forums Community Guidelines. Additional terms governing the Ideation Program are included in the Ideation Terms and may be found here. For your convenience, here’s a
Quick summary of the highlights:
- This area is for ideas – improving our products or suggesting entirely new products – please keep technical support issues on the other boards designated for that purpose
- You’re giving your ideas freely for us to use so we can improve our offerings to you
- The ideas you give us are your own and are not confidential
- If we decide we want exclusive use of your idea, you’re agreeing to sell it to us at a fixed price
By clicking on “Yes” below you certify that you have read and agree to the Community Guidelines and the Ideation Terms, and acknowledge that by submitting any ideas, material, or information on the Ideation site you grant Lenovo the right to use any such submissions by you in any way without acknowledging, notifying, or compensating you, as described in those documents.
What to Do If Acer Monitor Says Input Not Supported? [MiniTool News]
By Vera | Follow | Last Updated March 04, 2021
Summary :
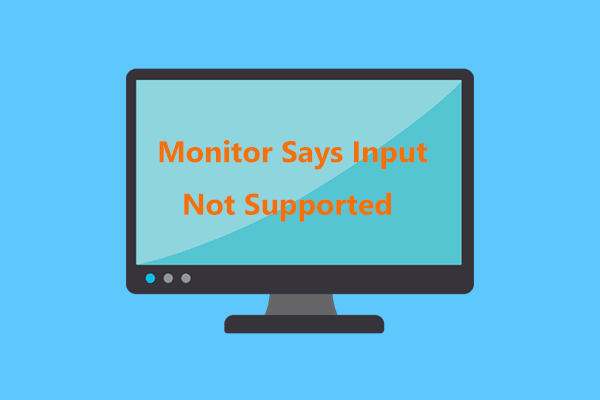
While you run games in Windows 10/8/7, you may experience the input not support issue that usually occurs in an Acer monitor. If you are looking for solutions to fix this issue, you have come to the right place and you can try four effective methods offered by MiniTool Solution to let your monitor run properly again.
Acer Monitor Input Not Supported
Sometimes when booting your PC, the Windows logo appears with a loading icon and then the screen turns black, saying “Input Not Supported” on the monitor. Sometimes the same error occurs when you are playing games on Windows or through a third-party client like Steam.
Usually, this error means the resolution of your computer has been set to one that is not supported on the monitor. The monitor input not supported issue is caused mainly by connection issues, incorrect resolution setup, outdated or corrupted display driver, faulty VGA cable, etc.
So, how to fix input not supported on games in Windows 10/8/7? Details are introduced below.
How to Remove Input Not Supported in Monitor
Method 1: Check the Monitor Connection
If the monitor connection goes wrong, the error may happen. So the first thing you should do is checking your monitor cable and make sure it can work properly. You can do this check via another monitor. In addition, it is also useful to check your connection ports. Make sure they are working correctly.
Method 2: Change the Resolution Setting via Safe Mode
Since you cannot go to the normal display and the screen is black with the error, you need to run the Windows system to its safe mode. Then, you can change the screen resolution.
When the PC boots into safe mode, follow these steps to change resolution. Take Windows 10 as an example:
1. Locate an empty area on the PC desktop and right-click it to choose Display settings.
2. Go to the Resolution section, choose a low resolution and work your way up to decide which one is best for you.
3. Click Advanced display settings, locate the monitor that has the input not supported issue and click Display adapter properties for Display.
4. Go to the Monitor tab, choose the recommended value from the Screen refresh rate menu.
5. Click OK to save the changes.
6. Restart your PC and check if you have fixed your issue.
Method 3: Update Drivers
Old or corrupted drivers can cause the input not supported issue on the Acer monitor. So, you should ensure your drivers are up-to-date and keep them in perfect condition. This time you should boot into safe mode with networking since you need to download the drivers from the Internet.
1. Press Win + R in Windows 10/8/7, input msc to the text box and click OK.
2. In the Device Manager’s main interface, expand Display adapters and right-click on the graphics card to choose Update driver.
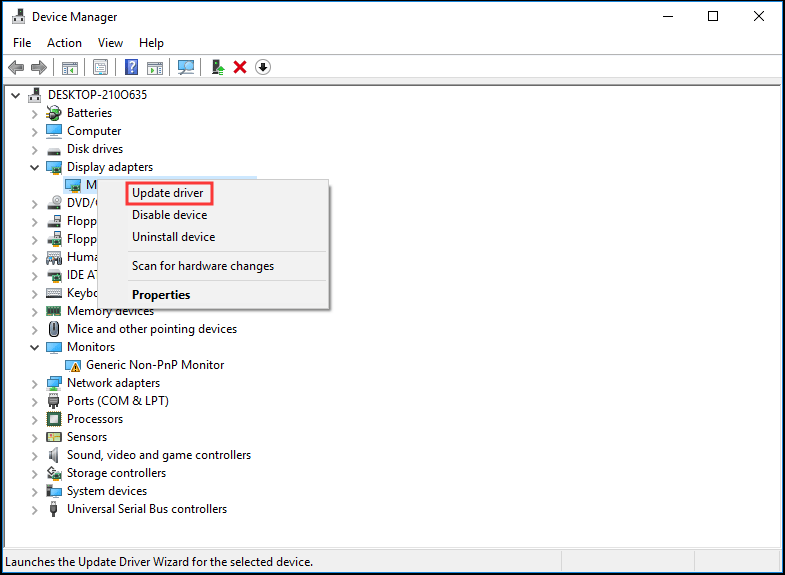
3. Then, let Windows search for the latest driver.
4. Do the same operations for your monitor driver.
5. Restart your PC. Your drivers will work correctly and the issue should be fixed.
Method 4: Change to Windowed Mode (for Games)
If input not supported happens when running games, perhaps the game settings are set to a much higher resolution that your monitor doesn’t support. To fix this issue, you can launch your game in Windowed mode and drag the ends to adjust the screen resolution.
Just click Alt + Enter to enter the mode directly and perform the fix.
The End
Does your Acer monitor say input not supported in Windows 10/8/7? After reading this post, now you clearly know how to get rid of this issue. Just try these methods above based on your actual cases.
ABOUT THE AUTHOR

Position: Columnist
Vera is an editor of the MiniTool Team since 2016 who has more than 5 years’ writing experiences in the field of technical articles. Her articles mainly focus on disk & partition management, PC data recovery, video conversion, as well as PC backup & restore, helping users to solve some errors and issues when using their computers. In her spare times, she likes shopping, playing games and reading some articles.
How to fix input Not Supported on Monitor issue on Windows 10?
‘Supporting another’s success won’t ever dampen yours’
Author Unknown
If you are looking how to fix the Monitor input not supported issue, then you have definitely come to the right place. Here you can gain some insight into this complex problem to find out how to get your monitor up and running again.
What is the Input not supported error on Windows 10?
The problem in question usually shows up when a Win 10 user boots up their system. The Input not supported error message is displayed on a blank screen, which makes the affected monitor unusable. This is especially common in cases where multiple monitors are used.
From what we have seen so far, the drama in question is often triggered by connection issues, incorrect resolution settings or driver failures. Unfortunately, it might be rather difficult to trace it back without professional help. But worry not – we are ready to help you.
How to get rid of the Input not supported on monitor problem?
Getting your monitor back on track will not be a problem if you follow the tips below. Just keep working your way down until you stumble upon the perfect fix for you. Here we go:
Check your monitor connection
If you keep running into the Input not supported on monitor problem, the first thing you should do is check your monitor cable. If there is something wrong with it, then it is definitely the culprit in your scenario. You will do well to test it using another monitor. In addition, it might prove helpful to check your connection ports – they are often behind the problem we are dealing with here.
Tweak your resolution settings
If the Input not supported on monitor headache is still here, there is no need to worry: tweaking certain settings might prove a way out. The thing is, your screen resolution might have been set up incorrectly, thus causing the Input not supported on monitor problem.
The best move in such a case is to change your display settings. Here is how:
- Locate an empty area on your desktop and right-click it.
- Select the Display settings option to proceed.
- Go to the Resolution settings.
- From the drop-down menu, select the resolution which is recommended for your display.
- Confirm your changes.
- Now click on the Advanced display settings link.
- In the Advanced display settings window, locate the name of the monitor that is having the Input not supported on monitor issue.
- Click on Display adapter properties for Display.
- Navigate to the Monitor tab.
- Move down to Screen refresh rate.
- Choose the recommended rate for your monitor from the drop-down menu.
- Make sure to click OK to save your changes!
Finally, you should restart your computer to see if the issue has been resolved.
Fix your drivers
The problem you are trying to solve might be a result of your monitor driver or graphics card driver failing to work properly. It is important to keep your drivers up to date and in perfect condition – otherwise, they refuse to work the way they are supposed to and you face issues like the one that brought you here.
Resolve PC Issues with Driver Updater
Unstable PC performance is often caused by outdated or corrupt drivers. Auslogics Driver Updater diagnoses driver issues and lets you update old drivers all at once or one at a time to get your PC running smoother
Update your drivers manually
This is the way for users who are experienced enough to choose the best drivers without professional assistance. If you know what specific software your system needs and where to get it, feel free to install the necessary drivers on your own. Even so, make sure to back up your important data in case you install the wrong driver on your PC – the thing is, the software which is incompatible with your graphics card or monitor may cause damage to your system. Therefore, it is wise to secure your personal information against permanent loss.
Use Device Manager
This solution is much safer than the previous one. That said, it is certainly not the best method of resolving driver issues since it is rather time-consuming. On top of that, Device Manager may fail to find the exact drivers your devices need to perform at their best. Nonetheless, you are free to make use of the instructions below:
- Open Device Manager by pressing the Windows logo key + X shortcut and choosing the appropriate option from the menu.
- Locate your graphics card in the list of the devices your PC uses.
- Right-click on the piece of hardware in question and choose the option to update its driver.
- Let Device Manager search for the necessary driver software online.
- Agree to install the driver that has been found.
- Now locate your monitor entry in Device Manager and perform the procedures described above again to update your monitor driver.
At the end, you should restart your computer so that the newly installed drivers can settle down and start working correctly.
Employ Auslogics Driver Updater
This is certainly the easiest fix on the list. This intuitive and reliable tool will do the job for you and ensure that your system has the best possible drivers. You can rest easy knowing that this tool monitors all your drivers to eliminate issues that may prevent your PC from working properly. What you should do to get your driver problems resolved once and for all is download and install Auslogics Driver Updater and let it scan your system. In just one click, you can fix what causes your hardware and devices to act up and proceed with your work.
We hope our tips have helped you get rid of the Input not supported on monitor problem. If you need further assistance, do not hesitate to post a comment below.
Fix: Input Not Supported
The error “Input not supported” occurs when the computer’s resolution doesn’t match with the monitor. This error usually comes forward when you plug in a new monitor with your computer or you change the resolution to some value which is not supported.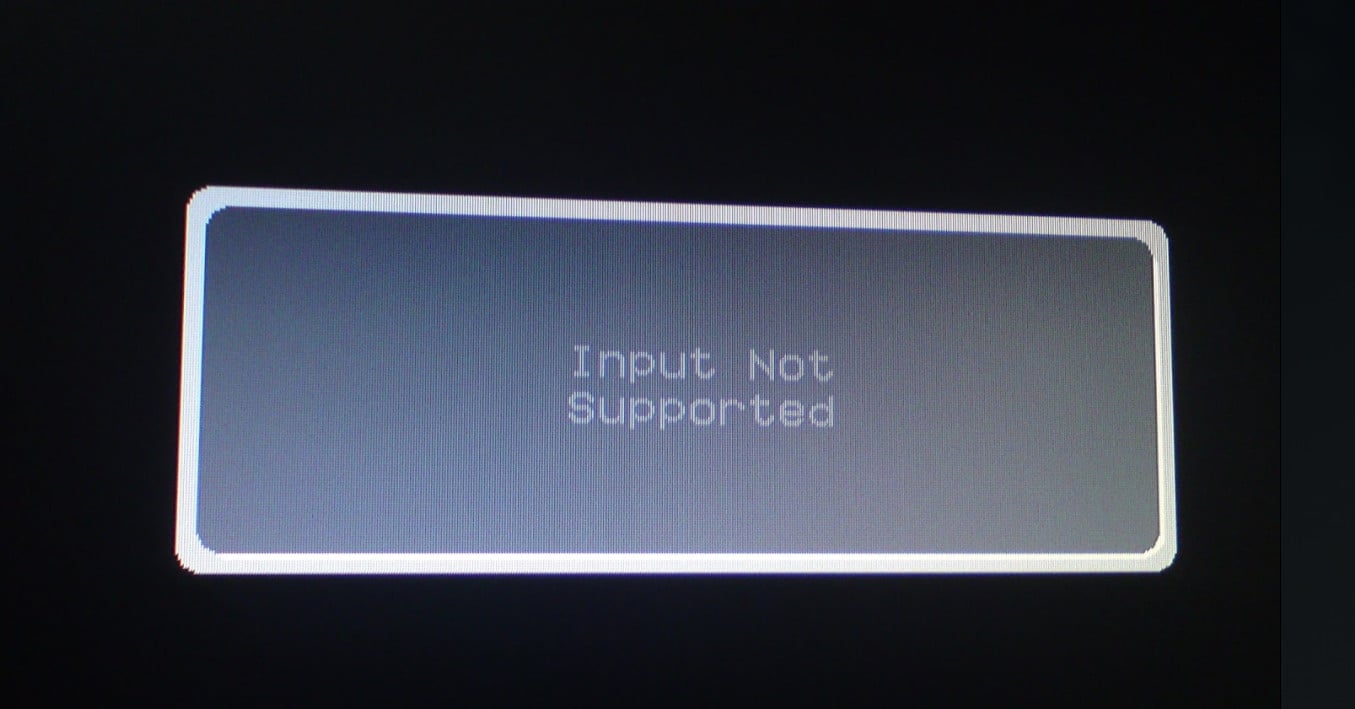
This error message also pops up when you are playing games on Windows or through some third-party clients such as Steam. Either the game doesn’t launch or an error pops up when you are playing it. The simplest solution to this error is to change your screen’s resolution. This can be done through a number of different ways listed below.
Solution 1: Using Base Video in MSConfig
MSConfig is a system utility present in Microsoft Windows which allows you to troubleshoot the operating system’s startup process. You can change a number of different startup parameters such as disabling services, drivers, etc. We will make use of this utility and try to make the computer boot at the lowest resolution. From here we may be able to log into the usual user account and then change the resolution manually. This method will be useful if you are unable to start the computer in normal mode. We will be using safe mode to execute these instructions.
- Boot your computer in Safe Mode. You can read our detailed guide on booting your computer in safe mode.
- Once in Safe Mode, press Windows + R, type “MSConfig” in the dialogue box and press Enter.
- Once in System Configuration, select the tab “boot” and check the option “base video”. Press Apply to save changes. This mode will ensure that your monitor is able to pick up the display signal when you are going to boot in your normal profile.
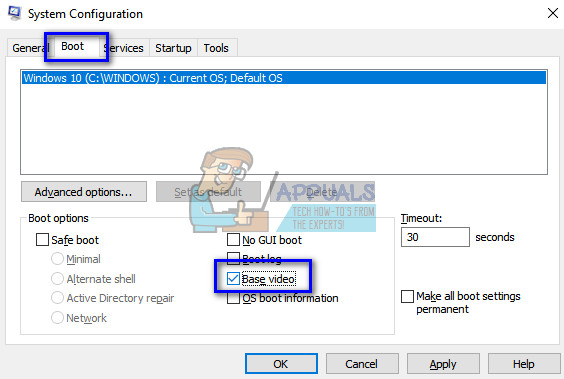
- Exit the safe mode and boot normally. You will be seeing extra-large icons and writings on your screen. Don’t worry and follow the steps below.
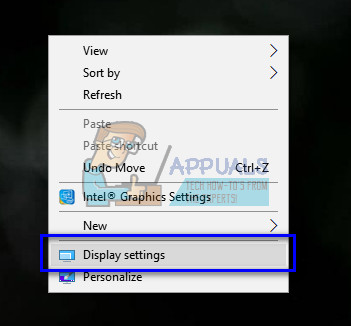
- Once in your normal profile, right-click on your Desktop and select “Display settings”.
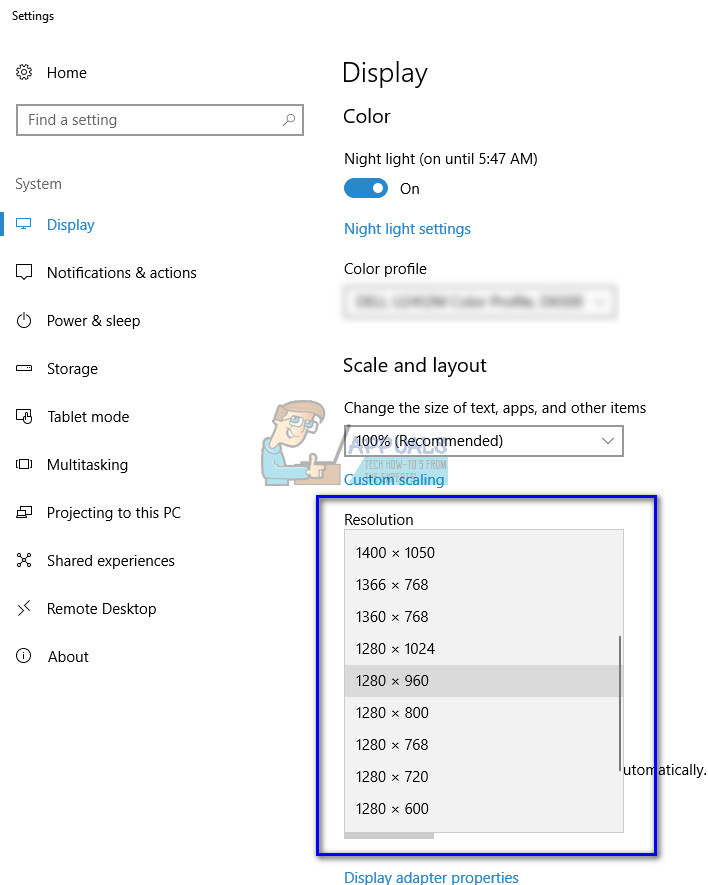
- Change the resolution. You can try changing the resolution other than the recommended resolution if it wasn’t working. It is advised to choose a low resolution and work your way up in order to determine which one works best for you.
- After changing the resolution, press Windows + R, type “MSConfig” again and press enter. Uncheck the option base video. Press Apply to save changes and restart your computer.
- Your computer should now reboot with the resolution set. If the error still persists, repeat the method and set another resolution.
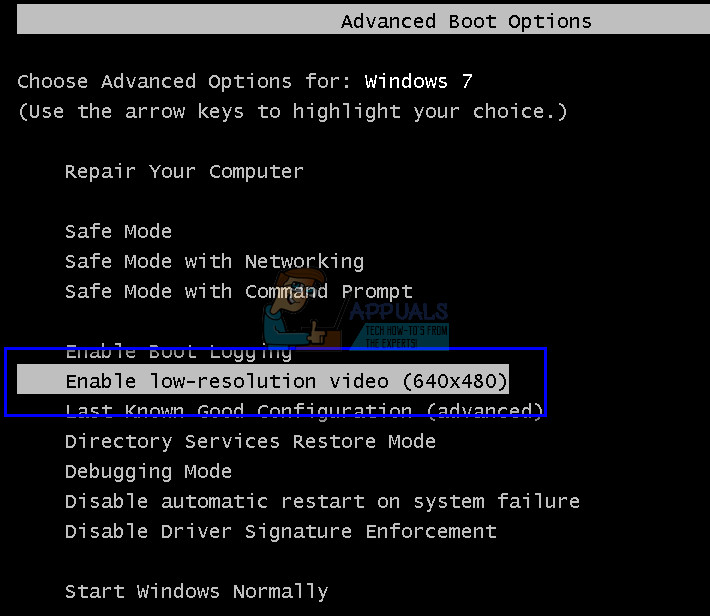
Solution 2: Booting in VGA/ Low-resolution mode
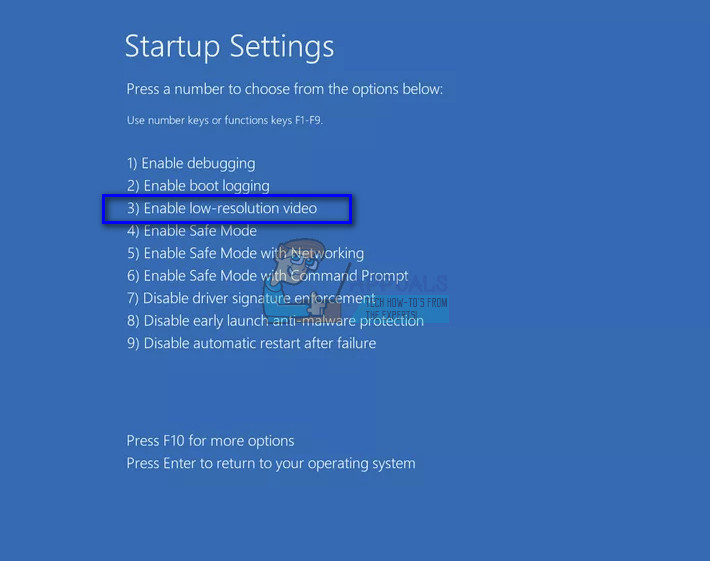
Another workaround which you can try is booting your computer in Low resolution or VGA mode. The name may vary according to the version of the operating system. Older systems use VGA mode while the newer iterations have a Low-resolution mode. This mode sets the resolution to 800×600 or 640×480 and in some monitors, the refresh rate is also lowered.
We will be selecting this boot option which is present in the Windows Recovery Environment. Once we boot on this mode, you can easily log into your normal account and change the resolution from there.
- Restart your computer. When your computer is just about to boot, press F8. We have listed the ways on how to select low video mode according to the OS in the steps below.
- If you own a Windows 7, you will see a menu like this. Select “Enable low-resolution video (640×480)”. Press OK to boot in this resolution.
- If you own a Windows 8 or 10, you might have to select the low-resolution video mode from a bunch of sub-menus. Navigate to troubleshoot and select Startup Settings from the menus. Here you will see an option to enable low-resolution video. After enabling it, let the computer boot.
- After the computer is booted, perform the steps mentioned in solution 1 to set the resolution to some lower value. Save changes and restart. Boot Windows normally and check if the problem at hand got solved.
Solution 3: Using another monitor
If you cannot access your computer even after following the above two methods, you can try connecting another high screen resolution monitor and see if this makes a difference. Most probably, you will be able to access your computer. Once you have access, change the screen resolution as shown in Solution 1. After the screen resolution is changed, plug your old monitor back and see if this solved the problem.
You should also make sure that there is no hardware fault in the monitor. See if the cables are connected properly or if the monitor is working without hardware faults. You can also plug it into another computer to make sure there is not any hardware issue.
Solution 4: Changing to Windowed Mode (for Games)
There were many cases seen where games fail to launch because the resolution settings set in the game were not supported by the monitor hardware. This issue can particularly arise if the game settings are set to a much higher resolution which your monitor cannot support.
A simple fix to this problem is to launch the game in Windowed mode and adjust the screen resolution manually by dragging the ends. If you do get inside the game, you can also navigate to Display settings and change the resolution accordingly.
There are two ways you can launch the game in Windowed mode:
- Either you can use Alt+ Enter to enter Windowed mode directly,
- Or you can add a ‘-windowed’ as a parameter in the shortcut and force it to run. This is also called launched options. You can see a detailed guide on setting launch options in Steam.
If you still cannot access the game settings, you can try deleting the configuration files of the game using File Explorer. Configuration files contain all your configuration settings which you have saved according to your preference. Do note that following this method might delete all your choices regarding the launching of the game.
There are different locations where each game’s application data is stored. Sometimes it is present in “%appdata%” or sometimes it may be present in the game’s configuration files. After deleting the files, you can relaunch the game change the settings from the menu.
Solution 5: Checking your Game for Wide Screen Fix
For some games, Solution 4 might solve the ‘Input not supported’ problem. For other games, it might be the case that the game itself doesn’t support the resolution of your monitor. Usually, this is the case for widescreen monitors. Some of these games include Manhunt, Cold Fear, Total Overdose, etc.
You can check online if this is also the issue for all the other users. If it is, you can search on Google for Widescreen fixes. These fixes are in the form of different patches. You need to integrate them into your game files before your game can successfully launch in your system.
Note: If all the above methods fail to produce any useful results, consider restoring your computer from a restore if you did a recent update or doing a fresh installation might also do the trick.
Solution 6: Update Graphics Drivers
It is also possible that your graphics card drivers might be outdated due to which this error is being triggered. Therefore, it is recommended that you try to update your graphics card drivers after uninstalling the older ones completely. This way, certain bugs/glitches might be fixed due to software patches by the Graphics provider.
Solution 7: Workaround
In some cases, the user might be unable to access the monitor due to which you might be blocked from changing any settings or employing any of the above fixes. Therefore, as a workaround, you can try to implement these changes by getting the monitor to work. For that:
- Disconnect the monitor completely from the computer.
- Remove your computer’s graphics card.
- Reinstall the GPU and then keep the monitor disconnected and boot up the computer.
- Wait for 5 minutes after booting up your computer and connect the monitor again without turning it off.
- Check to see if the monitor gives a display.
Solution 8: Booting into Compatibility Support Mode
In certain situations, the monitor might not be properly recognized by the computer until the CSM mode is enabled from the motherboard’s bios. This was recently discovered by many users that somehow the monitors functioned correctly when this feature was enabled. Beforehand, make sure to connect your computer to another monitor to get the screen to work which is required for the following steps. Therefore, to enable it, follow the guide below.
- Restart your computer.
- As soon as the computer shuts down, start pressing the “F2”, “Del”, “F12” or “F10” keys on your keyboard to get into the Bios.
- Once in the Bios, go to advanced mode using “F7” or if you see the “Boot” tab go directly to it.
- Once in the Advanced mode, navigate to the “Boot” tab.
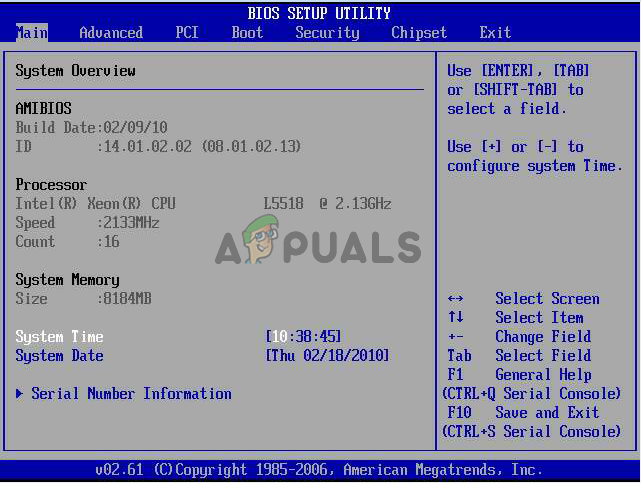 Navigate to the Boot tab
 - In here, make sure to enable the “Launch CSM/ Launch Compatibility Support Module”.
- After enabling this, connect the monitor to the computer and check to see if the issue persists.
Solution 9: Replacing CMOS battery
In some cases, taking out the CMOS battery from the motherboard temporarily and pressing the power button while the battery is out and the motherboard is disconnected from power can help discharge energy from the mobo and let it reset its basic load configs. This can also help in fixing this issue so make sure to take out the CMOS battery temporarily from your mobo and install it back in again. After that, check to see if the issue persists.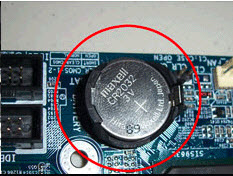
Note: For some very rare computers using an Intel GPU, go into the GPU control panel and set the Quantization Range to Limited Range and set the monitor to Extended Mode if you are using an Acer Monitor.


