As we all know, the updates come so that our applications or browsers integrate new and improved functions and allow an ideal experience with their users. Where you can listen to music, download videos and more. But it may happen that these updates may disable certain add-ons and do not allow certain websites to work correctly. Here you will learn to enable the NPAPI plugins in my Chrome or Firefox browser.
These types of plugins are widely used on web pages to play online and are needed to prevent downloads from being made from said platform. And therefore it is necessary to enable this Plugins and enjoy the benefits it brings again. That is why we will show you How to enable NPAPI plugins in my Chrome or Firefox browser?
We have already touched on this point and talked about the importance of having certain add-ons installed in applications or platforms. And in this way you can use it to solve practical problems, such as updating and uploading plugins or templates in WordPress manually by FTP.
How to enable NPAPI plugins in my Chrome or Firefox browser
I will perform this task to enable NPAPI plugins in my Chrome or Firefox browser, it can be very simple. But if you have the current versions of these browsers, you should know that plugins of this type are discarded. But in the same way we are going to teach you what you should do so that you can enable them without any problem.
We are going to start by telling you what you should do to enable the NPAPI plugins in my Chrome browser. But first we will inform you that these add-ons were eliminated from this browser in 2005. And since Chrome 45 version, they were totally eliminated. So we will show you what we should do, but through its source code.
Then as a first step it will be to install version 44 of Google Chrome or lower, the important thing is that we can have a version that allows the plugins to be enabled. Ready this happened, we will use the experimental functions of the browser. For this, we are going to write the following address chrome: // flags in the search bar .
This action will take you to a page, where you can see a large list, in it you must search for Enable NPAPI. When you find this section, you must now choose the Enable option, the next thing you should do is restart the browser. And in this way you will have already enabled the NPAPI plugins in the Chrome browser, quickly and easily.
How to enable NPAPI plugins in my Firefox browser
Seeing how easy it was to enable this add-on in Chrome browsers, now we will show you the steps you must follow to enable NPAPI plugins in my Firefox browser . Unlike in the Chrome browser, the NPAPI plugins in Firefox have only been removed for a short time and only 3 years have passed.
So you have a possibility to use this type of add-ons in your Firefox browser if you use version number 51 in ESR mode. And if you can achieve this, you must also carry out the following instructions. First of all, you must go to the folder address where the browser is installed, this folder is / Mozilla Firefox / defaults / pref /.
If it already finds you in that folder, you are now going to look for the following file channel-prefs.js and you must open it in a text editor, whatever you have on hand. This so you can change the value 1pref (“app.update.channel” , “release”); by 1pref (“app.update.channel” , “esr”); the next step will be to look in this same folder for the following update-settings.ini file .
Now you need to find the value 1ACCEPTED_MAR_CHANNEL_IDS = firefox-mozilla-release and change them to 1ACCEPTED_MAR_CHANNEL_IDS = firefox-mozilla-release . The next thing you should do is open the browser, so that then you enter the configuration and from there you go to look for the plugins section and finally you must enable the NPAPI.
These are the only possible ways for you to enable this plugin, but it is expected to be gone very soon. And so ends this article that showed you how easy it is to enable NPAPI plugins in my Chrome and Firefox browser.
Timeline

Puzzle piece with right-click context menu
Blocked plug-in page action


Right clicking the puzzle piece will bring up a context menu allowing the user to run or hide the plug-in (just once).
Left clicking the page action icon will bring up a bubble giving the user the choice to «Always allow plug-ins on this site» or «Run all plug-ins this time.»
Note that there will not be a yellow info bar (i.e. «drape») at the top of the page. Also, the page action icon will appear even if the plug-in itself is invisible. Visit this site in Canary to see the new UI in action: http://www.medicalrounds.com/quicktimecheck/troubleshooting.html
This behavior is similar to existing behavior when all plug-ins are blocked by default (“Settings” => “Advanced Settings” => “Privacy — Content Settings” => “Plug-ins,” select “Block all,” and then load, for example, http://techcrunch.com ).
January 2015
Currently Chrome supports NPAPI plugins, but they are blocked by default unless the user chooses to allow them for specific sites (via the page action UI ). A small number of the most popular plugins are allowed by default. In January 2015 all plugins will be blocked by default. Even though users will be able to let NPAPI plug-ins run by default in January, we encourage developers to migrate of off NPAPI as soon as possible. Support for NPAPI will be completely removed from Chrome by September 2015.
In April 2015 (Chrome 42) NPAPI support will be disabled by default in Chrome and we will unpublish extensions requiring NPAPI plugins from the Chrome Web Store. All NPAPI plugins will appear as if they are not installed, as they will not appear in the navigator.plugins list nor will they be instantiated (even as a placeholder). Although plugin vendors are working hard to move to alternate technologies, a small number of users still rely on plugins that haven’t completed the transition yet. We will provide an override for advanced users (via chrome://flags/#enable-npapi) and enterprises (via Enterprise Policy) to temporarily re-enable NPAPI (via the page action UI ) while they wait for mission-critical plugins to make the transition. In addition, setting any of the plugin Enterprise policies (e.g. EnabledPlugins, PluginsAllowedForUrls) will temporarily re-enable NPAPI.
September 2015
In September 2015 (Chrome 45) we will remove the override and NPAPI support will be permanently removed from Chrome. Installed extensions that require NPAPI plugins will no longer be able to load those plugins.
NPAPI Support is currently disabled.
NPAPI Support is currently disabled. Please follow the instructions below to enable it:
- 1.Input «chrome://flags/#enable-npapi» into address bar;
- 2.Click ‘Enable’ under the ‘Enable Npapi’;
- 3.Close the Chrome browser completely;
- 4.Reopen the Chrome and navigate to the system, the plugin is available.
Or the plugin is not installed, please download and install. Before installation, please close your browser.
Original title: janneth
Replies (6)
Thank you for posting your concern in Microsoft Community and welcome to the Windows 10 Family.
We need more information and details of the issue you are facing for us to be able to identify the issue and suggest you ideas and fixes.
We also need important details of the error messages and the troubleshooting steps you have performed, if any.
Write to us for more information.
9 people found this reply helpful
Was this reply helpful?
Sorry this didn’t help.
Great! Thanks for your feedback.
How satisfied are you with this reply?
Thanks for your feedback, it helps us improve the site.
How satisfied are you with this reply?
Thanks for your feedback.
 In reply to A. User’s post on May 20, 2016
I have just upgraded to win 10 and preciously viewed remote cctv via windows explorer and autonat.com.
When I open an Edge window, which I presume is the new name for windows explorer, I can open autonat.com and it accepts my login details.
It then returns the error message detailed in the above question. I do use Chrome, but I am not using Chrome for this cctv viewing, so the error does not make sense to me.
I have followed the advised path and npapi does not exist in the list so I can neither enable or disable it.
I do not know if it’s win 10 that is causing the problem or autonat.com, but it did work before I upgraded.
A fix would be appreciated.
4 people found this reply helpful
Was this reply helpful?
Sorry this didn’t help.
Great! Thanks for your feedback.
How satisfied are you with this reply?
Thanks for your feedback, it helps us improve the site.
How satisfied are you with this reply?
Thanks for your feedback.
In reply to Martin392’s post on January 14, 2017
correction, not exactly the same error message just in case it matters.
4 people found this reply helpful
Was this reply helpful?
Sorry this didn’t help.
Great! Thanks for your feedback.
How satisfied are you with this reply?
Thanks for your feedback, it helps us improve the site.
How satisfied are you with this reply?
Thanks for your feedback.
3 people found this reply helpful
Was this reply helpful?
Sorry this didn’t help.
Great! Thanks for your feedback.
How satisfied are you with this reply?
Thanks for your feedback, it helps us improve the site.
How satisfied are you with this reply?
Thanks for your feedback.
In reply to Ronald J W’s post on January 14, 2017
I am not using Chrome, I am using the web browser that opens with Win 10, from the big e on the taskbar.
Your reply may make sense to you and to other tech people, but is gibberish to me as a mere mortal. Nor does it helpfully explain what I can do about the issue I now have as a result of using Win 10!
The error message came up on the browser window when I used (e), to access autonat.com. It comes up in Chrome too, but it always has, that is why I used internet explorer under win 8.1
So, with respect, I don’t really care about what can and can’t do with or without flash or ppapi or npapi or whatever, as I have no idea what they are or what they do.
It used to work and now it doesn’t. under this new all singing all dancing operating system (that has also stopped my track pad from working) how do I fix that please?
PS please don’t try to explain how to get my trackpad working again!
How To Enable Chrome Flags (In 4 Simple Steps)
When you enable Chrome flags, you get access to hidden Chrome features like Reader Mode, Force Dark Mode, and plenty more besides. And best of all, it’s super simple to do!
New versions of Google’s Chrome browser drop pretty regularly but before they become official they have to go through A LOT of testing. This is done with beta builds. But how do normal people – like you and me – get early access to beta build of Chrome?
Simple: you have to enable Chrome Flags – and doing this is actually really easy, as you’ll see below. What are Chrome Flags? When new features are added to Chrome, but are not yet live, Google hides them behind Flags. Enabling Flags in Chrome gives you access to these new features in your browser.
To Access Chrome Flags, Simply Type “chrome://flags” Into The Chrome Browser
Of course, features that are hidden by Flags in Chrome are not designed or ready for the prime-time. They might not work or, worse still, they might negatively impact your machine’s performance. As always, be mindful when you’re messing around with beta features – they’re in beta for a reason.
How To Turn on Chrome Flags
We’ll know go through the simple steps of enabling Chrome Flags in Google’s Chrome browser. Please note: this method works on ALL types of Chrome browser – from Windows, Mac, and Linux to iPad, iOS, and Android.
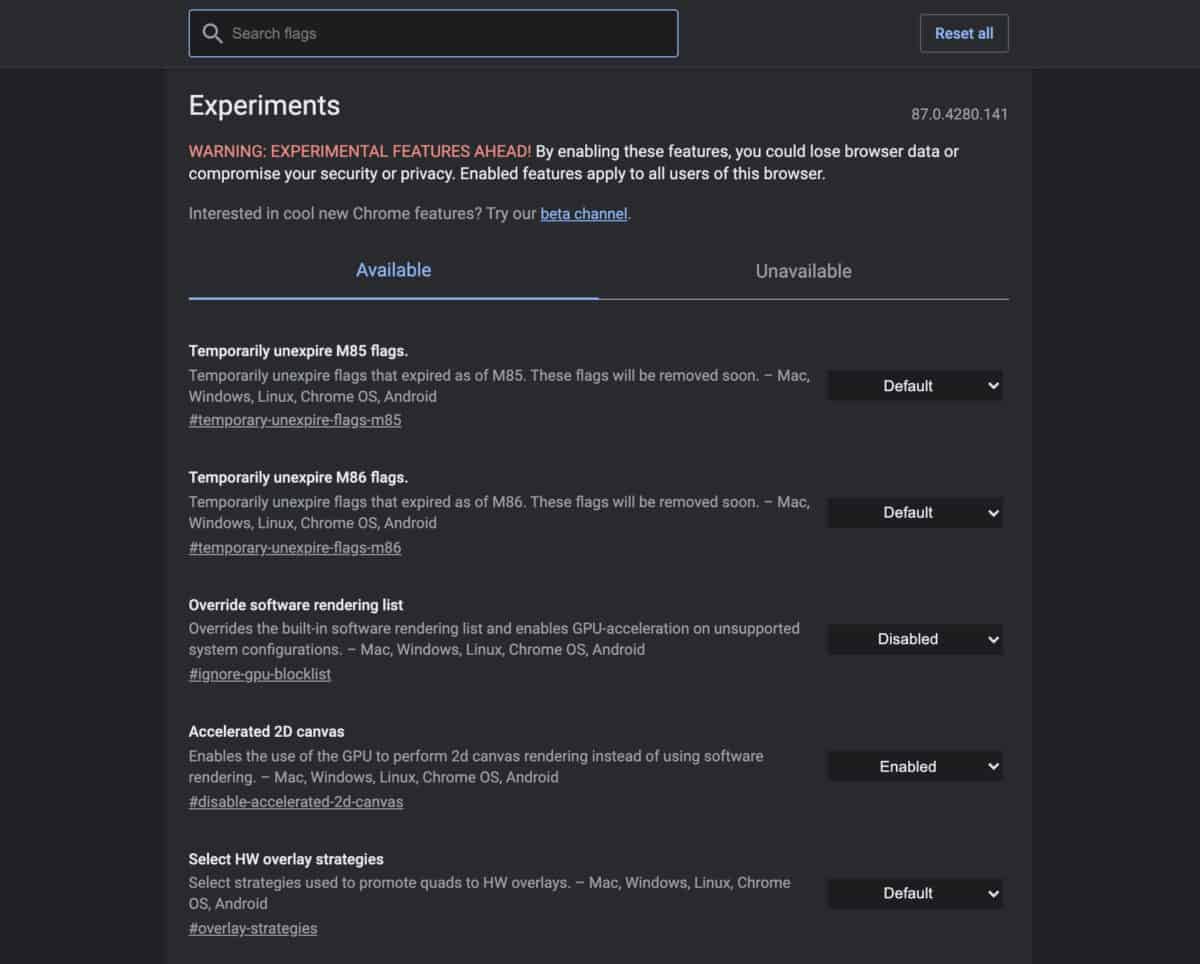
- STEP 1 – Open the Google Chrome Browser, go to the URL bar and type in chrome://flags and hit enter.
- STEP 2 – Hitting enter after typing “chrome://flags” into the navigation bar will open a new window, “Experimental”, and this window is divided into two parts: Available and Unavailable
- STEP 3 – Scroll through the list and find what you’re looking for. Once you’ve found the feature you’re looking for, select the drop down menu next to it (it usually says DEFAULT) and select ENABLED. This will enable Flags for this option.
- STEP 4 – Once you’ve enabled your desired Flags in Chrome’s Experimental Mode, you’ll need to restart the browser. Once you’ve restarted the Chrome browser, all of the new features will be available to use.
How To Restart Chrome Browser (The #1 Simplest & Quickest Method)
You can enable as many flags as you want inside Chrome’s Experimental Mode but you will be required to restart the browser before any of them take effect. And to restart the Chrome browser simply type chrome://restart into the browser and hit enter. Chrome will not restart and reopen once it is done rebooting.
Best Chrome Flags To Enable?
If you’re new to Flags in Chrome, or you just want some guidance on what new Chrome features to try out, here’s a selection of awesome Chrome Flags to try with your newly acquired developer status.
- Reader Mode – Apple’s Safari has had reader mode since forever. But you can unlock this feature in Chrome, simply by enabling the Flag for Reader Mode. With Reader Mode enabled, your web pages will be stripped of everything save for the text and images. No more ads, pop-ups, or silly CSS to look at.
- Focus Mode – With Focus Mode enabled in Chrome, all new windows that are opened with open without the search bar or bookmarks for a cleaner-looking browser experience.
- Tab Groups – With Tab Groups, you can group together similar pages inside one tab, so you could have a News Tab that contains all your regular news sites, for instance. I love this feature, as it basically kills the need to have so many tabs open.
- Force Dark Mode – With Force Dark Mode for Chrome enabled, it will load ALL web pages in dark mode, regardless of whether the site supports it or not.
- Tab Hover Cards – With Tab Hover Cards, a small preview of the site is loaded when you hover your mouse of its tab. This feature is great for anyone that likes to run LOADS of tabs at the same time.
- Page Sharing Via QR Codes – With this feature enabled, you can quickly share webpages using QR codes instead of a text link.
These are just a few of the best, hidden features currently available inside Google’s Chrome browser. There’s plenty more, though, so make sure you spend some time looking at what is available under Chrome’s Flag options.
¿Cómo habilitar los plugins NPAPI en mi navegador Chrome o Firefox?

Como ya todos sabemos, las actualizaciones llegan para que nuestras aplicaciones o navegadores integren nuevas funciones mejoradas y que permitan una experiencia ideal con sus usuarios. Donde puedas oir musica, descargar videos y más. Pero puede pasar, que estas actualizaciones puedan deshabilitar ciertos complementos y no permitan que funcionen de forma correctas ciertas web. Aquí aprenderás habilitar los plugins NPAPI en mi navegador Chrome o Firefox.

Este tipo de complementos se utilizan mucho en las páginas web para jugar en línea y se necesita para evitar que se realicen descargas desde dicha plataforma. Y por lo tanto se hace necesario el poder habilitar este Plugins y volver a disfrutar de los beneficios que aporta. Por eso te mostraremos ¿Cómo habilitar los plugins NPAPI en mi navegador Chrome o Firefox?
Ya hemos tocado este punto y hablado de la importancia que resulta tener instalado ciertos complementos en las aplicaciones o plataformas. Y de esta forma puedes usarlo para resolver problemas prácticos, como por ejemplo actualizar y subir plugins o plantillas en WordPress de forma manual por FTP.
Cómo habilitar los plugins NPAPI en mi navegador Chrome o Firefox
Realizaré esta tarea para habilitar los plugins NPAPI en mi navegador Chrome o Firefox puede ser muy sencillo. Pero si posees las versiones actuales de estos navegadores, debes conocer que los plugins de este tipo están descartados. Pero de igual modo te vamos a enseñar que debes hacer para que los puedas habilitar sin ningún problema.
Vamos a comenzar, indicándote que debes hacer para habilitar los plugins NPAPI en mi navegador Chrome. Pero antes te informaremos que estos complementos fueron eliminados de este navegador en el 2005. Y desde la versión Chrome 45, fueron eliminados totalmente. Así que te mostraremos que debemos hacer, pero por medio de su código fuente.
Entonces como primer paso será instalar la versión 44 de Google Chrome o inferior, lo importante es que podamos disponer de una versión que permita la habilitación del plugins. Listo este pasó, pasaremos a utilizar las funciones experimentales del navegador. Para ello vamos a escribir en la barra del buscador la siguiente dirección chrome://flags.
Esta acción te llevará a una página, donde podrás observar una gran lista, en ella debes buscar Habilitar NPAPI. Al encontrar esta sección, ahora debes elegir la opción Habilitar, lo siguiente que debes hacer es reiniciar el navegador. Y de esta manera ya habrás habilitado los plugins NPAPI en el navegador Chrome, de una forma rápida y sencilla.
Cómo habilitar los plugins NPAPI en mi navegador Firefox
Vez lo sencillo que resulto habilitar este complemento en los navegadores Chrome, ahora te enseñaremos de los pasos que debes seguir para habilitar los plugins NPAPI en mi navegador Firefox. Al contrario que en el navegador de Chrome, los plugins NPAPI en Firefox, tienen poco tiempo que lo eliminaron y apenas han pasado 3 años de ello.
Así que tienes una posibilidad de utilizar este tipo de complementos en tu navegador Firefox si utilizas en el modo ESR LA versión número 51. Y si puedes conseguir esto, también debes realizar las siguientes indicaciones. En primer lugar, debes ir a la dirección de carpeta donde se encuentra instalado el navegador, esta carpeta es /Mozilla Firefox/defaults/pref/.
Si ya te encuentra en dicha carpeta, vas a buscar ahora el archivo siguiente channel-prefs.js y lo debes abrir en un editor de texto, el que tú tengas a la mano. Esto para que puedas cambiar el valor 1pref(“app.update.channel”, “release”); por 1pref(“app.update.channel”, “esr”); el siguiente paso será, buscar en esta misma carpeta el siguiente fichero update-settings.ini.

Ahora debes buscar el valor 1ACCEPTED_MAR_CHANNEL_IDS=firefox-mozilla-release y cambiarlos por 1ACCEPTED_MAR_CHANNEL_IDS=firefox-mozilla-release. Lo siguiente que debes hacer es abrir el navegador, para que luego entres en la configuración y desde ahí vayas a buscar la sección de plugins y por último debes habilitar el NPAPI.
Estas son las únicas formas posibles para que puedas habilitar este complemento, pero se espera que muy pronto desaparezca. Y así termina este artículo que te mostró lo fácil que resulta habilitar los plugins NPAPI en mi navegador Chrome y Firefox.


